JavaScript로 데이터를 수집하고 작업을 자동화하는 방법
JavaScript는 웹을 크롤링하고, 데이터를 수집하고, 삶을 자동화하거나 비즈니스를 성장시키기 위한 도구로 런타임 Node.js와 함께 활용할 수 있는 널리 사용되는 널리 사용되는 언어입니다.
오늘의 게시물에서는 JavaScript를 사용하여 공개 데이터를 효율적으로 웹 스크래핑하는 방법을 분석하고 사례 연구로 이 플랫폼의 상위 작성자(또는 블로거) 목록을 추종자. 이러한 관행은 인플루언서의 마케팅을 디지털 마케팅 전략으로 선택하는 등 많은 이점이 있습니다.
이 게시물을 읽고 나면 Node.js 프로젝트를 만들고 실행하는 방법(아직 프로젝트가 없는 경우)과 라이브러리를 사용하여 웹을 스크랩하는 방법에 대한 기능적인 이해가 있을 것입니다.
이제 더 이상 고민하지 않고 시작하겠습니다.
왜 ScrapingAnt인가?
웹 스크레이퍼로서 당신은 도전적인 작업을 수행하고 있습니다. 예를 들어 요청이 대상 사이트에서 차단되지 않도록 해야 합니다.
그러나 좋은 소식은 이 작업을 직접 수행할 필요가 없다는 것입니다. 시장에는 귀하의 노력을 달성하는 데 필요한 인프라와 기술을 제공하는 도구가 있습니다. 웹 스크래핑 도구를 사용하면 다음과 같은 기능의 이점을 얻을 수 있습니다.
ScrapingAnt는 다음과 같은 이점을 제공하는 스크래핑 도구입니다.
몇 가지 코드를 만들고 하나의 간단한 스크립트로 목표를 달성하는 방법을 살펴보겠습니다. 시청을 선호하는 경우 여기에 비디오가 있습니다.
1단계: Node.js 프로젝트 생성
package.json 파일이 포함된 새 Node.js 프로젝트를 만들려면 새 폴더를 만들고 해당 폴더로 이동한 다음 npm init를 실행하고 다음 스크린샷과 같이 필요에 따라 몇 가지 세부 정보를 제공해야 합니다.
mkdir web-scrappingcd web-scrappingnpm init

2단계: 필요한 라이브러리 설치 및 호출
그런 다음 애플리케이션에 필요한 두 가지 종속성을 설치합니다.
npm install @scrapingant/scrapingant-client
npm install cheerio
ScrapingAnt 클라이언트
HTTP 클라이언트를 사용하여 대상 웹사이트 또는 웹 앱을 쿼리하는 대신 ScrapingAntClient 클래스에서 볼 수 있듯이 이미 구현에서 HTTP 클라이언트를 활용하고 있기 때문에 scrapingant-client 라이브러리를 사용합니다.
| const { default: ow } = require('ow'); | |
| const HttpClient = require('./http_client'); | |
| const ScrapingClient = require('./scraping_client'); | |
| /** | |
| * ScrapingAntClient is the official library to access ScrapingAnt API from your | |
| * JavaScript applications. It runs both in Node.js and browser | |
| * | |
| * @param {object} options | |
| * @param {number} [options.maxRetries=8] | |
| * @param {number} [options.minDelayBetweenRetriesMillis=500] | |
| * @param {number} [options.timeoutSecs] | |
| * @param {string} options.apiKey | |
| */ | |
| class ScrapingAntClient { | |
| constructor(options) { | |
| ow(options, ow.object.exactShape({ | |
| maxRetries: ow.optional.number, | |
| minDelayBetweenRetriesMillis: ow.optional.number, | |
| timeoutSecs: ow.optional.number, | |
| apiKey: ow.string, | |
| })); | |
| const { | |
| maxRetries = 8, | |
| minDelayBetweenRetriesMillis = 500, | |
| timeoutSecs = 60, | |
| apiKey, | |
| } = options; | |
| const httpClient = new HttpClient({ | |
| maxRetries, | |
| minDelayBetweenRetriesMillis, | |
| timeoutSecs, | |
| }); | |
| this.scrapingClient = new ScrapingClient({ | |
| httpClient, | |
| apiKey, | |
| }); | |
| } | |
| /** | |
| * General Web Scraping method. Requires URL and allows to pass optional parameters | |
| */ | |
| scrape(url, parameters) { | |
| ow(url, ow.string); | |
| return this.scrapingClient.call(url, parameters); | |
| } | |
| } |
Cheerio
대상 웹 페이지에 요청을 보내고 응답을 받은 후 원하는 데이터를 추출하기 위해 DOM을 구문 분석해야 합니다.
치어리오는 DOM을 구문 분석하고 조작하는 API를 노출하는 효율적이고 가벼운 라이브러리입니다. 이를 통해 서버 측에서 jQuery의 풍부하고 강력한 API를 사용할 수 있습니다.
const cheerio = require('cheerio');

const $ = cheerio.load(html);
const dialog = $('div[role=dialog]');
const links = $(dialog).find('a');
@types/node
require() 메서드를 사용하여 종속성을 가져오려면 @types/node를 설치하세요.
npm install --save-dev @types/node
프로젝트 진입점으로 이동합니다. 다른 이름을 지정하지 않은 경우 프로젝트 루트 폴더 아래의 index.js 파일입니다(내 프로젝트에서는 이름을 scraper.js로 지정했습니다). 그리고 필요한 라이브러리를 호출합니다. :
const client = require('@scrapingant/scrapingant-client');
const cheerio = require('cheerio');
3단계: 긁어야 할 대상 선택
나는 이 웹 페이지 https://medium.com/tag/${tag}를 선택했고 팔로워 수와 함께 최고 작가 목록을 스크랩하고 싶습니다.
${tag} 매개변수를 리더십, 스타트업, 기술, 창의성 등과 같은 적절한 태그 이름으로 교체한 후 상단 목록의 오른쪽에 표시되는 아래 스크린샷과 같이 올바른 목록을 얻습니다. "tech" 태그 작성자:

4단계: URL 설정 및 응답 확인
내 Node JS 프로젝트의 루트 폴더 아래에 다음 코드가 포함된 scraper.js 스크립트가 있습니다. 직접 시도하기 전에 ScrapingAnt API 키를 상수 SCRAPINT_ANT_KEY의 값으로 설정하기만 하면 됩니다.
const ScrapingAntClient = require('@scrapingant/scrapingant-client');
const cheerio = require('cheerio');

const SCRAPINGANT_API_KEY = 'YOUR_API_KEY';

const client = new ScrapingAntClient({ apiKey: SCRAPINGANT_API_KEY });
const tags = ['leadership', 'startup', 'technology'];
const followersRegex = />([0-9KM.]* Followers)<\//;
const openTopWritersJS = `document.evaluate("//p[text()='See More']", document, null, XPathResult.FIRST_ORDERED_NODE_TYPE, null).singleNodeValue.click()`;


(async () => {
    const writers = [];
    for (const tag of tags) {
        const response = await client.scrape(getTagURL(tag), { proxy_country: 'US', js_snippet: openTopWritersJS });
        writers.push(...await getDataFromTagPage(response.content));
    }

    for (const writer of writers) {
        const writerResponse = await client.scrape(writer.url, { proxy_country: 'US' });
        writer.followers = extractFollowersCount(writerResponse.content);
    }

    // scraped results
    console.log(writers);
})();


function getTagURL(tag) {
    return `https://medium.com/tag/${tag}`;
}

function getDataFromTagPage(html) {
    const pageResults = [];
    const $ = cheerio.load(html);
    const dialog = $('div[role=dialog]');
    const links = $(dialog).find('a');
    links.each((i, link) => {
        if (i % 2 === 1) {
            const result = {};
            result.url = getFullURL($(link).attr('href'));
            result.name = $(link).find('h2').text();
            pageResults.push(result);
        }
    });

    return pageResults;
}

function getFullURL(href) {
    if (href.startsWith('/')) {
        return `https://medium.com${href}`
    }

    return href;
}

function extractFollowersCount(writerContent) {
    return followersRegex.exec(writerContent)[1];
}
5단계: 실행
이제 명령 프롬프트에서 스크립트를 사용하여 터미널을 실행하고 노드를 호출하기만 하면 됩니다.
node scraper.js
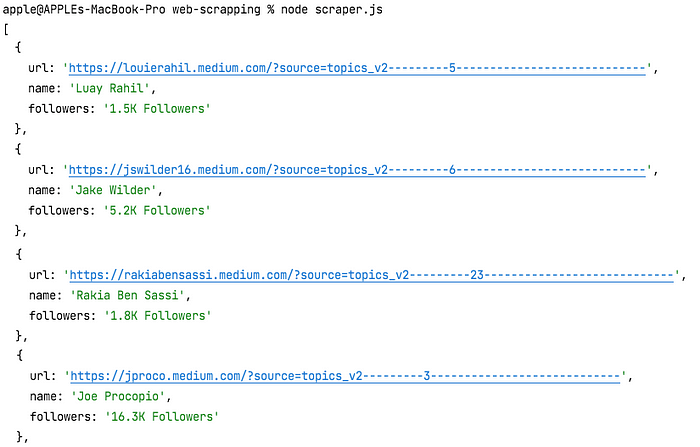
스크립트에 설정한 태그의 수와 각 태그에 대한 Top Writers 목록의 길이에 따라 결과를 반환하는 데 시간이 걸릴 수 있습니다. 인내심을 갖고 기다리면 콘솔에서 다음 추출과 유사한 JSON 데이터를 얻을 수 있습니다.
출처 : https://javascript.plainenglish.io/web-scraping-with-nodejs-and-javascript-10e6b4268be1
등록된 댓글이 없습니다.