인터넷은 보호되어야 하는 글로벌 공공 자원입니다. 인증 된 사용자가 인증되지 않은 사용자가 할 수 없는 특정 작업을 수행 할 수 있는 RESTful API를 보호하는 것부터 시작하겠습니다.
이것은 Learn PHP 시리즈의 두 번째 부분입니다. PHP에서 간단한 REST API 빌드를 선택하지 않은 경우 핵심 PHP에서 REST API를 빌드하는 방법을 배우고 싶다면 먼저 해당 기사를 확인하는 것이 좋습니다.
이 가이드는 Magic으로 PHP Rest API 엔드 포인트를 보호하는 방법을 안내합니다.
왜 매직인가?
Magic을 사용하면 몇 줄의 코드만으로 이메일 매직 링크, 소셜 로그인 및 WebAuthn과 같은 신뢰할 수 있는 암호 없는 로그인으로 API를 매우 안전하게 보호 할 수 있습니다.
Magic과 암호가 왜 나쁜지에 대해 자세히 알아보십시오.
전제 조건
시작하기
GitHub 저장소 복제
여기에서 시작하는 경우 PHP Rest API를 복제하지만, Learn PHP 시리즈를 따르고 있다면 괜찮습니다. 성공적인 레시피에 필요한 모든 재료가 이미 있습니다. 우리는 그것에 약간의 매직 터치를 추가 할 것입니다.
git clone https://github.com/shahbaz17/php-rest-api magic-php-rest-apiRest API 엔드 포인트
PHP REST API 용 데이터베이스 구성
Learn PHP 시리즈를 따르는 경우 이미 이 가이드를 따르는 데 필요한 것이 있습니다.
PHP 용 Magic Admin SDK 설치로 건너 뛰십시오.
MySQL을 사용하여 간단한 API를 구동합니다.
앱에 대한 새 데이터베이스 및 사용자를 만듭니다.
mysql -u root -p
CREATE DATABASE blog CHARACTER SET utf8mb4 COLLATE utf8mb4_unicode_ci;
CREATE USER 'rest_api_user'@'localhost' identified by 'rest_api_password';
GRANT ALL on blog.* to 'rest_api_user'@'localhost';
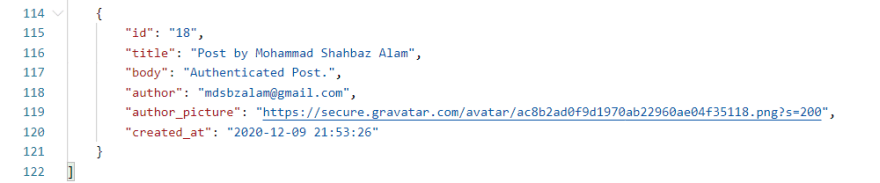
quitREST API에는 id, title, body, author, author_picture, created_at 필드가 있는 블로그 애플리케이션의 게시물이 포함됩니다. 사용자가 블로그 애플리케이션에 블로그를 게시 할 수 있습니다.
MySQL에서 데이터베이스 테이블을 만듭니다.
mysql -u rest_api_user -p;
// Enter your password
use blog;

CREATE TABLE `post` (
  `id` int(11) NOT NULL AUTO_INCREMENT,
  `title` varchar(255) NOT NULL,
  `body` text NOT NULL,
  `author` varchar(255),
  `author_picture` varchar(255),
  `created_at` datetime NOT NULL DEFAULT CURRENT_TIMESTAMP,
  PRIMARY KEY (`id`)
);
.env 파일에 데이터베이스 연결 변수를 추가합니다.
.env
DB_HOST=localhost
DB_PORT=3306
DB_DATABASE=blog
DB_USERNAME=rest_api_user
DB_PASSWORD=rest_api_password
PHP 용 Magic Admin SDK 설치
서버측 PHP용 Magic SDK를 사용하면 분산 형 ID 토큰을 쉽게 활용하여 앱 사용자를 인증할 수 있습니다.
Composer
Composer를 통해 바인딩을 설치할 수 있습니다.
예를 들어 Mac OS에 Composer를 설치하려면 다음 명령을 실행하십시오.
brew install composerComposer가 설치되면 다음 명령을 실행하여 PHP 용 최신 Magic Admin SDK를 가져옵니다.
composer require magiclabs/magic-admin-php수동 설치
Composer를 사용하지 않으려면 최신 릴리스를 다운로드 할 수 있습니다. 그런 다음 바인딩을 사용하려면 init.php 파일을 포함하십시오.
require_once('/path/to/magic-admin-php/init.php');설치 종속성
바인딩이 제대로 작동하려면 다음 확장이 필요합니다.
Composer를 사용하는 경우 이러한 종속성은 자동으로 처리 되어야 합니다. 수동으로 설치하는 경우 이러한 확장을 사용할 수 있는지 확인해야 합니다.
Magic Secret Key 받기
Magic에 가입하고 MAGIC_SECRET_KEY를 받으세요.
자동으로 구성된 테스트 애플리케이션을 자유롭게 사용하거나 대시 보드에서 새 애플리케이션을 생성하십시오.

.env 업데이트
이제 .env 파일에 하나의 MAGIC_SECRET_KEY 변수를 추가합니다.
.env 업데이트
MAGIC_SECRET_KEY={SECRET Key}
DB_HOST=localhost
DB_PORT=3306
DB_DATABASE=
DB_USERNAME=
DB_PASSWORD=
Post.php에 매직 추가
선호하는 편집기에서 src\Post.php를 엽니다.
getEmail() 추가
이 함수는 Magic Authentication의 시작점이며 Magic을 인스턴스화하고 토큰을 검증하고 토큰을 사용하여 발급자를 가져오고 발급자를 사용하여 사용자의 메타 데이터를 검색합니다. 또한 HTTP 헤더에서 토큰을 검색합니다.
public function getEmail() {
$did_token = \MagicAdmin\Util\Http::parse_authorization_header_value(
getallheaders()['Authorization']
);
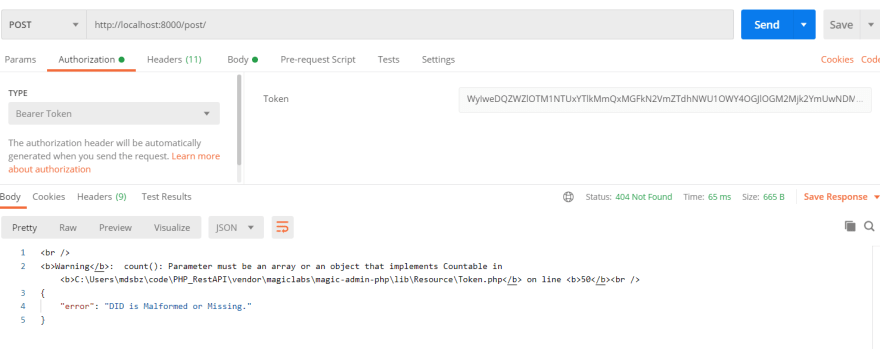
// DIDT is missing from the original HTTP request header. Returns 404: DID Missing
if ($did_token == null) {
return $this->didMissing();
return $response;
}
$magic = new \MagicAdmin\Magic(getenv('MAGIC_SECRET_KEY'));
try {
$magic->token->validate($did_token);
$issuer = $magic->token->get_issuer($did_token);
$user_meta = $magic->user->get_metadata_by_issuer($issuer);
return $user_meta->data->email;
} catch (\MagicAdmin\Exception\DIDTokenException $e) {
// DIDT is malformed.
return $this->didMissing();
return $response;
}
}이 함수가 수행하는 작업과 PHP Rest API를 사용하지 않는 경우 애플리케이션에 대해 구성하는 방법을 살펴 보겠습니다.
매직 인스턴스화
$magic = new \MagicAdmin\Magic(getenv('MAGIC_SECRET_KEY'));생성자를 사용하면 애플리케이션이 Magic API와 상호 작용할 때 API 비밀 키 및 HTTP 요청 전략을 지정할 수 있습니다.
문서에서 생성자와 인수에 대해 자세히 알아보세요.
HTTP 헤더 요청에서 <인증 토큰> 검색
$did_token = \MagicAdmin\Util\Http::parse_authorization_header_value(getallheaders()['Authorization']);Authorization: Bearer <auth token>코드에서 사용하는 경우 기존 코드에 위 코드를 포함하여 HTTP 헤더 요청에서 <인증 토큰>을 가져옵니다.
이 경우 <auth token>을 DID 토큰이라고 합니다.
if ($did_token == null) {
    return $this->didMissing();
    return $response;
}
DIDT가 원래 HTTP 요청 헤더에서 누락 된 경우. 404를 반환합니다. DID가 Malformed 또는 Missing입니다.
didMissing()
private function didMissing() {
    $response['status_code_header'] = 'HTTP/1.1 404 Not Found';
    $response['body'] = json_encode([
      'error' => 'DID is Malformed or Missing.'
  ]);
    return $response;
}
Validate DID Token <auth token>
DID 토큰은 클라이언트 측의 Magic 사용자가 생성하며 Frontend Application을 통해 서버로 전달됩니다.
$magic->token->validate($did_token);계속 진행하기 전에 항상 DID 토큰의 유효성을 검사해야 합니다. DID 토큰이 유효하면 아무것도 반환하지 않아야 하며, 그렇지 않으면 주어진 DID 토큰이 유효하지 않거나 형식이 잘못된 경우 DIDTokenException을 throw합니다.
발급자 받기
$issuer = $magic->token->get_issuer($did_token);get_issuer는 DID 토큰을 생성 한 매직 사용자의 분산 된 ID (iss)를 반환합니다.
사용자 메타 데이터 가져 오기
$user_meta = $magic->user->get_metadata_by_issuer($issuer);get_metadata_by_issuer는 DID 토큰에서 제공된 IS별로 사용자에 대한 정보를 검색합니다. 이 방법은 사용자 데이터와 함께 iss를 저장하는 경우에 유용하며 권장됩니다.
MagicResponse를 반환합니다.
-, issuer (str): 사용자의 분산 된 ID입니다.
-, email (str): 사용자의 이메일 주소입니다.
-, public_address (str): 인증 된 사용자의 공개 주소 (a.k.a .: 공개 키). 현재 이 값은 이더리움 블록 체인과 관련이 있습니다.
이 가이드에서는 게시물 테이블의 작성자로 이메일을 사용합니다.
createPost() 업데이트
이것이 보호 된 경로가 될 것이므로 매직을 추가해 보겠습니다. 인증 된 사람 만 게시물을 작성할 수 있으며, 여기서 게시물의 작성자 필드로 이메일을 사용할 수 있습니다.
private function createPost() {
    $input = (array) json_decode(file_get_contents('php://input'), TRUE);
    if (! $this->validatePost($input)) {
        return $this->unprocessableEntityResponse();
    }

    $query = "
        INSERT INTO posts
            (title, body, author, author_picture)
        VALUES
            (:title, :body, :author, :author_picture);
      ";

    $author = $this->getEmail();

    if(is_string($author)) {
        try {
          $statement = $this->db->prepare($query);
          $statement->execute(array(
            'title' => $input['title'],
            'body'  => $input['body'],
            'author' => $author,
            'author_picture' => 'https://secure.gravatar.com/avatar/'.md5(strtolower($author)).'.png?s=200',
          ));
          $statement->rowCount();
        } catch (\PDOException $e) {
            exit($e->getMessage());
        }

        $response['status_code_header'] = 'HTTP/1.1 201 Created';
        $response['body'] = json_encode(array('message' => 'Post Created'));
        return $response;
    } else {
      return $this->didMissing();
      return $response;
    }

}
작성자 이메일 받기
$author = $this->getEmail();인증 된 사용자의 이메일 ID를 반환합니다.
저자의 이메일 및 사진
인증 된 사용자의 이메일 주소를 게시물 작성자로 사용하고 이메일을 사용하여 Gravatar로 설정된 공개 프로필 사진을 가져 오겠습니다.
  'author' => $author,
    'author_picture' => 'https://secure.gravatar.com/avatar/'.md5(strtolower($author)).'.png?s=200',
updatePost($id) 업데이트
이 경로도 보호됩니다. 즉, 게시물을 업데이트 할 수 있는 사람은 게시물을 작성한 사람 뿐입니다.
private function updatePost($id) {
    $result = $this->find($id);
    if (! $result) {
        return $this->notFoundResponse();
    }
    $input = (array) json_decode(file_get_contents('php://input'), TRUE);
    if (! $this->validatePost($input)) {
        return $this->unprocessableEntityResponse();
    }

    $author = $this->getEmail();

    $query = "
        UPDATE posts
        SET
            title = :title,
            body  = :body,
            author = :author,
            author_picture = :author_picture
        WHERE id = :id AND author = :author;
    ";

    if(is_string($author)) {
      try {
          $statement = $this->db->prepare($query);
          $statement->execute(array(
              'id' => (int) $id,
              'title' => $input['title'],
              'body'  => $input['body'],
              'author' => $author,
              'author_picture' => 'https://secure.gravatar.com/avatar/'.md5(strtolower($author)).'.png?s=200',
          ));
          if($statement->rowCount()==0) {
            // Different Author trying to update.
            return $this->unauthUpdate();
            return $response;
          }
      } catch (\PDOException $e) {
          exit($e->getMessage());
      }
      $response['status_code_header'] = 'HTTP/1.1 200 OK';
      $response['body'] = json_encode(array('message' => 'Post Updated!'));
      return $response;
    } else {
      return $this->didMissing();
      return $response;
    }
}
무단 업데이트 보호
$query = "
    UPDATE posts
    SET
        title = :title,
        body  = :body,
        author = :author,
        author_picture = :author_picture
    WHERE id = :id AND author = :author;
";
unauthUpdate()
return $this->unauthUpdate();
.
.
.
// unauthUpdate()
private function unauthUpdate() {
    $response['status_code_header'] = 'HTTP/1.1 404 Not Found';
    $response['body'] = json_encode([
    'error' => 'You are not authorised to delete this post.'
  ]);
    return $response;
}
deletePost($id) 업데이트
이 경로도 보호됩니다. 즉, 게시물을 삭제할 수 있는 사람은 게시물을 작성한 사람 뿐입니다.
private function deletePost($id) {
    $author = $this->getEmail();
    if(is_string($author)) {
      $result = $this->find($id);
      if (! $result) {
          return $this->notFoundResponse();
      }

      $query = "
          DELETE FROM posts
          WHERE id = :id AND author = :author;
      ";

      try {
          $statement = $this->db->prepare($query);
          $statement->execute(array('id' => $id, 'author' => $author));
          if($statement->rowCount()==0) {
            // Different Author trying to delete.
            return $this->unauthDelete();
            return $response;
          }
      } catch (\PDOException $e) {
          exit($e->getMessage());
      }
      $response['status_code_header'] = 'HTTP/1.1 200 OK';
      $response['body'] = json_encode(array('message' => 'Post Deleted!'));
      return $response;
    } else {
      // DID Error.
      return $this->didMissing();
      return $response;
    }

}
무단 삭제 보호
$query = "
  DELETE FROM posts
  WHERE id = :id AND author = :author;
";
unauthDelete()
return $this->unauthDelete();
.
.
.
// unauthDelete()
private function unauthDelete() {
    $response['status_code_header'] = 'HTTP/1.1 404 Not Found';
    $response['body'] = json_encode([
      'error' => 'You are not authorised to delete this post.'
  ]);
    return $response;
}여기에서 완성 된 Post.php를 가져옵니다.
Endpoints
인증되지 않은 사용자에게 사용 가능 :
인증 된 사용자에게 사용 가능 : Magic으로 보호
개발
종속성을 설치하고 PHP 서버를 시작하고 Postman과 같은 도구로 API를 테스트 해 보겠습니다.
종속성 설치 :
composer install서버 실행 :
php -S localhost:8000 -t apiAPI 사용
Postman
GET /post

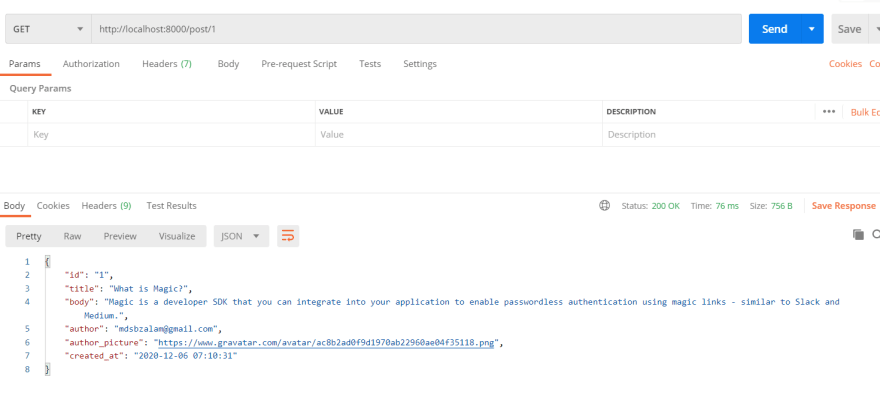
GET /post/{id}
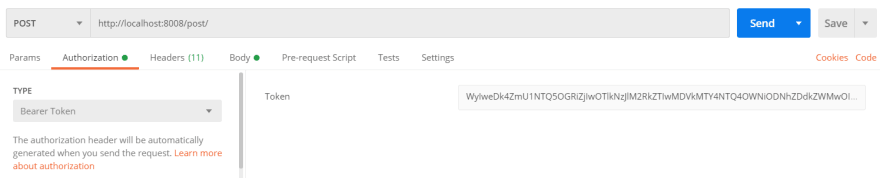
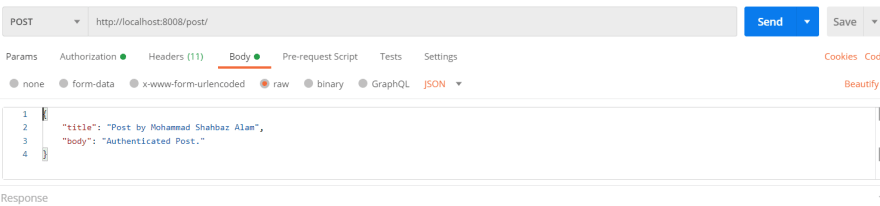
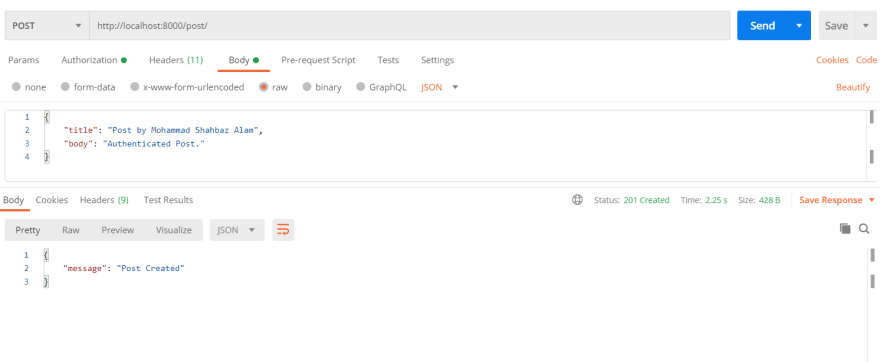
 POST /post
PUT /post/{id}


DELETE /post/{id}


Done
축하합니다!! Magic으로 PHP REST API를 성공적으로 보호했습니다.
https://dev.to/shahbaz17/secure-your-php-rest-api-with-magic-82k
등록된 댓글이 없습니다.