읽기 전에 :이 게시물의 목적은 저의 학습 여정을 공유하는 것입니다. 저는 블로그 작성자 인만큼 개발자만큼 초보자입니다. 여기서 흥미로운 것을 배우지 않을 것입니다.하지만 여전히 제 작품을 보고 싶다면 몇 가지 팁을 받고 싶습니다!
https://dev.to/killianfrappartdev/project-0-understanding-how-a-full-stack-app-works-4jhg
연습을 통해 코딩 모범 사례와 SPA / RestAPI 아키텍처의 핵심 개념을 학습합니다.
1. 개념
a. Idea
여기서 아이디어는 사용자가 다른 사용자와 장소 (이미지 및 위치)를 공유 할 수 있는 매우 간단한 소셜 미디어를 구축하는 것입니다.
b. Features
- 다른 사용자 장소보기
- 장소 추가
- Google지도 통합
- 사진 업로드
- Auth
c. Planning the Frontend

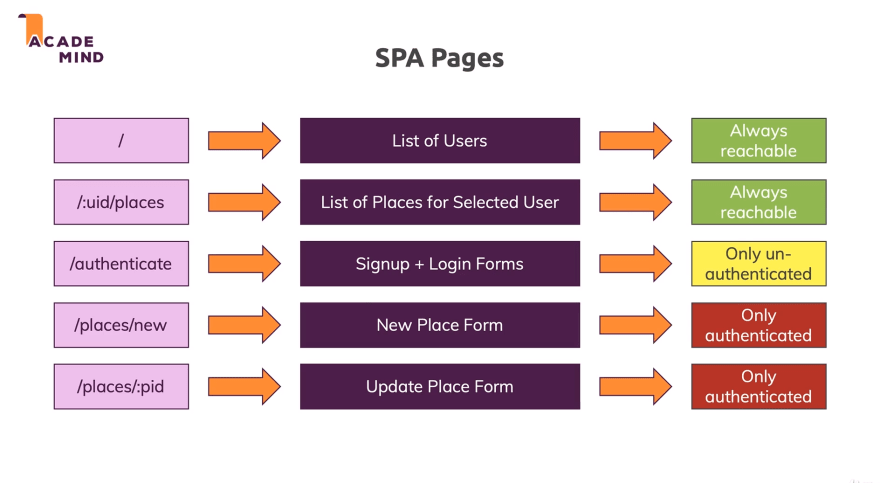
UI 프로토 타입은 이렇게 생겼습니다. 우리는 React로 프론트 엔드를 구축 할 계획입니다.
d. Routing
e. Planning the Backend
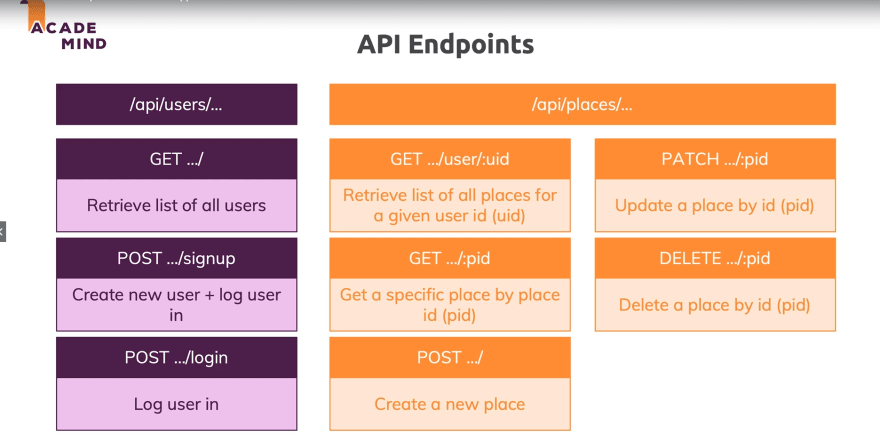
다음은 Node.js / Express로 RestAPI를 빌드 할 때 따라야 할 스키마입니다.
2. Process
a. Building the Frontend
- create-react-app부터 시작하여 첫 번째 단계는 쓸모없는 항목을 제거하고 하위 디렉터리를 추가하여 폴더 구조를 작업하는 것입니다.
- react-router-dom으로 라우팅을 추가합니다.
- 내 페이지 및 핵심 구성 요소 만들기.
- 더미 데이터로 사용자 목록 구성 요소 작업.
- 반응 형 탐색 표시 줄을 표시합니다.
- ReactDOM.createPortal()에 대해 배우고 이 함수를 구현하여 모바일 디자인을 위한 사이드 드로어를 렌더링 합니다.
- React 후크로 내 구성 요소의 상태를 관리합니다.
- react-transition-group으로 내 사이드 드로어 애니메이션.
- react-router-dom에서 제공하는 함수 인 동적 라우팅 / : something / xxx와 useParams() 사용법을 배웁니다.
- 점점 더 많은 구성 요소를 구축하는 중 ...
- Google 문서를 살펴보고 동적 Google지도 모달을 구현합니다.
- 이제 양식 유효성 검사가 내장 된 수제 입력 구성 요소를 사용하고 있습니다.
- 처음으로 커스텀 훅으로 작업하기 (나는 확실히 시간을 보내고 그것에 대해 더 깊은 지식을 얻어야 한다).
- 인증 페이지 준비.
- createContext() 및 useContext()로 인증 상태 관리.
- 프론트 엔드 부분 ✅로 끝났습니다.
b. Building the Backend
- Setting up the project by installing express, bodyParser and nodemon.
- Structuring my directories.
- Creating my routes according to the schema.
- Adding an error handler middleware.
- Following the idea of MVC structure, we added a controllers' folder.
- Handling POST requests and testing with Postman.
- Adding inputs validation with express-validator.
- Calling the geocoding api from google to translate address to coordinates using axios.
- Setting up MongoDB/Mongoose.
- Handling CRUD operations.
- Working on the relation between my MongoDb collections.
- Finishing with the backend ✅.
c. Connecting React to the API.
- Handling CORS.
- Fetching data from my backend with fetch().
- Building a custom hook for http requests.
- Fixing some little issues to provide the best possible user experience.
- Handling file upload with Multer.
- Encrypting users passwords with bcryptjs.
- Improving Authentication with jsonwebtoken.
- Storing tokens in localstorage.
- App is finished ✅.
3. Build & Deploy
- Swapping to env variables.
- Adding lazy loading to React pages.
- Deployed backend on Heroku.
- Deployed frontend on Firebase.
튜토리얼을 마쳤고 모든 것이 로컬에서 잘 작동하지만 heroku에 이미지를 저장할 수 없어서 정말 실망스럽습니다. 나중에 백엔드를 AWS에 연결할 계획입니다.
Source code:
https://github.com/KillianFrappartDev/FullStack-Project0