여러분 안녕하세요,이 튜토리얼에 오신 것을 환영합니다.
시작하기 전에 기본 ReactJS 개념에 익숙해야 합니다. 그렇지 않은 경우 ReactJS 설명서를 참조하십시오.
이 응용 프로그램에서 다음 구성 요소를 사용합니다.
https://www.freecodecamp.org/news/how-to-build-a-todo-application-using-reactjs-and-firebase/
응용 프로그램이 어떻게 보일지 :
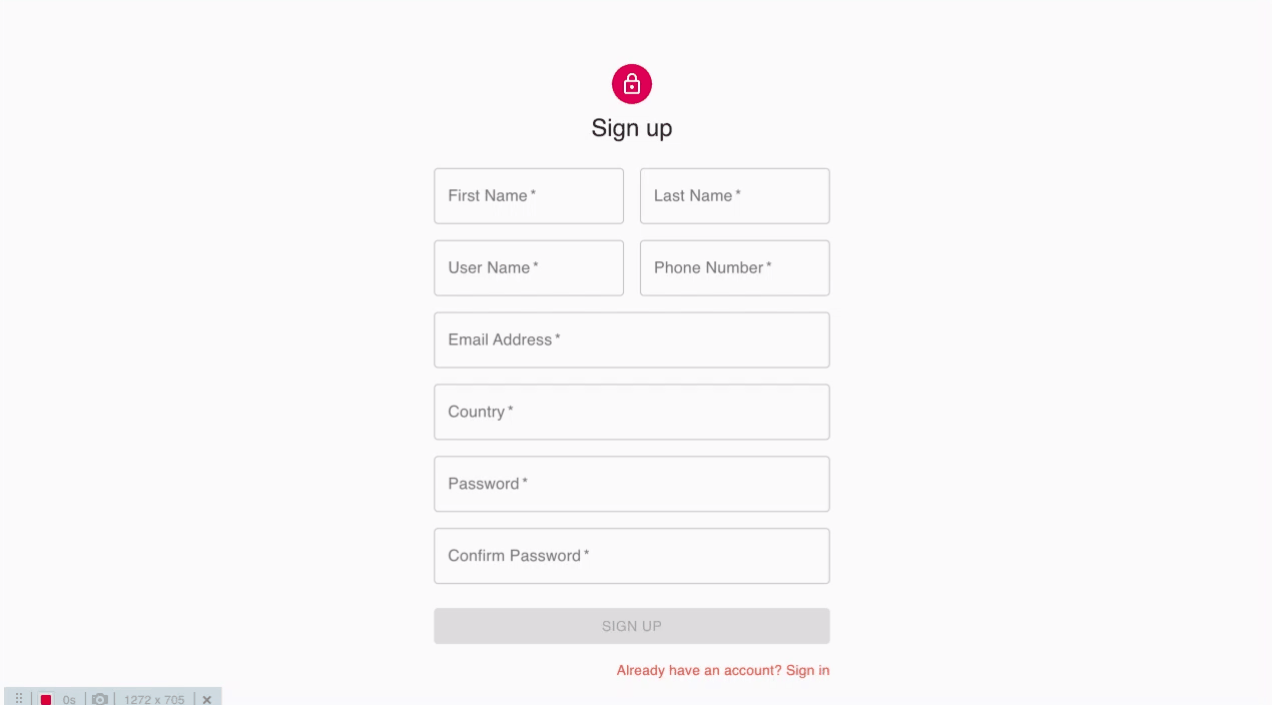
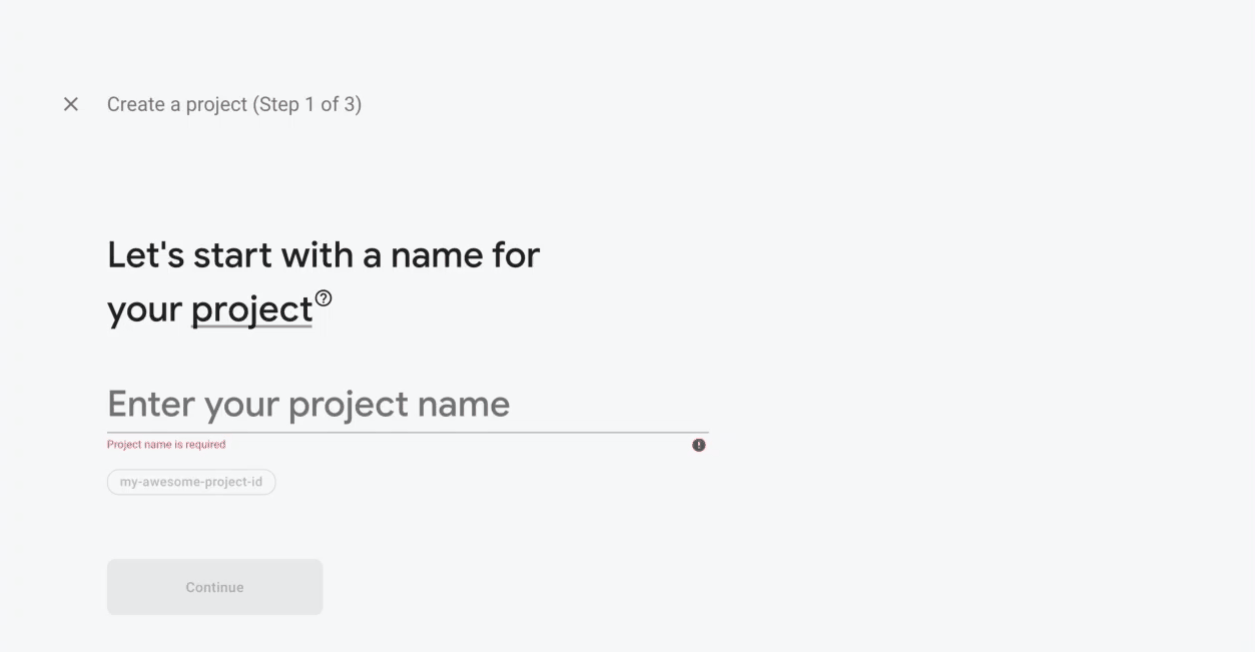
계정 생성
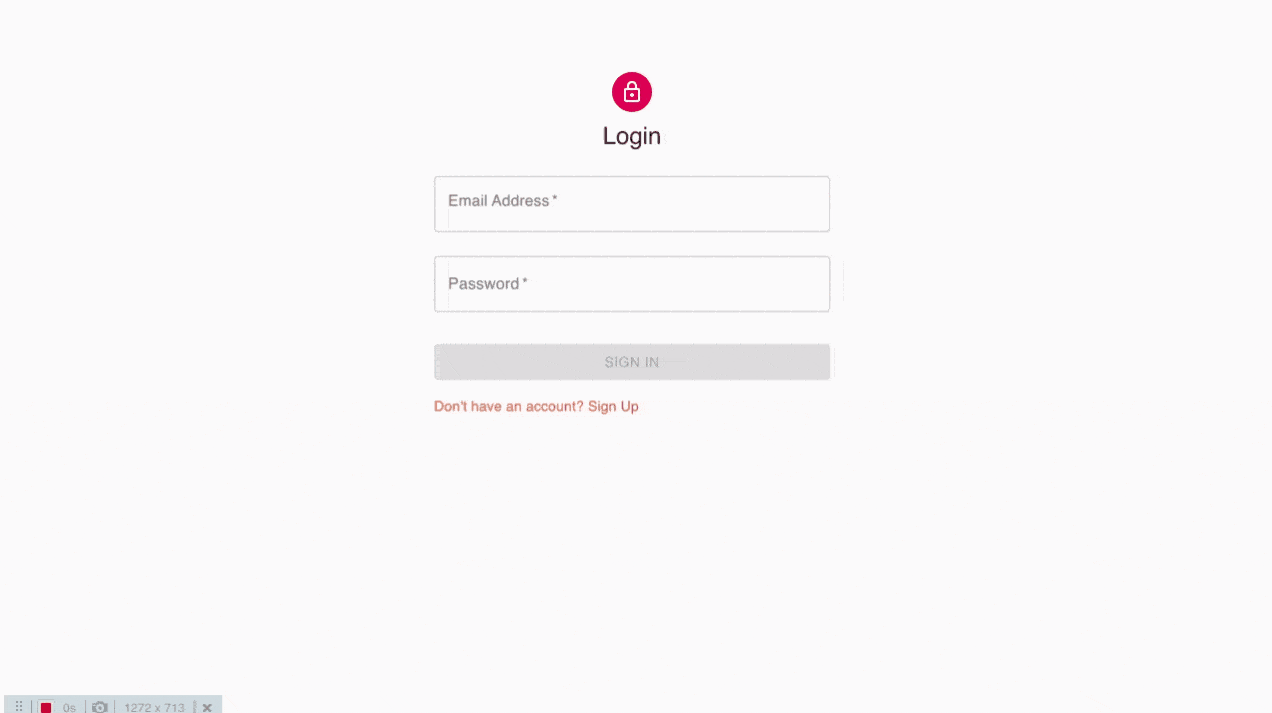
TodoApp 대시 보드
응용 프로그램 아키텍처 :
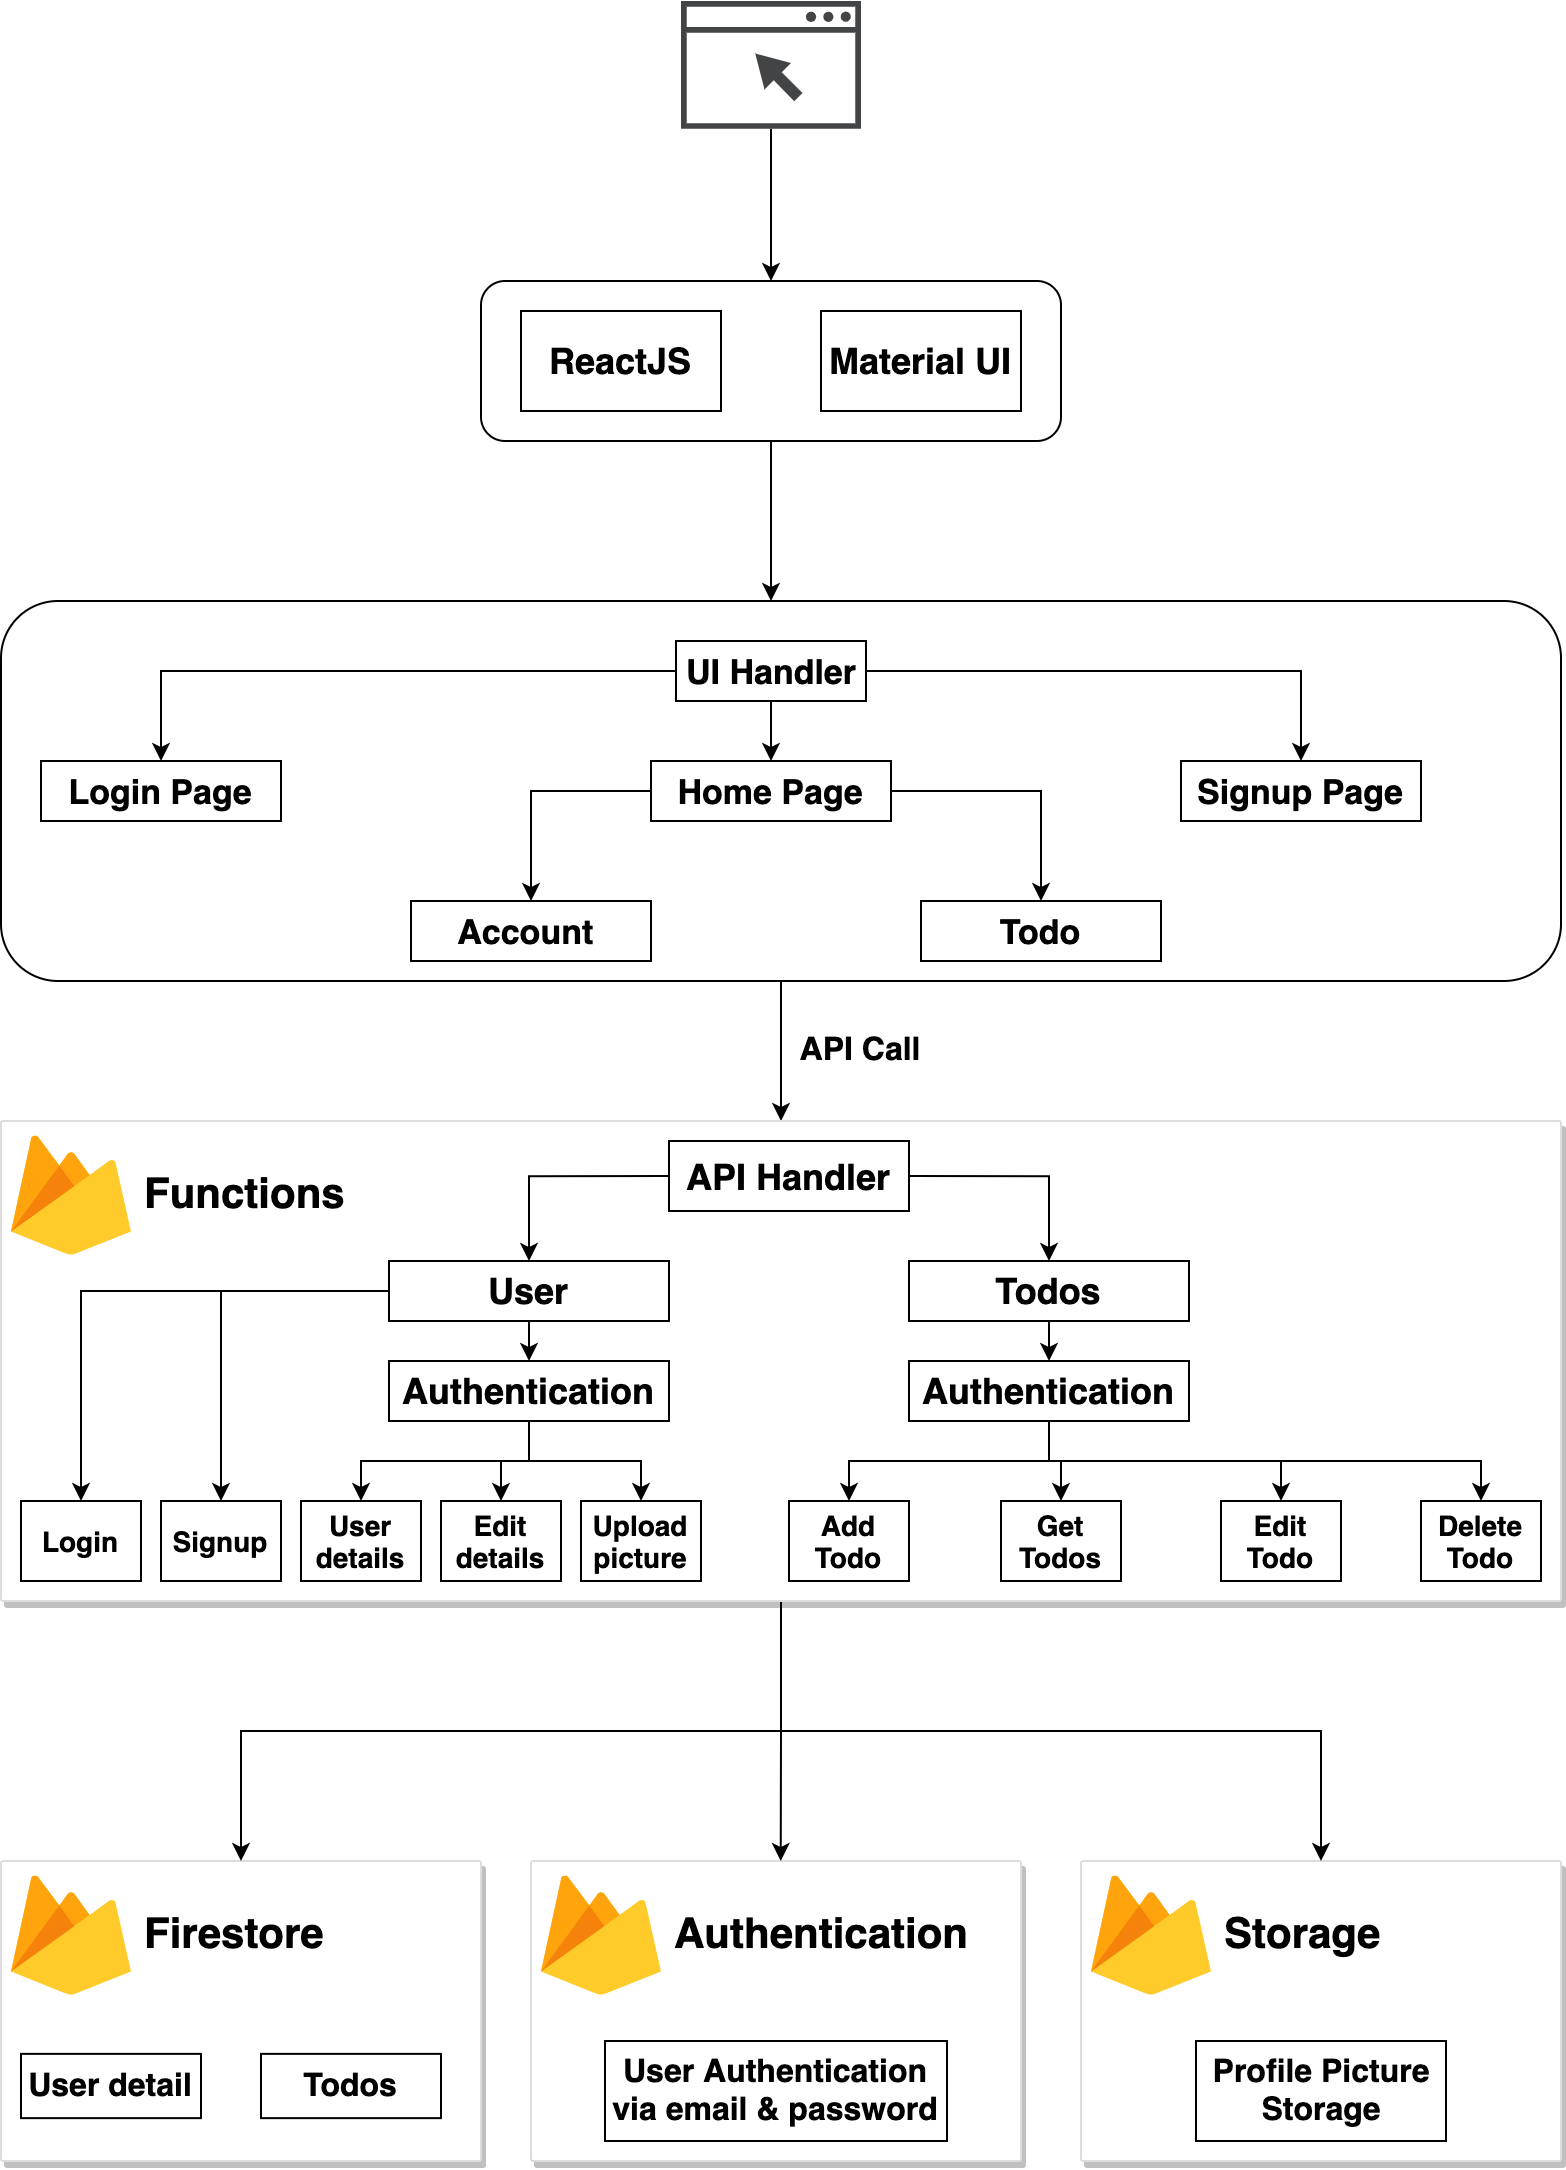
응용 프로그램 아키텍처
구성 요소 이해 :
이 애플리케이션에서 왜 Firebase를 사용하는지 궁금 할 것입니다. 보안 인증, 실시간 데이터베이스, 서버리스 구성 요소 및 스토리지 버킷을 제공합니다.
여기서는 HTTP 예외를 처리 할 필요가 없도록 Express를 사용하고 있습니다. 함수 구성 요소에 모든 firebase 패키지를 사용하려고 합니다. 클라이언트 응용 프로그램을 너무 크게 만들고 싶지 않기 때문에 UI의 로딩 프로세스가 느려집니다.
참고 :이 튜토리얼을 4 개의 개별 섹션으로 나누겠습니다. 모든 섹션의 시작 부분에는 해당 섹션에서 개발 된 코드가 있는 git commit이 있습니다. 또한 전체 코드를 보려면 이 저장소에서 사용할 수 있습니다.
섹션 1 : Todo API 개발
이 섹션에서는 다음 요소를 개발할 것입니다.
이 섹션에서 구현 된 Todo API 코드는 이 커밋에서 찾을 수 있습니다.
Firebase 기능 구성 :
Firebase 콘솔로 이동합니다.
Firebase 콘솔
프로젝트 추가 옵션을 선택하십시오. 그런 다음 아래 gif를 단계별로 따라 Firebase 프로젝트를 구성하십시오.
Firebase 구성
함수 탭으로 이동하여 시작하기 버튼을 클릭하십시오.
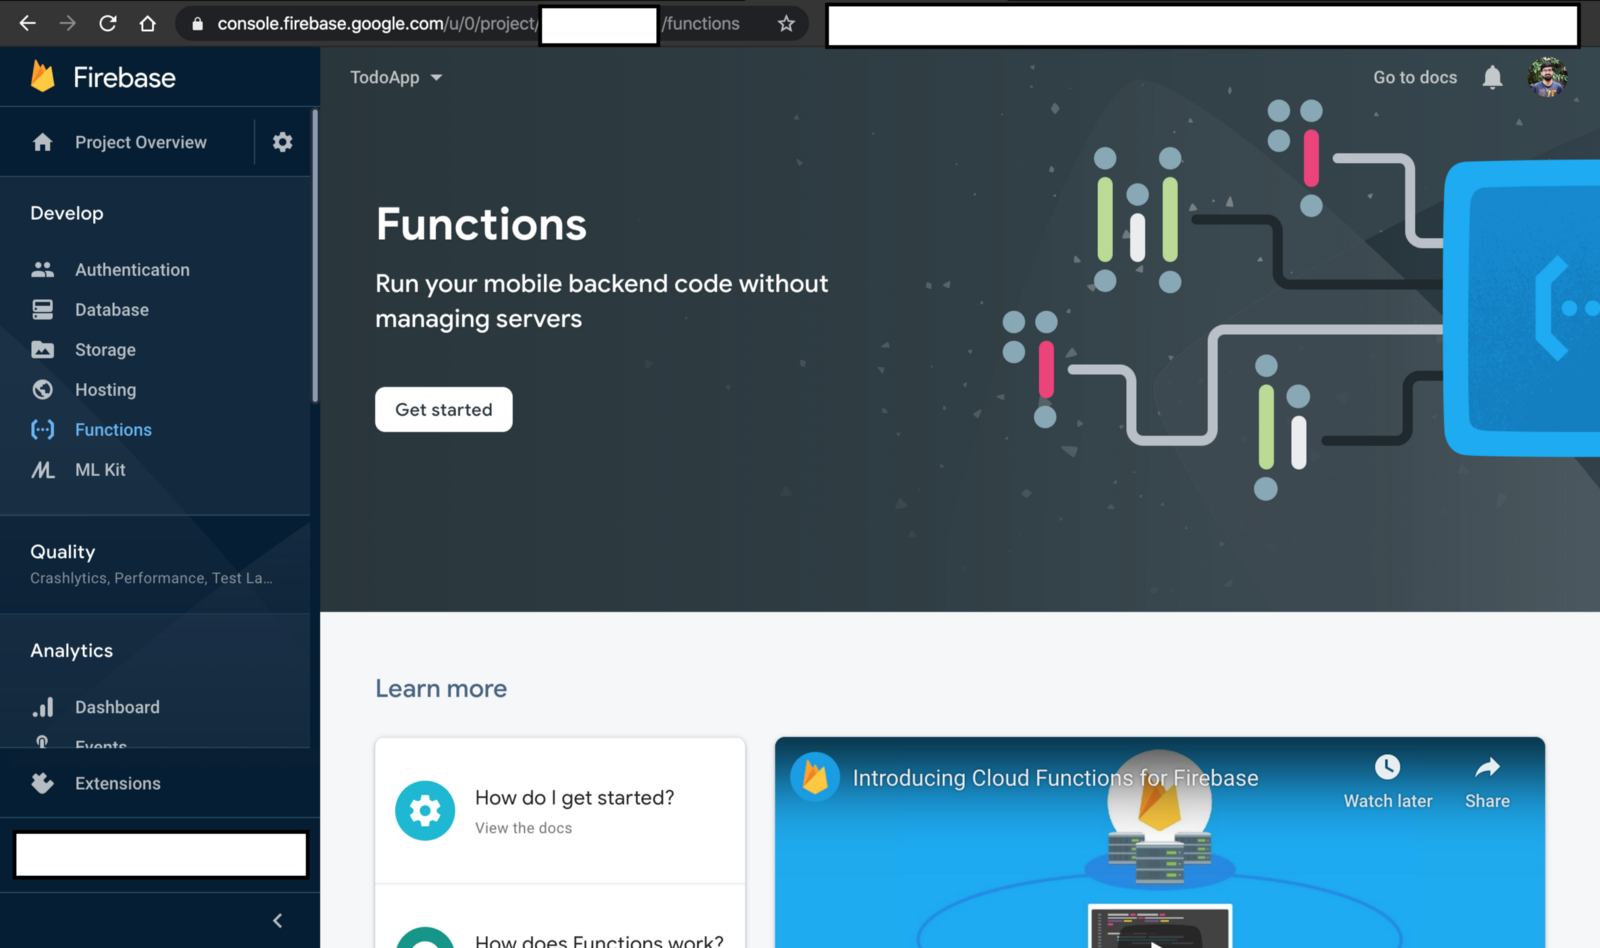
함수 대시 보드
Firebase 함수를 설정하는 방법에 대한 지침이 있는 대화 상자가 표시됩니다. 지역 환경으로 이동하십시오. 명령 줄 도구를 엽니다. 머신에 파이어베이스 도구를 설치하려면 아래 명령을 사용하십시오.
npm install -g firebase-tools완료되면 firebase init 명령을 사용하여 로컬 환경에서 firebase 함수를 구성하십시오. 로컬 환경에서 firebase 함수를 초기화 할 때 다음 옵션을 선택하십시오.
구성이 완료되면 다음 메시지가 표시됩니다.
✔ Firebase initialization complete!초기화가 완료되면 디렉토리 구조가 됩니다.
+-- firebase.json
+-- functions
|   +-- index.js
|   +-- node_modules
|   +-- package-lock.json
|   +-- package.json
이제 functions 디렉토리에서 index.js를 열고 다음 코드를 복사하여 붙여 넣습니다.
const functions = require('firebase-functions');

exports.helloWorld = functions.https.onRequest((request, response) => {
     response.send("Hello from Firebase!");
});
다음 명령을 사용하여 코드를 firebase 함수에 배포하십시오.
firebase deploy배포가 완료되면 명령 줄 끝에 다음과 같은 로그 라인이 표시됩니다.
> ✔  Deploy complete!
> Project Console: https://console.firebase.google.com/project/todoapp-<id>/overview
Project Console> Functions로 이동하면 API의 URL을 찾을 수 있습니다. URL은 다음과 같습니다.
https://<hosting-region>-todoapp-<id>.cloudfunctions.net/helloWorld이 URL을 복사하여 브라우저에 붙여 넣으십시오. 다음과 같은 응답이 나타납니다.
Hello from Firebase!Firebase 기능이 올바르게 구성되었음을 확인합니다.
Express Framework를 설치하십시오.
이제 다음 명령을 사용하여 프로젝트에 Express 프레임 워크를 설치하겠습니다.
npm i express이제 functions 디렉토리 안에 APIs 디렉토리를 만들어 봅시다. 그 디렉토리 안에 todos.js라는 파일을 만들 것입니다. index.js에서 모든 것을 제거하고 다음 코드를 복사하여 붙여 넣습니다.
//index.js

const functions = require('firebase-functions');
const app = require('express')();

const {
    getAllTodos
} = require('./APIs/todos')

app.get('/todos', getAllTodos);
exports.api = functions.https.onRequest(app);
getAllTodos 함수를 /todos 라우트에 지정했습니다. 따라서 이 라우트의 모든 API 호출은 getAllTodos 함수를 통해 실행됩니다. 이제 API 디렉토리 아래의 todos.js 파일로 이동하여 getAllTodos 함수를 작성하십시오.
//todos.js

exports.getAllTodos = (request, response) => {
    todos = [
        {
            'id': '1',
            'title': 'greeting',
            'body': 'Hello world from sharvin shah'
        },
        {
            'id': '2',
            'title': 'greeting2',
            'body': 'Hello2 world2 from sharvin shah'
        }
    ]
    return response.json(todos);
}
여기에서 샘플 JSON 객체를 선언했습니다. 나중에 우리는 그것을 Firestore에서 파생 시킬 것입니다. 그러나 당분간 우리는 이것을 반환 할 것입니다. 이제 firebase deploy 명령을 사용하여 이것을 firebase 함수에 배포하십시오. helloworld 모듈을 삭제할 수 있는 권한을 요청합니다. y 만 입력하면 됩니다.
The following functions are found in your project but do not exist in your local source code: helloWorld

Would you like to proceed with deletion? Selecting no will continue the rest of the deployments. (y/N) y
이 작업이 완료되면 Project Console> Functions로 이동하여 API의 URL을 찾으십시오. API는 다음과 같습니다.
https://<hosting-region>-todoapp-<id>.cloudfunctions.net/api이제 브라우저로 이동하여 URL을 복사하여 붙여넣고 이 URL 끝에 / todos를 추가하십시오. 다음과 같은 결과가 나타납니다.
[
        {
            'id': '1',
            'title': 'greeting',
            'body': 'Hello world from sharvin shah'
        },
        {
            'id': '2',
            'title': 'greeting2',
            'body': 'Hello2 world2 from sharvin shah'
        }
]
Firebase Firestore:
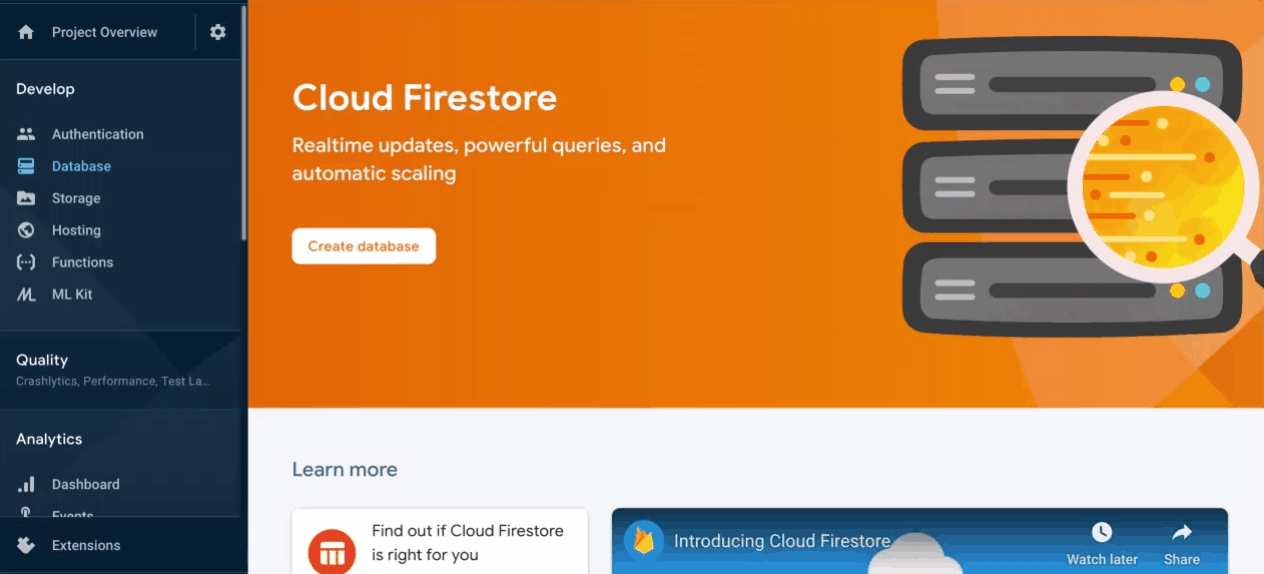
애플리케이션의 실시간 데이터베이스로 firebase firestore를 사용합니다. 이제 Firebase 콘솔에서 콘솔> 데이터베이스로 이동하십시오. Firestore를 구성하려면 아래 gif를 따르십시오.
Firestore 구성
구성이 완료되면 콜렉션 시작 단추를 클릭하고 콜렉션 ID를 작업 관리로 설정하십시오. 다음을 클릭하면 다음과 같은 팝업이 나타납니다.
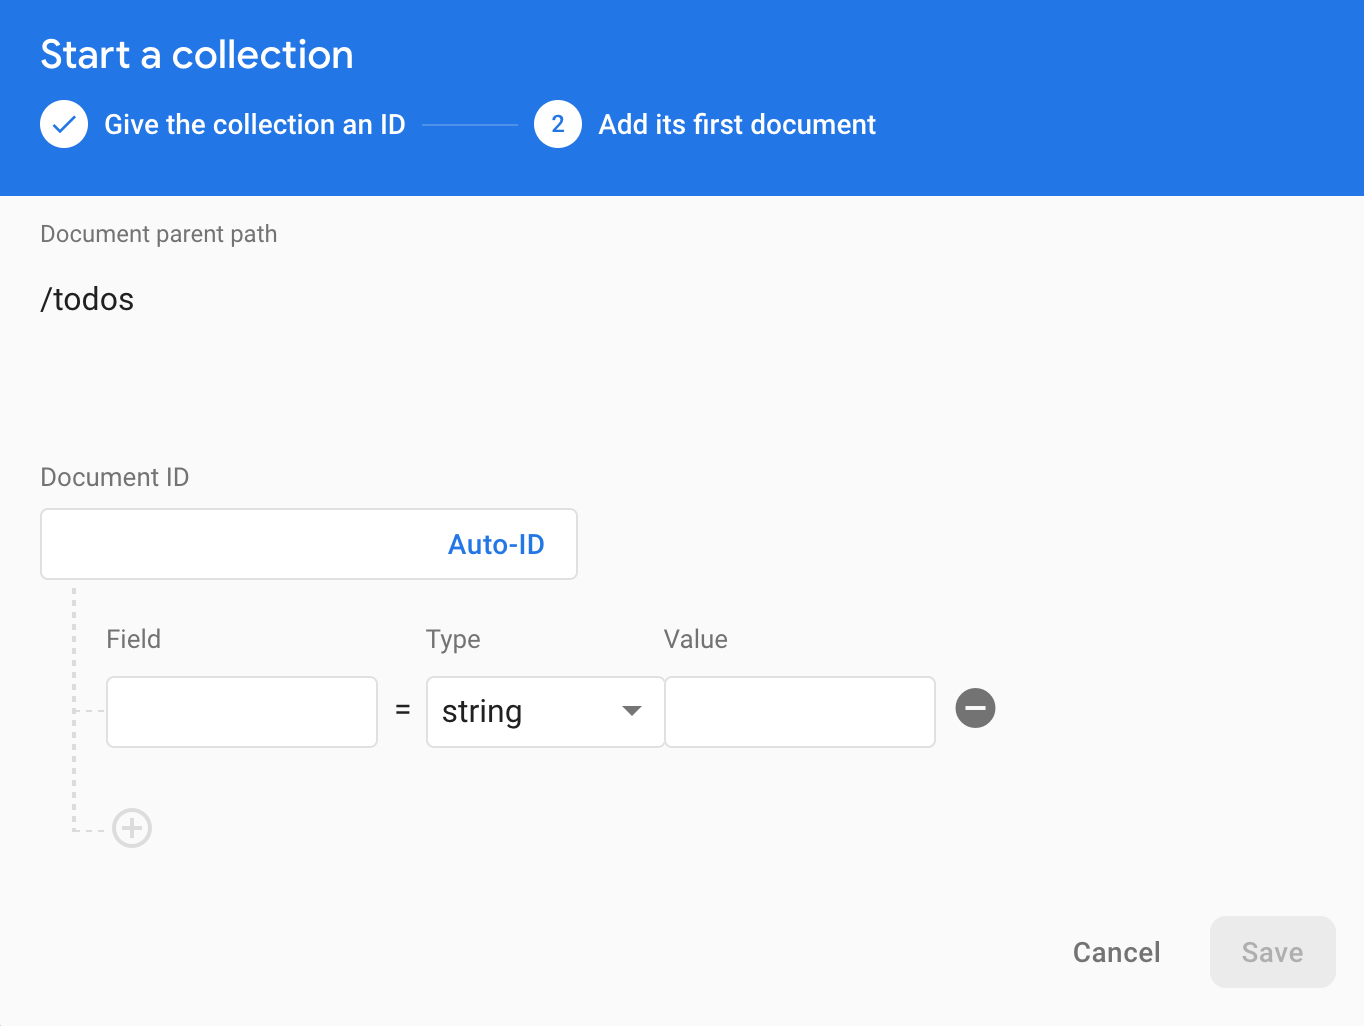
데이터베이스 수동 생성
DocumentID 키를 무시하십시오. 필드, 유형 및 값은 아래의 JSON을 참조하십시오. 그에 따라 값을 업데이트하십시오.
{
    Field: title,
    Type: String,
    Value: Hello World
},
{
    Field: body,
    Type: String,
    Value: Hello folks I hope you are staying home...
},
{
    Field: createtAt,
    type: timestamp,
    value: Add the current date and time here
}
저장 버튼을 누릅니다. 컬렉션과 문서가 생성 된 것을 볼 수 있습니다. 로컬 환경으로 돌아갑니다. 필요한 firestore 패키지가 있는 firebase-admin을 설치해야 합니다. 이 명령을 사용하여 설치하십시오.
npm i firebase-admin함수 디렉토리 아래에 util 디렉토리를 작성하십시오. 이 디렉토리로 이동하여 파일 이름 admin.js를 작성하십시오. 이 파일에서는 firebase 관리 패키지를 가져오고 firestore 데이터베이스 객체를 초기화합니다. 다른 모듈에서 사용할 수 있도록 이를 내보낼 것입니다.
//admin.js

const admin = require('firebase-admin');

admin.initializeApp();

const db = admin.firestore();

module.exports = { admin, db };
이제 이 데이터를 가져 오는 API를 작성해 보겠습니다. 함수> API 디렉토리에서 todos.js로 이동하십시오. 이전 코드를 제거하고 아래 코드를 복사하여 붙여 넣습니다.
//todos.js

const { db } = require('../util/admin');

exports.getAllTodos = (request, response) => {
	db
		.collection('todos')
		.orderBy('createdAt', 'desc')
		.get()
		.then((data) => {
			let todos = [];
			data.forEach((doc) => {
				todos.push({
                    todoId: doc.id,
                    title: doc.data().title,
					body: doc.data().body,
					createdAt: doc.data().createdAt,
				});
			});
			return response.json(todos);
		})
		.catch((err) => {
			console.error(err);
			return response.status(500).json({ error: err.code});
		});
};
여기서 우리는 데이터베이스에서 모든 할 일을 가져 와서 클라이언트를 목록으로 전달합니다.
매번 배포하는 대신 firebase serve 명령을 사용하여 로컬에서 애플리케이션을 실행할 수도 있습니다. 해당 명령을 실행하면 자격 증명과 관련된 오류가 발생할 수 있습니다. 이를 해결하려면 아래 언급 된 단계를 수행하십시오.
export GOOGLE_APPLICATION_CREDENTIALS="/home/user/Downloads/[FILE_NAME].json"그 후 firebase serve 명령을 실행하십시오. 여전히 오류가 발생하면 firebase login --reauth 명령을 사용하십시오. 브라우저에서 Google 로그인 페이지가 열립니다. 로그인이 완료되면 오류 없이 작동합니다.
firebase serve 명령을 실행할 때 명령 행 도구의 로그에서 URL을 찾을 수 있습니다. 브라우저에서 이 URL을 열고 그 뒤에 / todos를 추가하십시오.
✔ functions[api]: http function initialized (http://localhost:5000/todoapp-<project-id>/<region-name>/api).브라우저에서 다음 JSON 출력을 얻을 수 있습니다.
[
    {
        "todoId":"W67t1kSMO0lqvjCIGiuI",
        "title":"Hello World",
        "body":"Hello folks I hope you are staying home...",
        "createdAt":{"_seconds":1585420200,"_nanoseconds":0 }
    }
]
다른 API 작성 :
이제 애플리케이션에 필요한 다른 모든 할 일 API를 작성해야 합니다.
1. 작업 관리 항목 작성 : 함수 디렉토리 아래의 index.js로 이동하십시오. 기존 getAllTodos에서 postOneTodo 메소드를 가져 오십시오. 또한 해당 방법에 POST 경로를 할당하십시오.
//index.js

const {
    ..,
    postOneTodo
} = require('./APIs/todos')

app.post('/todo', postOneTodo);
함수 디렉토리 내의 todos.js로 이동하여 기존 getAllTodos 메소드 아래에 postOneTodo 새 메소드를 추가하십시오.
//todos.js

exports.postOneTodo = (request, response) => {
	if (request.body.body.trim() === '') {
		return response.status(400).json({ body: 'Must not be empty' });
    }

    if(request.body.title.trim() === '') {
        return response.status(400).json({ title: 'Must not be empty' });
    }

    const newTodoItem = {
        title: request.body.title,
        body: request.body.body,
        createdAt: new Date().toISOString()
    }
    db
        .collection('todos')
        .add(newTodoItem)
        .then((doc)=>{
            const responseTodoItem = newTodoItem;
            responseTodoItem.id = doc.id;
            return response.json(responseTodoItem);
        })
        .catch((err) => {
			response.status(500).json({ error: 'Something went wrong' });
			console.error(err);
		});
};
이 방법에서는 데이터베이스에 새 Todo를 추가합니다. 우리 몸의 요소가 비어 있으면 응답 400을 반환하거나 그렇지 않으면 데이터를 추가합니다.
firebase serve 명령을 실행하고 우편 배달부 애플리케이션을 엽니다. 새 요청을 작성하고 메소드 유형을 POST로 선택하십시오. URL 및 JSON 유형의 본문을 추가하십시오.
URL: http://localhost:5000/todoapp-<app-id>/<region-name>/api/todo

METHOD: POST

Body: {
   "title":"Hello World",
   "body": "We are writing this awesome API"
}
보내기 버튼을 누르면 다음과 같은 응답이 나타납니다.
{
     "title": "Hello World",
     "body": "We are writing this awesome API",
     "createdAt": "2020-03-29T12:30:48.809Z",
     "id": "nh41IgARCj8LPWBYzjU0"
}
2. 작업 관리 항목 삭제 : 기능 디렉토리 아래의 index.js로 이동하십시오. 기존 postOneTodo에서 deleteTodo 메소드를 가져 오십시오. 또한 해당 메소드에 DELETE 경로를 지정하십시오.
//index.js

const {
    ..,
    deleteTodo
} = require('./APIs/todos')

app.delete('/todo/:todoId', deleteTodo);
todos.js로 이동하여 기존 postOneTodo 메소드 아래에 새 메소드 deleteTodo를 추가하십시오.
//todos.js

exports.deleteTodo = (request, response) => {
    const document = db.doc(`/todos/${request.params.todoId}`);
    document
        .get()
        .then((doc) => {
            if (!doc.exists) {
                return response.status(404).json({ error: 'Todo not found' })
            }
            return document.delete();
        })
        .then(() => {
            response.json({ message: 'Delete successfull' });
        })
        .catch((err) => {
            console.error(err);
            return response.status(500).json({ error: err.code });
        });
};
이 방법에서는 데이터베이스에서 Todo를 삭제합니다. firebase serve 명령을 실행하고 우편 배달부로 이동하십시오. 새 요청을 작성하고 메소드 유형을 DELETE로 선택한 후 URL을 추가하십시오.
URL: http://localhost:5000/todoapp-<app-id>/<region-name>/api/todo/<todo-id>

METHOD: DELETE
보내기 버튼을 누르면 다음과 같은 응답이 나타납니다.
{
   "message": "Delete successfull"
}
3. Todo 항목 편집 : functions 디렉토리 아래의 index.js로 이동하십시오. 기존 deleteTodo에서 editTodo 메소드를 가져 오십시오. 또한 해당 방법에 PUT 경로를 할당하십시오.
//index.js

const {
    ..,
    editTodo
} = require('./APIs/todos')

app.put('/todo/:todoId', editTodo);
todos.js로 이동하여 기존 deleteTodo 메소드 아래에 새 메소드 editTodo를 추가하십시오.
//todos.js

exports.editTodo = ( request, response ) => {
    if(request.body.todoId || request.body.createdAt){
        response.status(403).json({message: 'Not allowed to edit'});
    }
    let document = db.collection('todos').doc(`${request.params.todoId}`);
    document.update(request.body)
    .then(()=> {
        response.json({message: 'Updated successfully'});
    })
    .catch((err) => {
        console.error(err);
        return response.status(500).json({
                error: err.code
        });
    });
};
이 방법에서는 데이터베이스에서 Todo를 편집하고 있습니다. 여기서는 사용자가 todoId 또는 createdAt 필드를 편집 할 수 없습니다. firebase serve 명령을 실행하고 우편 배달부로 이동하십시오. 새 요청을 작성하고 메소드 유형을 PUT으로 선택한 후 URL을 추가하십시오.
URL: http://localhost:5000/todoapp-<app-id>/<region-name>/api/todo/<todo-id>

METHOD: PUT
보내기 버튼을 누르면 다음과 같은 응답이 나타납니다.
{
   "message": "Updated successfully"
}
지금까지 디렉토리 구조 :
+-- firebase.json
+-- functions
|   +-- API
|   +-- +-- todos.js
|   +-- util
|   +-- +-- admin.js
|   +-- index.js
|   +-- node_modules
|   +-- package-lock.json
|   +-- package.json
|   +-- .gitignore
이것으로 신청서의 첫 번째 섹션을 완성했습니다. 커피를 마시고 휴식을 취한 후 사용자 API 개발을 위해 노력할 것입니다.
섹션 2 : 사용자 API 개발
이 섹션에서는 다음 구성 요소를 개발할 것입니다.
이 섹션에서 구현 된 사용자 API 코드는 이 커밋에서 찾을 수 있습니다.
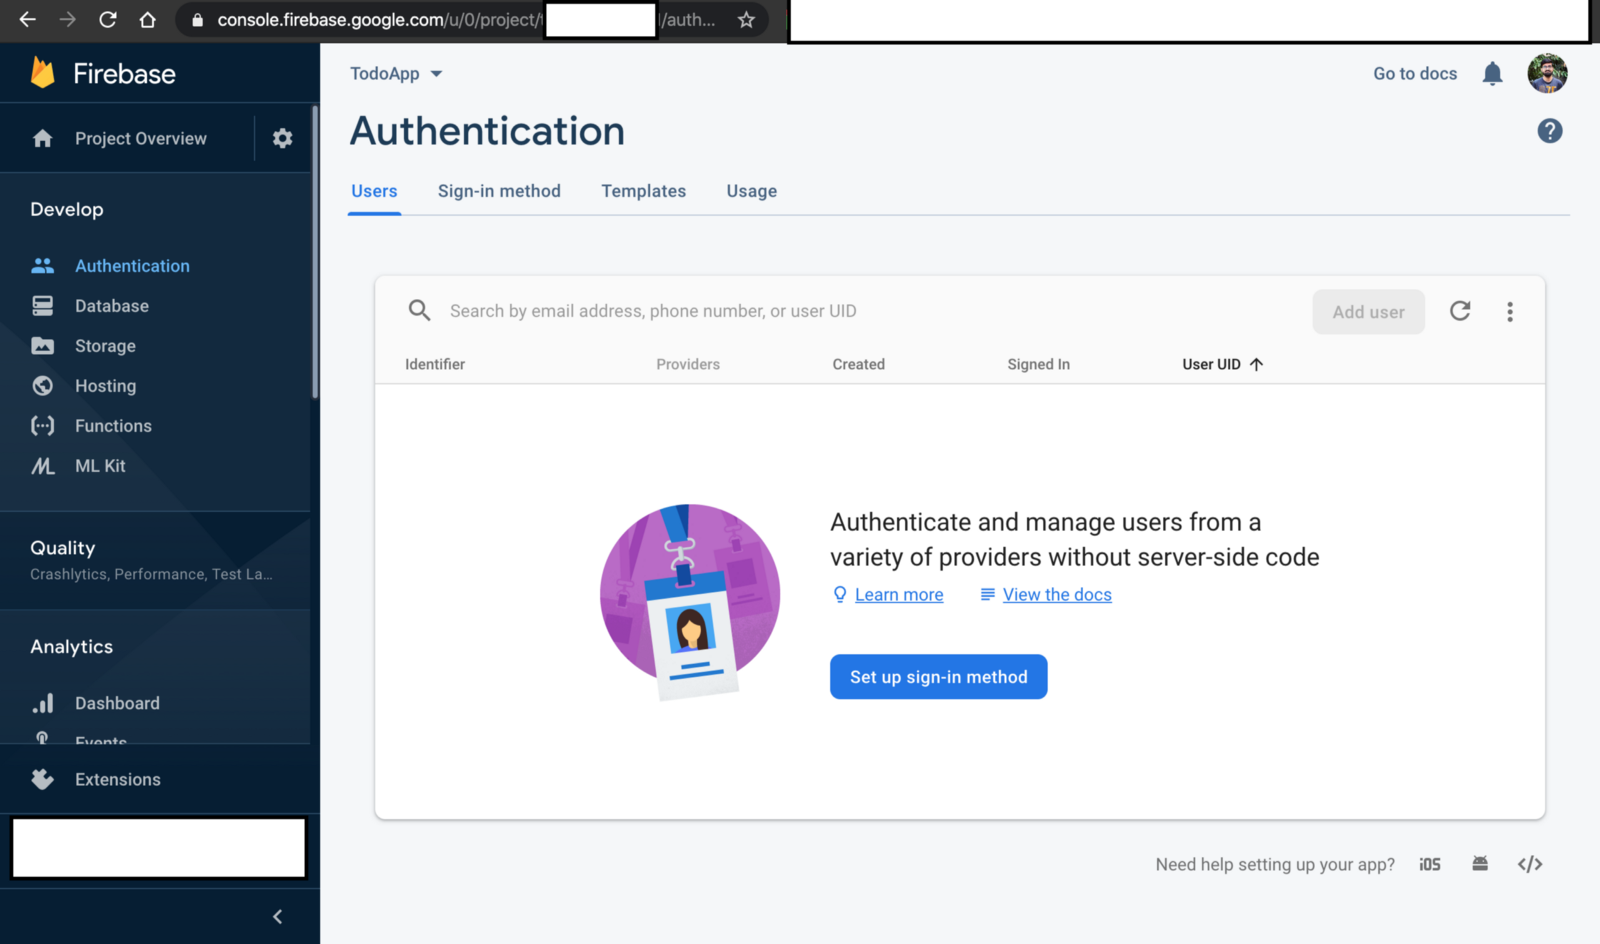
이제 사용자 인증 API 구축을 시작하겠습니다. Firebase 콘솔> 인증으로 이동합니다.
Firebase 인증 페이지
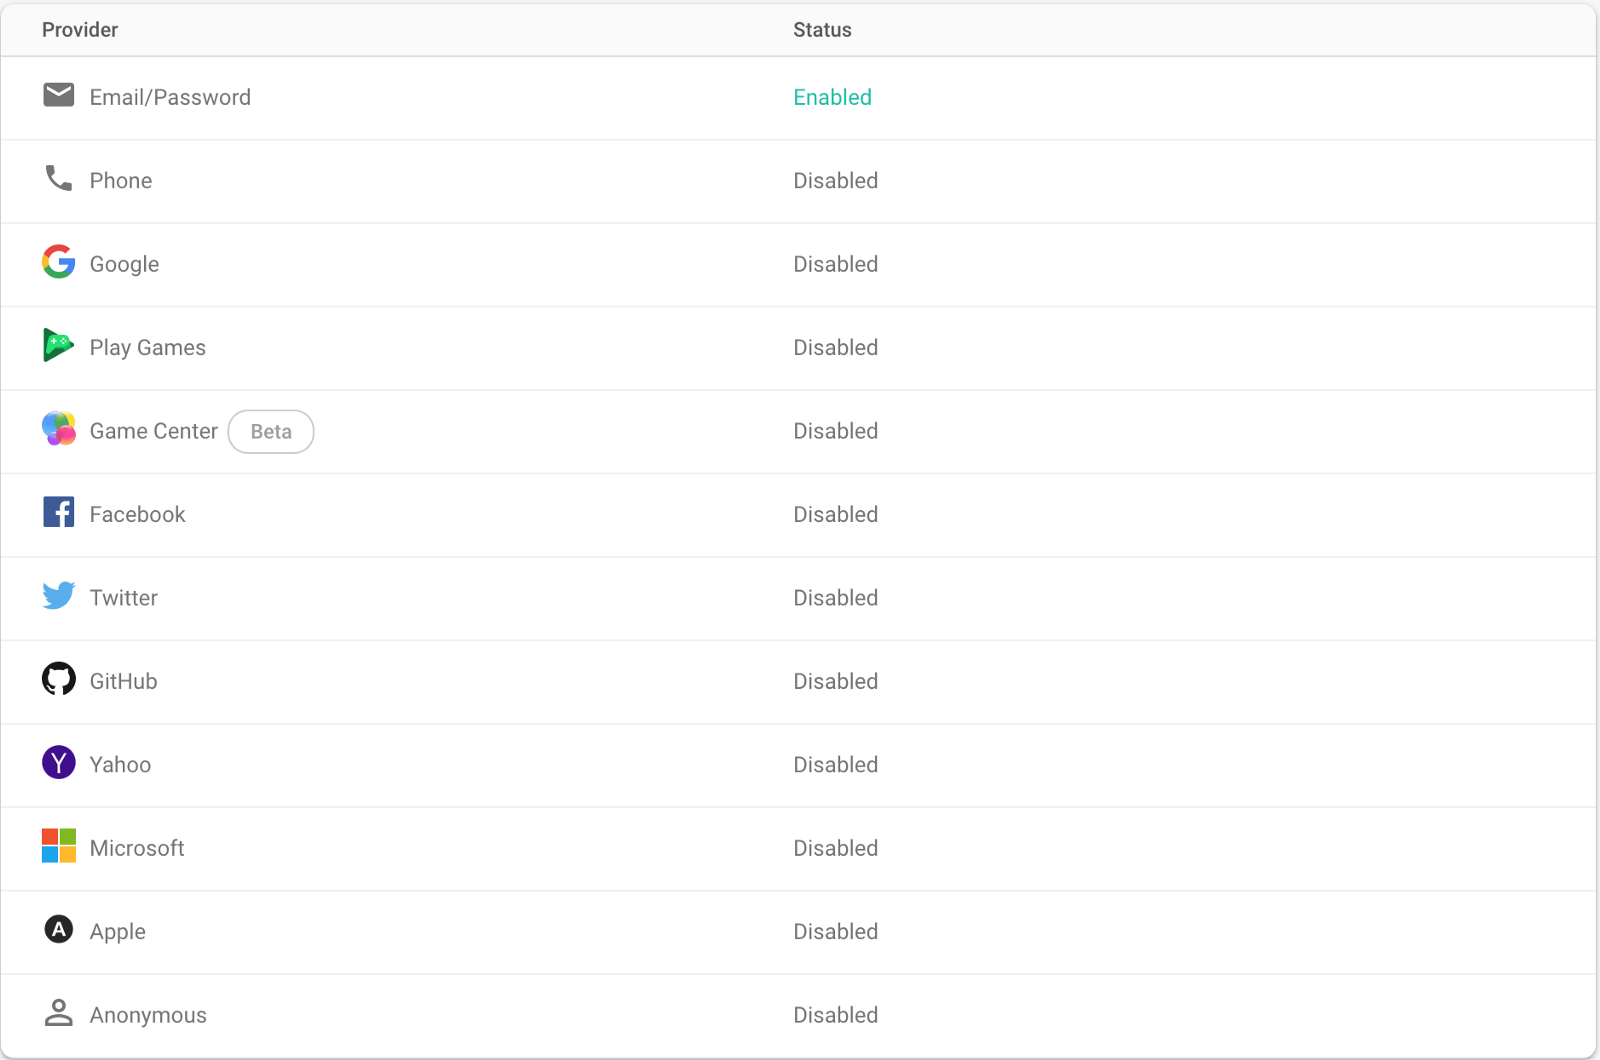
로그인 방법 설정 버튼을 클릭하십시오. 사용자 확인을 위해 이메일과 비밀번호를 사용합니다. 이메일 / 비밀번호 옵션을 활성화하십시오.
Firebase 설정 가입 페이지
지금 우리는 수동으로 사용자를 만들 것입니다. 먼저 Login API를 빌드 합니다. 그런 다음 Sign-Up API를 빌드 합니다.
인증 아래의 사용자 탭으로 이동하여 사용자 세부 사항을 입력 한 후 사용자 추가 단추를 클릭하십시오.

수동으로 사용자 추가
1. 사용자 로그인 API :
먼저 다음 명령을 사용하여 Firebase 인증 라이브러리로 구성된 firebase 패키지를 설치해야 합니다.
npm i firebase설치가 완료되면 기능> API 디렉토리로 이동하십시오. 여기서 users.js 파일을 만듭니다. 이제 index.js 내부에서 loginUser 메소드를 가져오고 POST 경로를 지정하십시오.
//index.js

const {
    loginUser
} = require('./APIs/users')

// Users
app.post('/login', loginUser);
프로젝트 설정> 일반으로 이동하여 다음 카드를 찾으십시오.

Firebase 구성하기
웹 아이콘을 선택한 다음 아래 gif를 따르십시오.
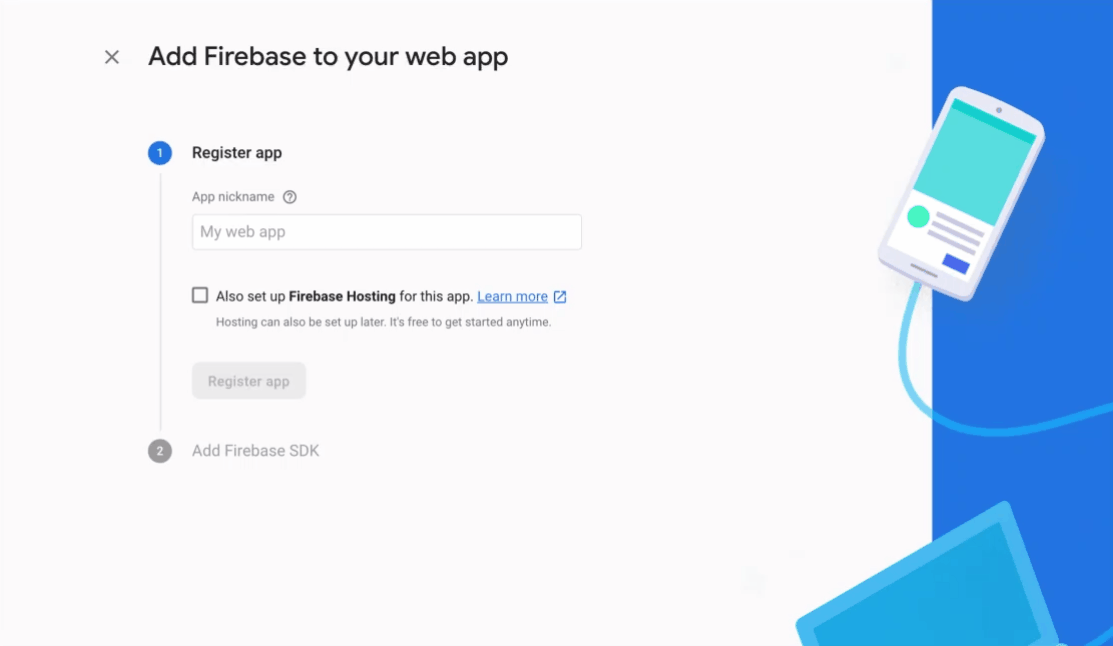
콘솔 계속 옵션을 선택하십시오. 이 작업이 완료되면 firebase 구성을 사용하는 JSON이 표시됩니다. 함수> util 디렉토리로 이동하여 config.js 파일을 작성하십시오. 이 파일에 다음 코드를 복사하여 붙여 넣습니다.
// config.js

module.exports = {
    apiKey: "............",
    authDomain: "........",
    databaseURL: "........",
    projectId: ".......",
    storageBucket: ".......",
    messagingSenderId: "........",
    appId: "..........",
    measurementId: "......."
};
............를 Firebase 콘솔> 프로젝트 설정> 일반> 앱> Firebase SD 스 니펫> 구성에서 얻은 값으로 바꿉니다.
users.js 파일에 다음 코드를 복사하여 붙여 넣습니다.
// users.js

const { admin, db } = require('../util/admin');
const config = require('../util/config');

const firebase = require('firebase');

firebase.initializeApp(config);

const { validateLoginData, validateSignUpData } = require('../util/validators');

// Login
exports.loginUser = (request, response) => {
    const user = {
        email: request.body.email,
        password: request.body.password
    }

    const { valid, errors } = validateLoginData(user);
	if (!valid) return response.status(400).json(errors);

    firebase
        .auth()
        .signInWithEmailAndPassword(user.email, user.password)
        .then((data) => {
            return data.user.getIdToken();
        })
        .then((token) => {
            return response.json({ token });
        })
        .catch((error) => {
            console.error(error);
            return response.status(403).json({ general: 'wrong credentials, please try again'});
        })
};
여기서는 firebase signInWithEmailAndPassword 모듈을 사용하여 사용자가 제출 한 자격 증명이 올바른지 확인합니다. 그들이 맞다면, 우리는 그 사용자의 토큰 또는 "잘못된 자격 증명"메시지와 함께 403 상태를 보냅니다.
이제 함수> util 디렉토리에서 validators.js를 만들어 봅시다. 이 파일에 다음 코드를 복사하여 붙여 넣습니다.
// validators.js

const isEmpty = (string) => {
	if (string.trim() === '') return true;
	else return false;
};

exports.validateLoginData = (data) => {
   let errors = {};
   if (isEmpty(data.email)) errors.email = 'Must not be empty';
   if (isEmpty(data.password)) errors.password = 'Must not be  empty';
   return {
       errors,
       valid: Object.keys(errors).length === 0 ? true : false
    };
};
이것으로 LoginAPI가 완성되었습니다. firebase serve 명령을 실행하고 우편 배달부로 이동하십시오. 새 요청을 작성하고 메소드 유형을 POST로 선택한 후 URL 및 본문을 추가하십시오.
URL: http://localhost:5000/todoapp-<app-id>/<region-name>/api/login

METHOD: POST

Body: {
    "email":"Add email that is assigned for user in console",
    "password": "Add password that is assigned for user in console"
}
우편 배달부에서 요청 보내기 버튼을 누르면 다음과 같은 결과가 나타납니다.
{
    "token": ".........."
}
향후 이 부분에서 이 토큰을 사용하여 사용자 세부 정보를 얻을 것입니다. 이 토큰은 60 분 안에 만료됩니다. 새 토큰을 생성하려면 이 API를 다시 사용하십시오.
2. 사용자 가입 API :
firebase의 기본 인증 메커니즘을 사용하면 이메일, 비밀번호 등의 정보 만 저장할 수 있습니다. 그러나 이 사용자가 할 일을 소유하고 있는지 식별하여 추가 읽기, 업데이트 및 삭제 작업을 수행 할 수 있도록 하려면 추가 정보가 필요합니다.
이 목표를 달성하기 위해 users라는 새로운 컬렉션을 만들려고 합니다. 이 컬렉션에는 사용자 이름을 기반으로 할 일에 매핑 될 사용자 데이터가 저장됩니다. 각 사용자 이름은 플랫폼의 모든 사용자에게 고유합니다.
index.js로 이동하십시오. signUpUser 메소드를 가져 와서 POST 경로를 지정합니다.
//index.js

const {
    ..,
    signUpUser
} = require('./APIs/users')

app.post('/signup', signUpUser);
이제 validators.js로 가서 validateLoginData 메소드 아래에 다음 코드를 추가하십시오.
// validators.js

const isEmail = (email) => {
	const emailRegEx = /^(([^<>()\[\]\\.,;:\s@"]+(\.[^<>()\[\]\\.,;:\s@"]+)*)|(".+"))@((\[[0-9]{1,3}\.[0-9]{1,3}\.[0-9]{1,3}\.[0-9]{1,3}\])|(([a-zA-Z\-0-9]+\.)+[a-zA-Z]{2,}))$/;
	if (email.match(emailRegEx)) return true;
	else return false;
};

exports.validateSignUpData = (data) => {
	let errors = {};

	if (isEmpty(data.email)) {
		errors.email = 'Must not be empty';
	} else if (!isEmail(data.email)) {
		errors.email = 'Must be valid email address';
	}

	if (isEmpty(data.firstName)) errors.firstName = 'Must not be empty';
	if (isEmpty(data.lastName)) errors.lastName = 'Must not be empty';
	if (isEmpty(data.phoneNumber)) errors.phoneNumber = 'Must not be empty';
	if (isEmpty(data.country)) errors.country = 'Must not be empty';

	if (isEmpty(data.password)) errors.password = 'Must not be empty';
	if (data.password !== data.confirmPassword) errors.confirmPassword = 'Passowrds must be the same';
	if (isEmpty(data.username)) errors.username = 'Must not be empty';

	return {
		errors,
		valid: Object.keys(errors).length === 0 ? true : false
	};
};
이제 users.js로 이동하여 loginUser 모듈 아래에 다음 코드를 추가하십시오.
// users.js

exports.signUpUser = (request, response) => {
    const newUser = {
        firstName: request.body.firstName,
        lastName: request.body.lastName,
        email: request.body.email,
        phoneNumber: request.body.phoneNumber,
        country: request.body.country,
		password: request.body.password,
		confirmPassword: request.body.confirmPassword,
		username: request.body.username
    };

    const { valid, errors } = validateSignUpData(newUser);

	if (!valid) return response.status(400).json(errors);

    let token, userId;
    db
        .doc(`/users/${newUser.username}`)
        .get()
        .then((doc) => {
            if (doc.exists) {
                return response.status(400).json({ username: 'this username is already taken' });
            } else {
                return firebase
                        .auth()
                        .createUserWithEmailAndPassword(
                            newUser.email,
                            newUser.password
                    );
            }
        })
        .then((data) => {
            userId = data.user.uid;
            return data.user.getIdToken();
        })
        .then((idtoken) => {
            token = idtoken;
            const userCredentials = {
                firstName: newUser.firstName,
                lastName: newUser.lastName,
                username: newUser.username,
                phoneNumber: newUser.phoneNumber,
                country: newUser.country,
                email: newUser.email,
                createdAt: new Date().toISOString(),
                userId
            };
            return db
                    .doc(`/users/${newUser.username}`)
                    .set(userCredentials);
        })
        .then(()=>{
            return response.status(201).json({ token });
        })
        .catch((err) => {
			console.error(err);
			if (err.code === 'auth/email-already-in-use') {
				return response.status(400).json({ email: 'Email already in use' });
			} else {
				return response.status(500).json({ general: 'Something went wrong, please try again' });
			}
		});
}
사용자 데이터를 확인한 후 firebase createUserWithEmailAndPassword 모듈에 이메일과 비밀번호를 보내 사용자를 만듭니다. 사용자가 성공적으로 만들어지면 사용자 자격 증명을 데이터베이스에 저장합니다.
이것으로 SignUp API가 완성되었습니다. firebase serve 명령을 실행하고 우편 배달부로 이동하십시오. 새 요청을 작성하고 메소드 유형을 POST로 선택하십시오. URL과 본문을 추가하십시오.
URL: http://localhost:5000/todoapp-<app-id>/<region-name>/api/signup

METHOD: POST

Body: {
   "firstName": "Add a firstName here",
   "lastName": "Add a lastName here",
   "email":"Add a email here",
   "phoneNumber": "Add a phone number here",
   "country": "Add a country here",
   "password": "Add a password here",
   "confirmPassword": "Add same password here",
   "username": "Add unique username here"
}
우편 배달부에서 요청 보내기 버튼을 누르면 다음과 같은 결과가 나타납니다.
{
    "token": ".........."
}
이제 Firebase 콘솔> 데이터베이스로 이동하면 다음과 같은 결과가 표시됩니다.
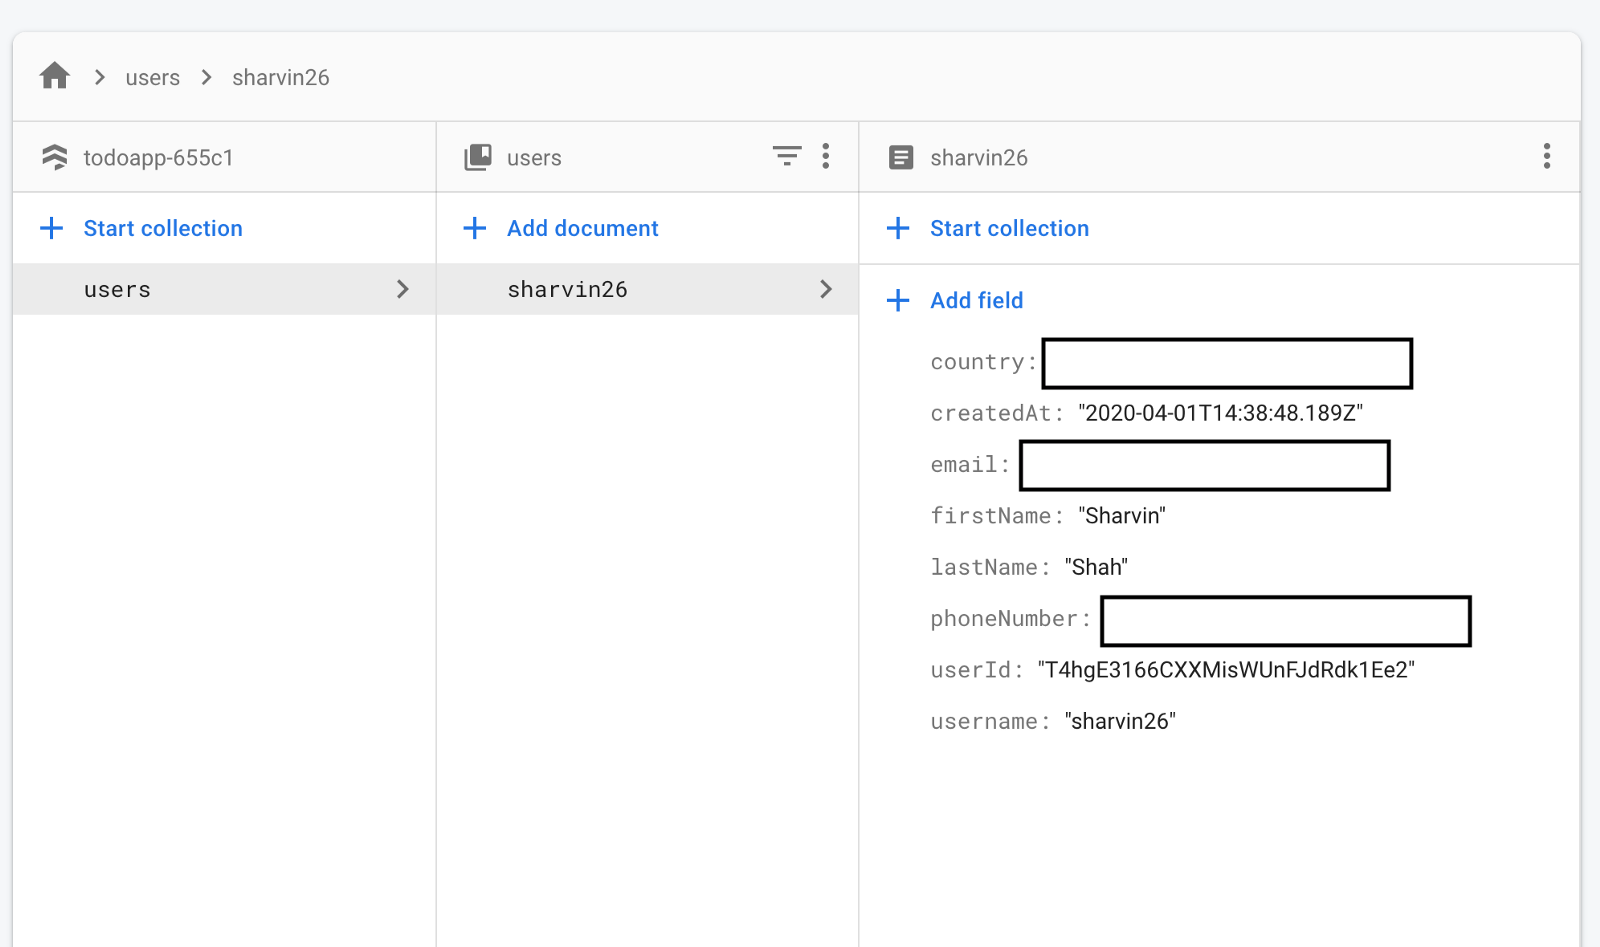
보시다시피, 사용자의 컬렉션은 하나의 문서로 성공적으로 생성되었습니다.
3. 사용자 프로필 사진 업로드 :
사용자는 자신의 프로필 사진을 업로드 할 수 있습니다. 이를 위해 스토리지 버킷을 사용합니다. Firebase 콘솔> 저장소로 이동하여 시작하기 버튼을 클릭하십시오. 구성에 대해서는 아래 GIF를 따르십시오.
이제 스토리지 아래의 규칙 탭으로 이동하여 아래 이미지에 따라 버킷 액세스 권한을 업데이트하십시오.

프로필 사진을 업로드하기 위해 busyboy라는 패키지를 사용할 것입니다. 이 패키지를 설치하려면 다음 명령을 사용하십시오.
npm i busyboyindex.js로 이동하십시오. 기존 signUpUser 메소드 아래로 uploadProfilePhoto 메소드를 가져 오십시오. 또한 해당 방법에 POST 경로를 할당하십시오.
//index.js

const auth = require('./util/auth');

const {
    ..,
    uploadProfilePhoto
} = require('./APIs/users')

app.post('/user/image', auth, uploadProfilePhoto);
여기에는 해당 계정과 연결된 사용자 만 이미지를 업로드 할 수 있도록 인증 계층을 추가했습니다. 이제 functions> utils 디렉토리에 auth.js라는 파일을 작성하십시오. 해당 파일에 다음 코드를 복사하여 붙여 넣습니다.
// auth.js

const { admin, db } = require('./admin');

module.exports = (request, response, next) => {
	let idToken;
	if (request.headers.authorization && request.headers.authorization.startsWith('Bearer ')) {
		idToken = request.headers.authorization.split('Bearer ')[1];
	} else {
		console.error('No token found');
		return response.status(403).json({ error: 'Unauthorized' });
	}
	admin
		.auth()
		.verifyIdToken(idToken)
		.then((decodedToken) => {
			request.user = decodedToken;
			return db.collection('users').where('userId', '==', request.user.uid).limit(1).get();
		})
		.then((data) => {
			request.user.username = data.docs[0].data().username;
			request.user.imageUrl = data.docs[0].data().imageUrl;
			return next();
		})
		.catch((err) => {
			console.error('Error while verifying token', err);
			return response.status(403).json(err);
		});
};
여기서는 firebase verifyIdToken 모듈을 사용하여 토큰을 확인합니다. 그 후 우리는 사용자 세부 정보를 해독하고 기존 요청에 전달합니다.
users.js로 이동하여 가입 방법 아래에 다음 코드를 추가하십시오.
// users.js

deleteImage = (imageName) => {
    const bucket = admin.storage().bucket();
    const path = `${imageName}`
    return bucket.file(path).delete()
    .then(() => {
        return
    })
    .catch((error) => {
        return
    })
}

// Upload profile picture
exports.uploadProfilePhoto = (request, response) => {
    const BusBoy = require('busboy');
	const path = require('path');
	const os = require('os');
	const fs = require('fs');
	const busboy = new BusBoy({ headers: request.headers });

	let imageFileName;
	let imageToBeUploaded = {};

	busboy.on('file', (fieldname, file, filename, encoding, mimetype) => {
		if (mimetype !== 'image/png' && mimetype !== 'image/jpeg') {
			return response.status(400).json({ error: 'Wrong file type submited' });
		}
		const imageExtension = filename.split('.')[filename.split('.').length - 1];
        imageFileName = `${request.user.username}.${imageExtension}`;
		const filePath = path.join(os.tmpdir(), imageFileName);
		imageToBeUploaded = { filePath, mimetype };
		file.pipe(fs.createWriteStream(filePath));
    });
    deleteImage(imageFileName);
	busboy.on('finish', () => {
		admin
			.storage()
			.bucket()
			.upload(imageToBeUploaded.filePath, {
				resumable: false,
				metadata: {
					metadata: {
						contentType: imageToBeUploaded.mimetype
					}
				}
			})
			.then(() => {
				const imageUrl = `https://firebasestorage.googleapis.com/v0/b/${config.storageBucket}/o/${imageFileName}?alt=media`;
				return db.doc(`/users/${request.user.username}`).update({
					imageUrl
				});
			})
			.then(() => {
				return response.json({ message: 'Image uploaded successfully' });
			})
			.catch((error) => {
				console.error(error);
				return response.status(500).json({ error: error.code });
			});
	});
	busboy.end(request.rawBody);
};
이것으로 Upload Profile Picture API가 완성되었습니다. firebase serve 명령을 실행하고 우편 배달부로 이동하십시오. 새 요청을 작성하고 메소드 유형을 POST로 선택하고 URL을 추가 한 후 본문 섹션에서 유형을 양식 데이터로 선택하십시오.
요청이 보호되므로 베어러 토큰도 보내야 합니다. 베어러 토큰을 보내려면 토큰이 만료 된 경우 다시 로그인하십시오. 그런 다음 Postman App> Authorization 탭> Type> Bearer Token에서 토큰 섹션에 토큰을 붙여 넣습니다.
URL: http://localhost:5000/todoapp-<app-id>/<region-name>/api/user/image

METHOD: GET

Body: { REFER THE IMAGE down below }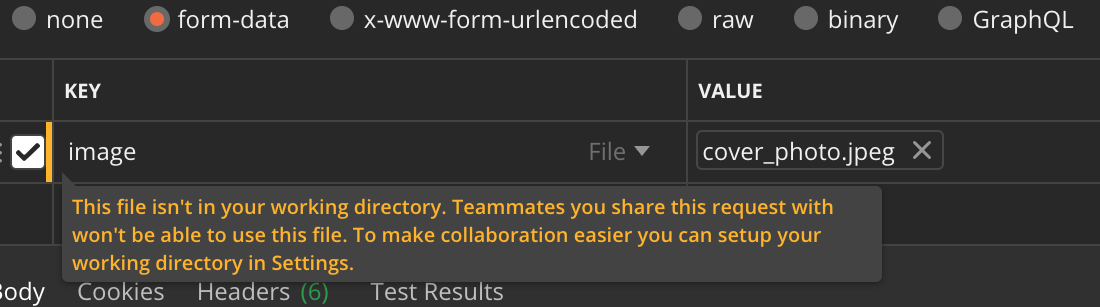
우편 배달부에서 요청 보내기 버튼을 누르면 다음과 같은 결과가 나타납니다.
{
    "message": "Image uploaded successfully"
}
4. 사용자 정보 얻기 :
여기서는 데이터베이스에서 사용자 데이터를 가져옵니다. index.js로 이동하여 getUserDetail 메소드를 가져 와서 GET 라우트를 지정하십시오.
// index.js

const {
    ..,
    getUserDetail
} = require('./APIs/users')

app.get('/user', auth, getUserDetail);
이제 users.js로 이동하여 uploadProfilePhoto 모듈 뒤에 다음 코드를 추가하십시오.
// users.js

exports.getUserDetail = (request, response) => {
    let userData = {};
	db
		.doc(`/users/${request.user.username}`)
		.get()
		.then((doc) => {
			if (doc.exists) {
                userData.userCredentials = doc.data();
                return response.json(userData);
			}
		})
		.catch((error) => {
			console.error(error);
			return response.status(500).json({ error: error.code });
		});
}
firebase doc(). get() 모듈을 사용하여 사용자 세부 정보를 얻습니다. 이것으로 GET User Details API가 완성되었습니다. firebase serve 명령을 실행하고 우편 배달부로 이동하십시오. 새 요청을 작성하고 메소드 유형 GET을 선택한 후 URL 및 본문을 추가하십시오.
요청이 보호되므로 베어러 토큰도 보내야 합니다. 베어러 토큰을 보내려면 토큰이 만료 된 경우 다시 로그인하십시오.
URL: http://localhost:5000/todoapp-<app-id>/<region-name>/api/user
METHOD: GET
우편 배달부에서 요청 보내기 버튼을 누르면 다음과 같은 결과가 나타납니다.
{
   "userCredentials": {
       "phoneNumber": "........",
       "email": "........",
       "country": "........",
       "userId": "........",
       "username": "........",
       "createdAt": "........",
       "lastName": "........",
       "firstName": "........"
    }
}
5. 사용자 정보 업데이트 :
이제 사용자 세부 정보를 업데이트하는 기능을 추가하겠습니다. index.js로 이동하여 다음 코드를 복사하여 붙여 넣습니다.
// index.js

const {
    ..,
    updateUserDetails
} = require('./APIs/users')

app.post('/user', auth, updateUserDetails);
이제 users.js로 이동하여 기존 getUserDetails 아래에 updateUserDetails 모듈을 추가하십시오.
// users.js

exports.updateUserDetails = (request, response) => {
    let document = db.collection('users').doc(`${request.user.username}`);
    document.update(request.body)
    .then(()=> {
        response.json({message: 'Updated successfully'});
    })
    .catch((error) => {
        console.error(error);
        return response.status(500).json({
            message: "Cannot Update the value"
        });
    });
}
여기서는 firebase 업데이트 방법을 사용하고 있습니다. 이것으로 Update User Details API가 완성되었습니다. 한 번의 변경으로 위의 사용자 세부 사항 가져 오기 API와 동일한 요청 절차를 따르십시오. 여기에 요청에 본문을 추가하고 POST로 메소드를 추가하십시오.
URL: http://localhost:5000/todoapp-<app-id>/<region-name>/api/user

METHOD: POST

Body : {
    // You can edit First Name, last Name and country
    // We will disable other Form Tags from our UI
}
우편 배달부에서 요청 보내기 버튼을 누르면 다음과 같은 결과가 나타납니다.
{
    "message": "Updated successfully"
}
6. Todo API 보안 :
선택한 사용자 만 액세스 할 수 있도록 Todo API를 보호하기 위해 기존 코드를 약간 변경합니다. 먼저 index.js를 다음과 같이 업데이트합니다.
// index.js

// Todos
app.get('/todos', auth, getAllTodos);
app.get('/todo/:todoId', auth, getOneTodo);
app.post('/todo',auth, postOneTodo);
app.delete('/todo/:todoId',auth, deleteTodo);
app.put('/todo/:todoId',auth, editTodo);
모든 API 호출에 토큰이 필요하고 특정 사용자 만 액세스 할 수 있도록 auth를 추가하여 모든 Todo 라우트를 업데이트했습니다.
그런 다음 함수> API 디렉토리 아래의 todos.js로 이동하십시오.
1. Todo API 작성 : todos.js를 열고 postOneTodo 메소드에서 다음과 같이 사용자 이름 키를 추가하십시오.
const newTodoItem = {
     ..,
     username: request.user.username,
     ..
}
2. 모든 Todos API 가져 오기 : todos.js를 열고 getAllTodos 메소드 아래에 where 절을 다음과 같이 추가하십시오.
db
.collection('todos')
.where('username', '==', request.user.username)
.orderBy('createdAt', 'desc')
firebase serve를 실행하고 GET API를 테스트하십시오. 무기명 토큰을 보내는 것을 잊지 마십시오. 여기에 다음과 같은 응답 오류가 발생합니다.
{
    "error": 9
}
명령 행으로 이동하면 다음 행이 기록됩니다.
i functions: Beginning execution of "api"> Error: 9 FAILED_PRECONDITION: The query requires an index. You can create it here: <URL>> at callErrorFromStatus브라우저에서 이 <URL>을 열고 색인 작성을 클릭하십시오.
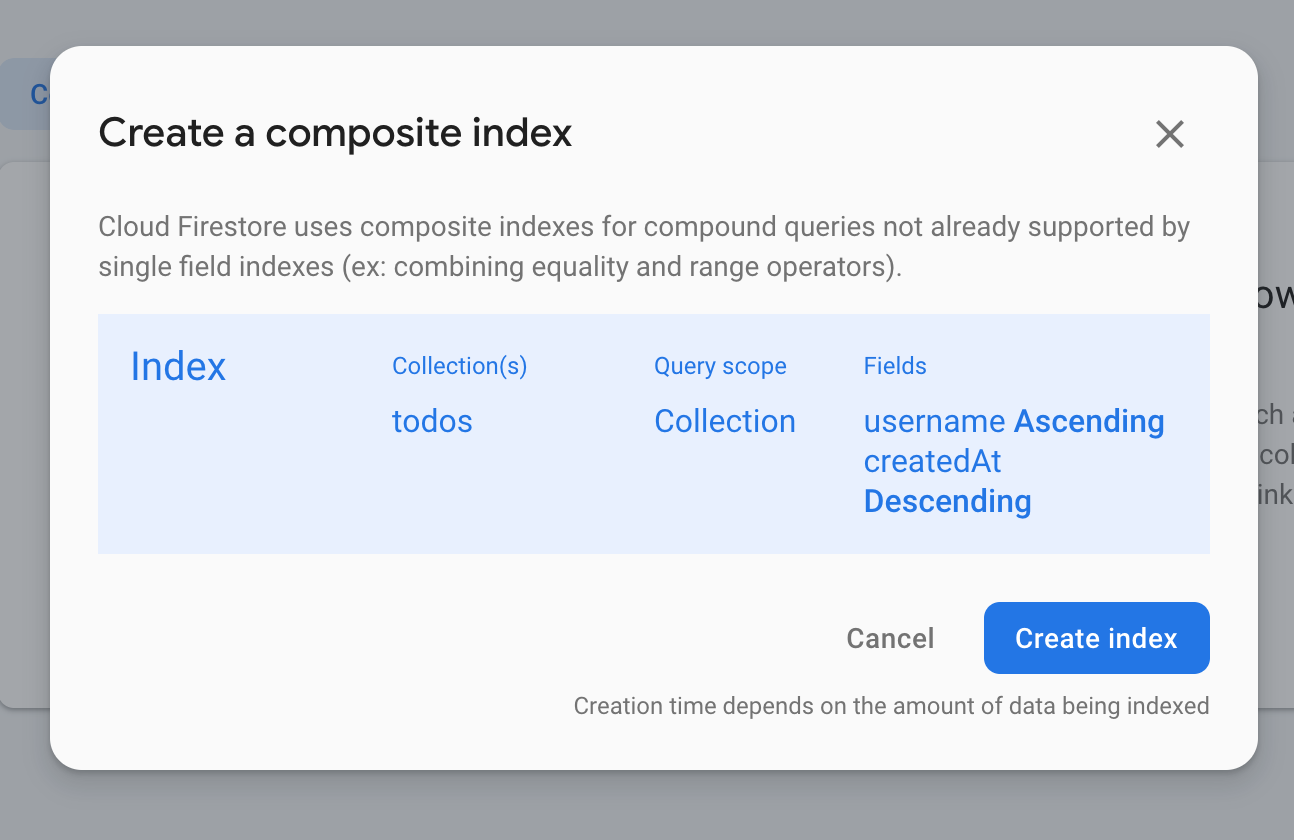
색인이 작성되면 요청을 다시 보내면 다음과 같은 출력이 표시됩니다.
[
   {
      "todoId": "......",
      "title": "......",
      "username": "......",
      "body": "......",
      "createdAt": "2020-03-30T13:01:58.478Z"
   }
]
3. Todo API 삭제 : todos.js를 열고 deleteTodo 메소드에서 다음 조건을 추가하십시오. ! doc.exists 조건 아래 document.get().then() 쿼리 안에 이 조건을 추가하십시오.
..
if(doc.data().username !== request.user.username){
     return response.status(403).json({error:"UnAuthorized"})
}
지금까지의 디렉토리 구조 :
+-- firebase.json
+-- functions
|   +-- API
|   +-- +-- todos.js
|   +-- +-- users.js
|   +-- util
|   +-- +-- admin.js
|   +-- +-- auth.js
|   +-- +-- validators.js
|   +-- index.js
|   +-- node_modules
|   +-- package-lock.json
|   +-- package.json
|   +-- .gitignore
이것으로 API 백엔드를 완성했습니다. 휴식을 취하고 커피를 마시고 그 후에 우리는 응용 프로그램의 프런트 엔드를 구축하기 시작합니다
섹션 3 : 사용자 대시 보드
이 섹션에서는 다음 구성 요소를 개발할 것입니다.
이 섹션에서 구현 된 사용자 대시 보드 코드는 이 커밋에서 찾을 수 있습니다.
1. ReactJS 및 Material UI를 설정합니다 :
create-react-app 템플릿을 사용합니다. 응용 프로그램 개발을위한 기본 구조를 제공합니다. 설치하려면 다음 명령을 사용하십시오.
npm install -g create-react-app함수 디렉토리가 있는 프로젝트의 루트 폴더로 이동하십시오. 다음 명령을 사용하여 프런트 엔드 응용 프로그램을 초기화하십시오.
create-react-app viewReactJS 라이브러리 버전 v16.13.1을 사용해야 합니다.
설치가 완료되면 명령 행 로그에 다음이 표시됩니다.
cd view
  npm start
Happy hacking!
이를 통해 React 애플리케이션을 구성했습니다. 다음과 같은 디렉토리 구조를 얻게 됩니다.
+-- firebase.json
+-- functions { This Directory consists our API logic }
+-- view { This Directory consists our FrontEnd Compoenents }
+-- .firebaserc
+-- .gitignore
이제 npm start 명령을 사용하여 응용 프로그램을 실행하십시오. http : // localhost : 3000 /의 브라우저로 이동하면 다음 출력이 표시됩니다.
이제 불필요한 구성 요소를 모두 제거합니다. 보기 디렉토리로 이동 한 후 앞에 [제거]가있는 모든 파일을 제거하십시오. 이에 대해서는 아래의 디렉토리 트리 구조를 참조하십시오.
+-- README.md [ Remove ]
+-- package-lock.json
+-- package.json
+-- node_modules
+-- .gitignore
+-- public
|   +-- favicon.ico [ Remove ]
|   +-- index.html
|   +-- logo192.png [ Remove ]
|   +-- logo512.png [ Remove ]
|   +-- manifest.json
|   +-- robots.txt
+-- src
|   +-- App.css
|   +-- App.test.js
|   +-- index.js
|   +-- serviceWorker.js
|   +-- App.js
|   +-- index.css [ Remove ]
|   +-- logo.svg [ Remove ]
|   +-- setupTests.js
공용 디렉토리에서 index.html로 이동하여 다음 행을 제거하십시오.
<link rel="icon" href="%PUBLIC_URL%/favicon.ico" />
<link rel="apple-touch-icon" href="%PUBLIC_URL%/logo192.png" />
<link rel="manifest" href="%PUBLIC_URL%/manifest.json" />
이제 src 디렉토리 아래의 App.js로 이동하여 이전 코드를 다음 코드로 바꿉니다.
import React from 'react';
function App() {
  return (
    <div>
    </div>
  );
}
export default App;
index.js로 이동하여 다음 가져 오기를 제거하십시오.
import './index.css'App.css를 삭제하지 않았으며 이 응용 프로그램에서 사용하고 있습니다. 그러나 삭제하거나 사용하려면 자유롭게 할 수 있습니다.
http : // localhost : 3000 /의 브라우저로 이동하면 빈 화면이 출력 됩니다.
머티리얼 UI를 설치하려면 뷰 디렉토리로 이동하여 터미널에서 이 명령을 복사하여 붙여 넣습니다.
npm install @material-ui/core머티리얼 UI 라이브러리 버전 v4.9.8을 사용해야 합니다.
2. 로그인 양식 :
로그인 양식을 개발하려면 App.js로 이동하십시오. App.js 맨 위에 다음 가져 오기를 추가하십시오.
import { BrowserRouter as Router, Route, Switch } from 'react-router-dom';
import login from './pages/login';
우리는 TodoApp에 경로를 할당하기 위해 스위치 및 경로를 사용하고 있습니다. 지금은 / login 라우트 만 추가하고 로그인 구성 요소를 지정합니다.
// App.js

<Router>
    <div>
       <Switch>
           <Route exact path="/login" component={login}/>
       </Switch>
    </div>
</Router>
기존 보기 디렉토리 아래에 pages 디렉토리를 작성하고 pages 디렉토리 아래에 login.js라는 파일을 작성하십시오.
우리는 login.js에 머티리얼 UI 컴포넌트와 Axios 패키지를 가져옵니다 :
// login.js

// Material UI components
import React, { Component } from 'react';
import Avatar from '@material-ui/core/Avatar';
import Button from '@material-ui/core/Button';
import CssBaseline from '@material-ui/core/CssBaseline';
import TextField from '@material-ui/core/TextField';
import Link from '@material-ui/core/Link';
import Grid from '@material-ui/core/Grid';
import LockOutlinedIcon from '@material-ui/icons/LockOutlined';
import Typography from '@material-ui/core/Typography';
import withStyles from '@material-ui/core/styles/withStyles';
import Container from '@material-ui/core/Container';
import CircularProgress from '@material-ui/core/CircularProgress';

import axios from 'axios';
로그인 페이지에 다음 스타일을 추가합니다.
// login.js

const styles = (theme) => ({
	paper: {
		marginTop: theme.spacing(8),
		display: 'flex',
		flexDirection: 'column',
		alignItems: 'center'
	},
	avatar: {
		margin: theme.spacing(1),
		backgroundColor: theme.palette.secondary.main
	},
	form: {
		width: '100%',
		marginTop: theme.spacing(1)
	},
	submit: {
		margin: theme.spacing(3, 0, 2)
	},
	customError: {
		color: 'red',
		fontSize: '0.8rem',
		marginTop: 10
	},
	progess: {
		position: 'absolute'
	}
});
우리는 폼을 가진 login 클래스를 만들고 그 안에 제출 핸들러를 제출할 것입니다.
// login.js

class login extends Component {
	constructor(props) {
		super(props);

		this.state = {
			email: '',
			password: '',
			errors: [],
			loading: false
		};
	}

	componentWillReceiveProps(nextProps) {
		if (nextProps.UI.errors) {
			this.setState({
				errors: nextProps.UI.errors
			});
		}
	}

	handleChange = (event) => {
		this.setState({
			[event.target.name]: event.target.value
		});
	};

	handleSubmit = (event) => {
		event.preventDefault();
		this.setState({ loading: true });
		const userData = {
			email: this.state.email,
			password: this.state.password
		};
		axios
			.post('/login', userData)
			.then((response) => {
				localStorage.setItem('AuthToken', `Bearer ${response.data.token}`);
				this.setState({
					loading: false,
				});
				this.props.history.push('/');
			})
			.catch((error) => {
				this.setState({
					errors: error.response.data,
					loading: false
				});
			});
	};

	render() {
		const { classes } = this.props;
		const { errors, loading } = this.state;
		return (
			<Container component="main" maxWidth="xs">
				<CssBaseline />
				<div className={classes.paper}>
					<Avatar className={classes.avatar}>
						<LockOutlinedIcon />
					</Avatar>
					<Typography component="h1" variant="h5">
						Login
					</Typography>
					<form className={classes.form} noValidate>
						<TextField
							variant="outlined"
							margin="normal"
							required
							fullWidth
							id="email"
							label="Email Address"
							name="email"
							autoComplete="email"
							autoFocus
							helperText={errors.email}
							error={errors.email ? true : false}
							onChange={this.handleChange}
						/>
						<TextField
							variant="outlined"
							margin="normal"
							required
							fullWidth
							name="password"
							label="Password"
							type="password"
							id="password"
							autoComplete="current-password"
							helperText={errors.password}
							error={errors.password ? true : false}
							onChange={this.handleChange}
						/>
						<Button
							type="submit"
							fullWidth
							variant="contained"
							color="primary"
							className={classes.submit}
							onClick={this.handleSubmit}
							disabled={loading || !this.state.email || !this.state.password}
						>
							Sign In
							{loading && <CircularProgress size={30} className={classes.progess} />}
						</Button>
						<Grid container>
							<Grid item>
								<Link href="signup" variant="body2">
									{"Don't have an account? Sign Up"}
								</Link>
							</Grid>
						</Grid>
						{errors.general && (
							<Typography variant="body2" className={classes.customError}>
								{errors.general}
							</Typography>
						)}
					</form>
				</div>
			</Container>
		);
	}
}
이 파일의 끝에 다음 내보내기를 추가하십시오.
export default withStyles(styles)(login);firebase 함수 URL을 추가하여 다음과 같이> package.json을 봅니다.
기억하십시오 : 기존 browserslist JSON 객체 아래에 proxy라는 키를 추가하십시오.
"proxy": "https://<region-name>-todoapp-<id>.cloudfunctions.net/api"다음 명령을 사용하여 Axios 및 재료 아이콘 패키지를 설치하십시오.
// Axios command:
npm i axios
// Material Icons:
npm install @material-ui/icons
App.js에 로그인 경로를 추가했습니다. login.js에서 상태를 처리하고 Axios 패키지를 사용하여 로그인 API에 게시 요청을 보내는 클래스 구성 요소를 만들었습니다. 요청이 성공하면 토큰을 저장합니다. 응답에 오류가 발생하면 단순히 UI에서 오류를 렌더링 합니다.
http : // localhost : 3000 / login의 브라우저로 이동하면 다음 로그인 UI가 표시됩니다.
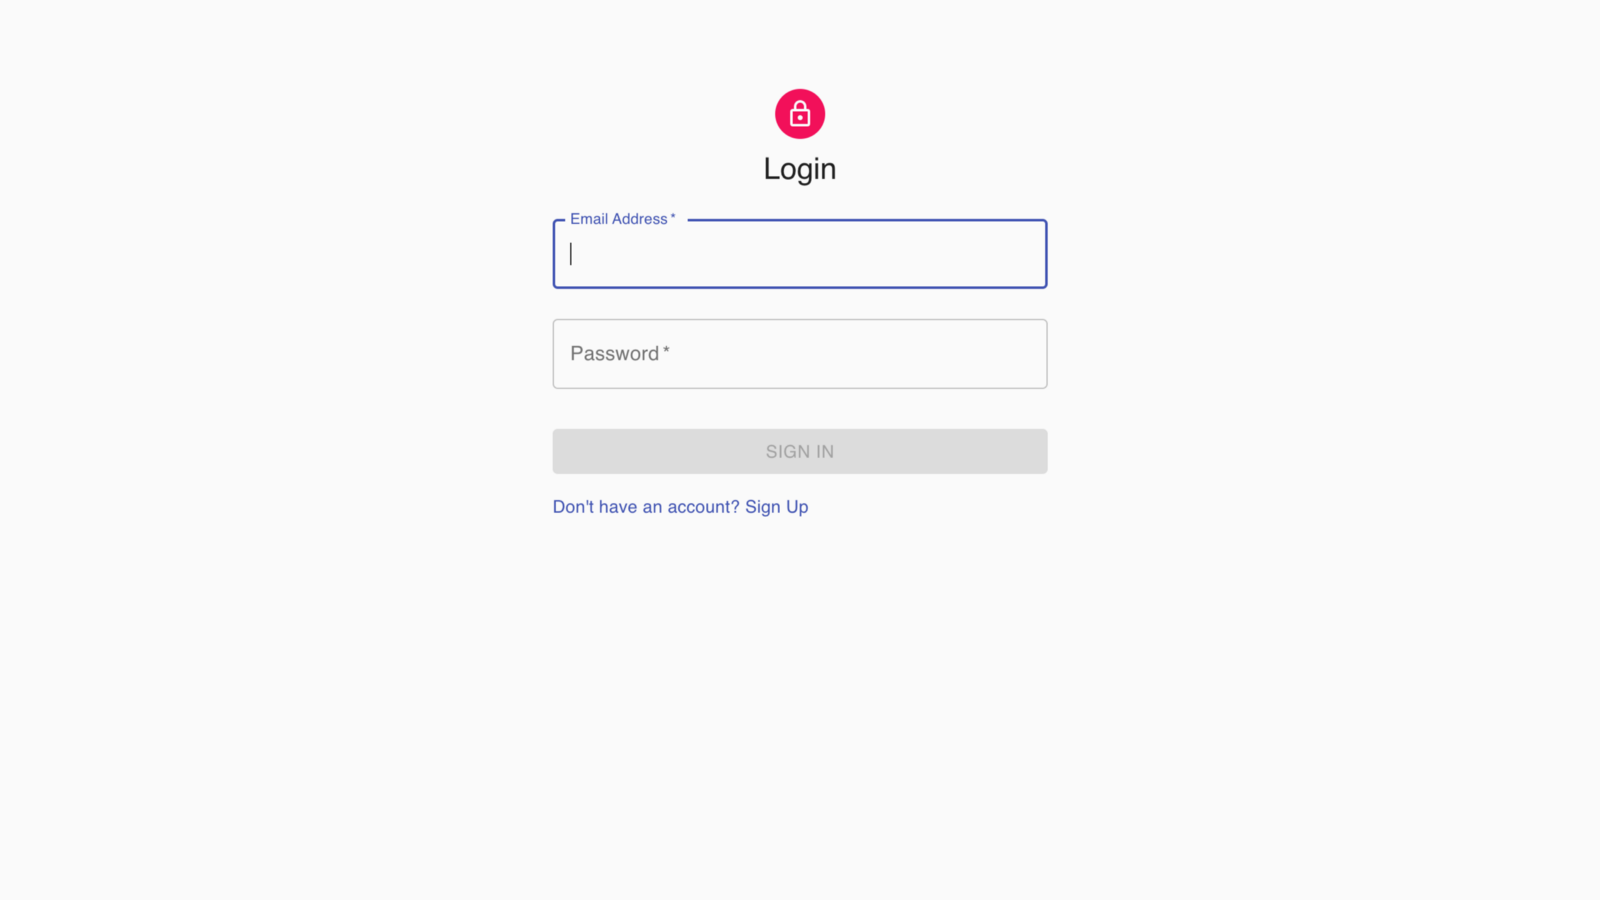
로그인 페이지
잘못된 자격 증명을 작성하거나 빈 요청을 보내면 오류가 발생합니다. 유효한 요청을 보내십시오. 개발자 콘솔> 애플리케이션으로 이동하십시오. 사용자 토큰이 로컬 스토리지에 저장되어 있음을 알 수 있습니다. 로그인에 성공하면 홈 페이지로 다시 라우팅됩니다.
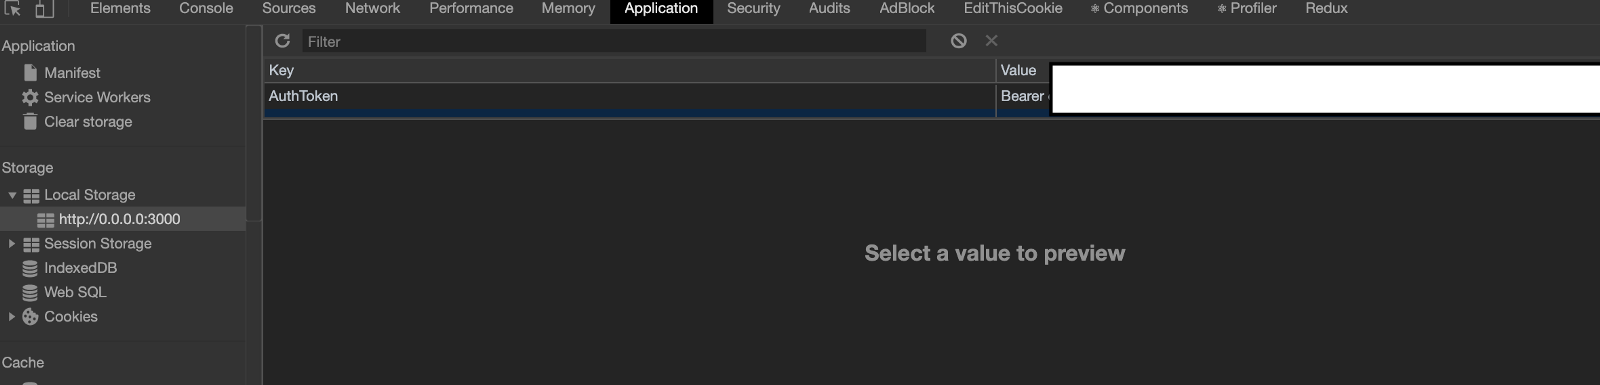
구글 크롬 개발자 콘솔
3. 가입 양식 :
가입 양식을 개발하려면 App.js로 이동하여 기존 행 구성 요소를 아래 줄로 업데이트하십시오.
// App.js

<Route exact path="/signup" component={signup}/>
가져 오는 것을 잊지 마십시오 :
// App.js

import signup from './pages/signup';
pages 디렉토리 아래에 signup.js라는 파일을 작성하십시오.
signup.js 안에 머티리얼 UI 및 Axios 패키지를 가져옵니다 :
// signup.js

import React, { Component } from 'react';
import Avatar from '@material-ui/core/Avatar';
import Button from '@material-ui/core/Button';
import CssBaseline from '@material-ui/core/CssBaseline';
import TextField from '@material-ui/core/TextField';
import Link from '@material-ui/core/Link';
import Grid from '@material-ui/core/Grid';
import LockOutlinedIcon from '@material-ui/icons/LockOutlined';
import Typography from '@material-ui/core/Typography';
import Container from '@material-ui/core/Container';
import withStyles from '@material-ui/core/styles/withStyles';
import CircularProgress from '@material-ui/core/CircularProgress';

import axios from 'axios';
가입 페이지에 다음 스타일을 추가합니다.
// signup.js


const styles = (theme) => ({
	paper: {
		marginTop: theme.spacing(8),
		display: 'flex',
		flexDirection: 'column',
		alignItems: 'center'
	},
	avatar: {
		margin: theme.spacing(1),
		backgroundColor: theme.palette.secondary.main
	},
	form: {
		width: '100%', // Fix IE 11 issue.
		marginTop: theme.spacing(3)
	},
	submit: {
		margin: theme.spacing(3, 0, 2)
	},
	progess: {
		position: 'absolute'
	}
});
양식이 있는 signup이라는 클래스를 작성하고 그 안에 제출 핸들러를 제출합니다.
// signup.js

class signup extends Component {
	constructor(props) {
		super(props);

		this.state = {
			firstName: '',
			lastName: '',
			phoneNumber: '',
			country: '',
			username: '',
			email: '',
			password: '',
			confirmPassword: '',
			errors: [],
			loading: false
		};
	}

	componentWillReceiveProps(nextProps) {
		if (nextProps.UI.errors) {
			this.setState({
				errors: nextProps.UI.errors
			});
		}
	}

	handleChange = (event) => {
		this.setState({
			[event.target.name]: event.target.value
		});
	};

	handleSubmit = (event) => {
		event.preventDefault();
		this.setState({ loading: true });
		const newUserData = {
			firstName: this.state.firstName,
			lastName: this.state.lastName,
			phoneNumber: this.state.phoneNumber,
			country: this.state.country,
			username: this.state.username,
			email: this.state.email,
			password: this.state.password,
			confirmPassword: this.state.confirmPassword
		};
		axios
			.post('/signup', newUserData)
			.then((response) => {
				localStorage.setItem('AuthToken', `${response.data.token}`);
				this.setState({
					loading: false,
				});
				this.props.history.push('/');
			})
			.catch((error) => {
				this.setState({
					errors: error.response.data,
					loading: false
				});
			});
	};

	render() {
		const { classes } = this.props;
		const { errors, loading } = this.state;
		return (
			<Container component="main" maxWidth="xs">
				<CssBaseline />
				<div className={classes.paper}>
					<Avatar className={classes.avatar}>
						<LockOutlinedIcon />
					</Avatar>
					<Typography component="h1" variant="h5">
						Sign up
					</Typography>
					<form className={classes.form} noValidate>
						<Grid container spacing={2}>
							<Grid item xs={12} sm={6}>
								<TextField
									variant="outlined"
									required
									fullWidth
									id="firstName"
									label="First Name"
									name="firstName"
									autoComplete="firstName"
									helperText={errors.firstName}
									error={errors.firstName ? true : false}
									onChange={this.handleChange}
								/>
							</Grid>
							<Grid item xs={12} sm={6}>
								<TextField
									variant="outlined"
									required
									fullWidth
									id="lastName"
									label="Last Name"
									name="lastName"
									autoComplete="lastName"
									helperText={errors.lastName}
									error={errors.lastName ? true : false}
									onChange={this.handleChange}
								/>
							</Grid>

							<Grid item xs={12} sm={6}>
								<TextField
									variant="outlined"
									required
									fullWidth
									id="username"
									label="User Name"
									name="username"
									autoComplete="username"
									helperText={errors.username}
									error={errors.username ? true : false}
									onChange={this.handleChange}
								/>
							</Grid>

							<Grid item xs={12} sm={6}>
								<TextField
									variant="outlined"
									required
									fullWidth
									id="phoneNumber"
									label="Phone Number"
									name="phoneNumber"
									autoComplete="phoneNumber"
									pattern="[7-9]{1}[0-9]{9}"
									helperText={errors.phoneNumber}
									error={errors.phoneNumber ? true : false}
									onChange={this.handleChange}
								/>
							</Grid>

							<Grid item xs={12}>
								<TextField
									variant="outlined"
									required
									fullWidth
									id="email"
									label="Email Address"
									name="email"
									autoComplete="email"
									helperText={errors.email}
									error={errors.email ? true : false}
									onChange={this.handleChange}
								/>
							</Grid>

							<Grid item xs={12}>
								<TextField
									variant="outlined"
									required
									fullWidth
									id="country"
									label="Country"
									name="country"
									autoComplete="country"
									helperText={errors.country}
									error={errors.country ? true : false}
									onChange={this.handleChange}
								/>
							</Grid>

							<Grid item xs={12}>
								<TextField
									variant="outlined"
									required
									fullWidth
									name="password"
									label="Password"
									type="password"
									id="password"
									autoComplete="current-password"
									helperText={errors.password}
									error={errors.password ? true : false}
									onChange={this.handleChange}
								/>
							</Grid>
							<Grid item xs={12}>
								<TextField
									variant="outlined"
									required
									fullWidth
									name="confirmPassword"
									label="Confirm Password"
									type="password"
									id="confirmPassword"
									autoComplete="current-password"
									onChange={this.handleChange}
								/>
							</Grid>
						</Grid>
						<Button
							type="submit"
							fullWidth
							variant="contained"
							color="primary"
							className={classes.submit}
							onClick={this.handleSubmit}
                            disabled={loading ||
                                !this.state.email ||
                                !this.state.password ||
                                !this.state.firstName ||
                                !this.state.lastName ||
                                !this.state.country ||
                                !this.state.username ||
                                !this.state.phoneNumber}
						>
							Sign Up
							{loading && <CircularProgress size={30} className={classes.progess} />}
						</Button>
						<Grid container justify="flex-end">
							<Grid item>
								<Link href="login" variant="body2">
									Already have an account? Sign in
								</Link>
							</Grid>
						</Grid>
					</form>
				</div>
			</Container>
		);
	}
}
이 파일의 끝에 다음 내보내기를 추가하십시오.
export default withStyles(styles)(signup);Signup 구성 요소의 논리는 로그인 구성 요소와 동일합니다. http : // localhost : 3000 / signup의 브라우저로 이동하면 다음과 같은 가입 UI가 표시됩니다. 가입이 완료되면 홈 페이지로 다시 라우팅 됩니다.
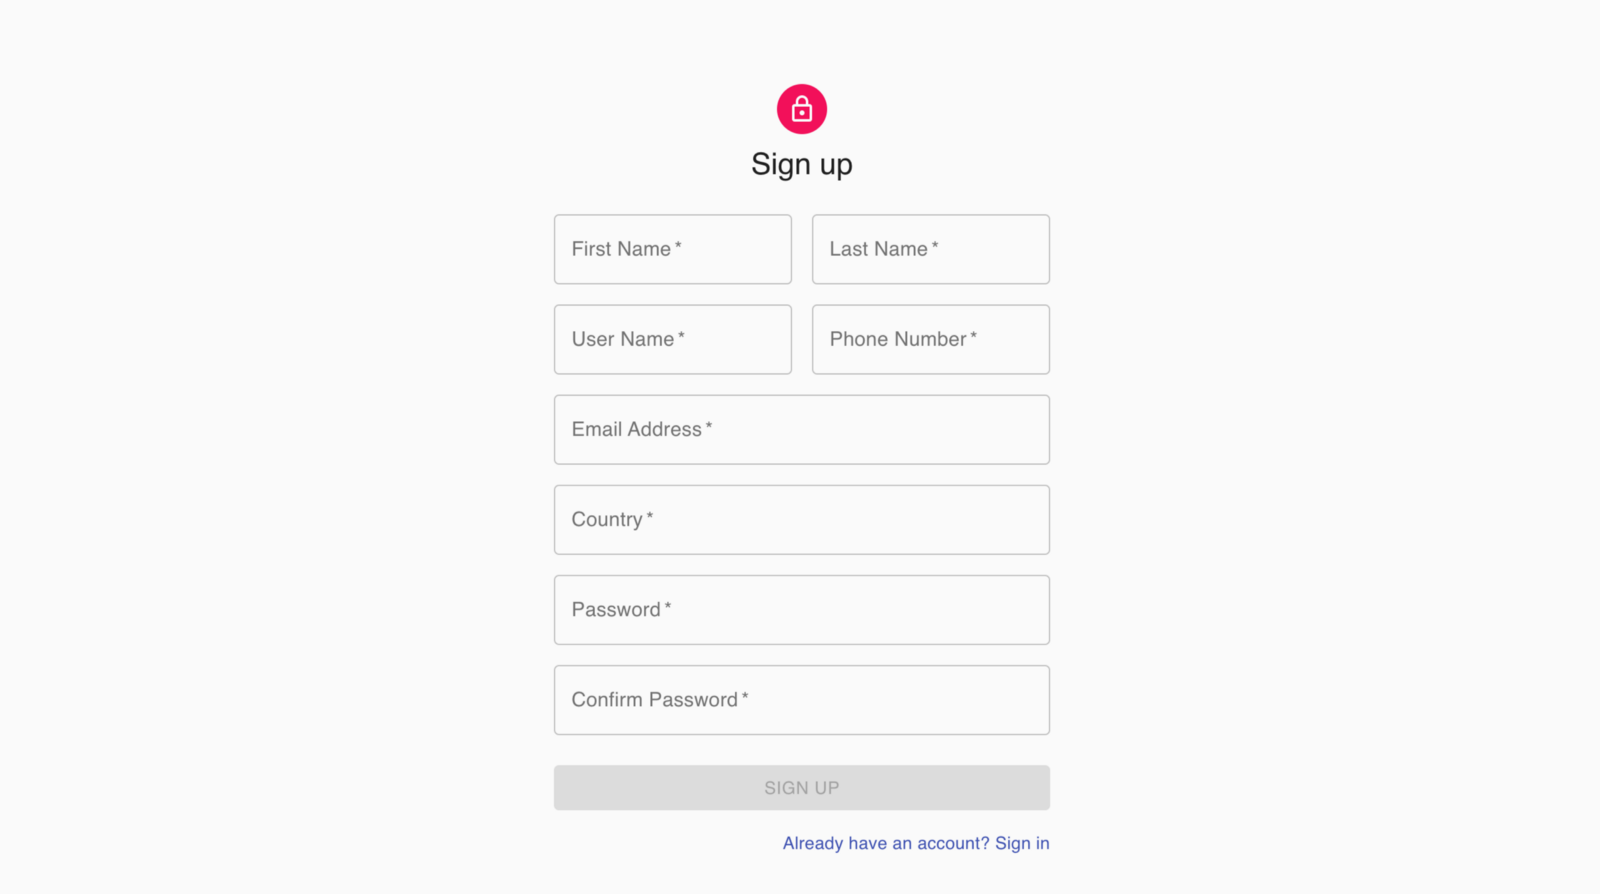
가입 양식
잘못된 자격 증명을 작성하거나 빈 요청을 보내면 오류가 발생합니다. 유효한 요청을 보내십시오. 개발자 콘솔> 애플리케이션으로 이동하십시오. 사용자 토큰이 로컬 스토리지에 저장되어 있음을 알 수 있습니다.

크롬 개발자 콘솔
4. 계정 섹션 :
계정 페이지를 작성하려면 먼저 계정 섹션을 로드 할 홈 페이지를 작성해야 합니다. App.js로 이동하여 다음 경로를 업데이트하십시오.
// App.js

<Route exact path="/" component={home}/>
가져오기를 잊지 마십시오 :
// App.js

import home from './pages/home';
home.js라는 새 파일을 작성하십시오. 이 파일은 응용 프로그램의 색인이 됩니다. 계정 및 할 일 섹션은 버튼 클릭을 기준으로 이 페이지에 로드됩니다.
머티리얼 UI 패키지, Axios 패키지, 커스텀 계정, 할 일 컴포넌트 및 인증 미들웨어를 가져옵니다.
// home.js

import React, { Component } from 'react';
import axios from 'axios';

import Account from '../components/account';
import Todo from '../components/todo';

import Drawer from '@material-ui/core/Drawer';
import AppBar from '@material-ui/core/AppBar';
import CssBaseline from '@material-ui/core/CssBaseline';
import Toolbar from '@material-ui/core/Toolbar';
import List from '@material-ui/core/List';
import Typography from '@material-ui/core/Typography';
import Divider from '@material-ui/core/Divider';
import ListItem from '@material-ui/core/ListItem';
import ListItemIcon from '@material-ui/core/ListItemIcon';
import ListItemText from '@material-ui/core/ListItemText';
import withStyles from '@material-ui/core/styles/withStyles';
import AccountBoxIcon from '@material-ui/icons/AccountBox';
import NotesIcon from '@material-ui/icons/Notes';
import Avatar from '@material-ui/core/avatar';
import ExitToAppIcon from '@material-ui/icons/ExitToApp';
import CircularProgress from '@material-ui/core/CircularProgress';

import { authMiddleWare } from '../util/auth'
drawerWidth를 다음과 같이 설정합니다.
const drawerWidth = 240;홈페이지에 다음 스타일을 추가 할 것입니다.
const styles = (theme) => ({
	root: {
		display: 'flex'
	},
	appBar: {
		zIndex: theme.zIndex.drawer + 1
	},
	drawer: {
		width: drawerWidth,
		flexShrink: 0
	},
	drawerPaper: {
		width: drawerWidth
	},
	content: {
		flexGrow: 1,
		padding: theme.spacing(3)
	},
	avatar: {
		height: 110,
		width: 100,
		flexShrink: 0,
		flexGrow: 0,
		marginTop: 20
	},
	uiProgess: {
		position: 'fixed',
		zIndex: '1000',
		height: '31px',
		width: '31px',
		left: '50%',
		top: '35%'
	},
	toolbar: theme.mixins.toolbar
});
우리는 home이라는 클래스를 만들 것입니다. 이 클래스에는 사용자의 프로필 사진, 이름 및 성을 얻기 위한 API 호출이 있습니다. 또한 Todo 또는 Account 중에서 표시 할 구성 요소를 선택하는 논리가 있습니다.
class home extends Component {
	state = {
		render: false
	};

	loadAccountPage = (event) => {
		this.setState({ render: true });
	};

	loadTodoPage = (event) => {
		this.setState({ render: false });
	};

	logoutHandler = (event) => {
		localStorage.removeItem('AuthToken');
		this.props.history.push('/login');
	};

	constructor(props) {
		super(props);

		this.state = {
			firstName: '',
			lastName: '',
			profilePicture: '',
			uiLoading: true,
			imageLoading: false
		};
	}

	componentWillMount = () => {
		authMiddleWare(this.props.history);
		const authToken = localStorage.getItem('AuthToken');
		axios.defaults.headers.common = { Authorization: `${authToken}` };
		axios
			.get('/user')
			.then((response) => {
				console.log(response.data);
				this.setState({
					firstName: response.data.userCredentials.firstName,
					lastName: response.data.userCredentials.lastName,
					email: response.data.userCredentials.email,
					phoneNumber: response.data.userCredentials.phoneNumber,
					country: response.data.userCredentials.country,
					username: response.data.userCredentials.username,
					uiLoading: false,
					profilePicture: response.data.userCredentials.imageUrl
				});
			})
			.catch((error) => {
				if(error.response.status === 403) {
					this.props.history.push('/login')
				}
				console.log(error);
				this.setState({ errorMsg: 'Error in retrieving the data' });
			});
	};

	render() {
		const { classes } = this.props;
		if (this.state.uiLoading === true) {
			return (
				<div className={classes.root}>
					{this.state.uiLoading && <CircularProgress size={150} className={classes.uiProgess} />}
				</div>
			);
		} else {
			return (
				<div className={classes.root}>
					<CssBaseline />
					<AppBar position="fixed" className={classes.appBar}>
						<Toolbar>
							<Typography variant="h6" noWrap>
								TodoApp
							</Typography>
						</Toolbar>
					</AppBar>
					<Drawer
						className={classes.drawer}
						variant="permanent"
						classes={{
							paper: classes.drawerPaper
						}}
					>
						<div className={classes.toolbar} />
						<Divider />
						<center>
							<Avatar src={this.state.profilePicture} className={classes.avatar} />
							<p>
								{' '}
								{this.state.firstName} {this.state.lastName}
							</p>
						</center>
						<Divider />
						<List>
							<ListItem button key="Todo" onClick={this.loadTodoPage}>
								<ListItemIcon>
									{' '}
									<NotesIcon />{' '}
								</ListItemIcon>
								<ListItemText primary="Todo" />
							</ListItem>

							<ListItem button key="Account" onClick={this.loadAccountPage}>
								<ListItemIcon>
									{' '}
									<AccountBoxIcon />{' '}
								</ListItemIcon>
								<ListItemText primary="Account" />
							</ListItem>

							<ListItem button key="Logout" onClick={this.logoutHandler}>
								<ListItemIcon>
									{' '}
									<ExitToAppIcon />{' '}
								</ListItemIcon>
								<ListItemText primary="Logout" />
							</ListItem>
						</List>
					</Drawer>

					<div>{this.state.render ? <Account /> : <Todo />}</div>
				</div>
			);
		}
	}
}
여기 코드에서 authMiddleWare (this.props.history); 사용. 이 미들웨어는 authToken이 널인지 확인합니다. 그렇다면 사용자를 login.js로 다시 푸시 합니다. 사용자가 가입하거나 로그인하지 않고 / 라우트에 액세스 할 수 없도록 추가되었습니다.이 파일의 끝에 다음 내보내기를 추가하십시오.
export default withStyles(styles)(home);이제 home.js의이 코드가 무엇을 하는지 궁금하십니까?
<div>{this.state.render ? <Account /> : <Todo />}</div>버튼 클릭시 설정 중인 렌더 상태를 확인하고 있습니다. 컴포넌트 디렉토리를 작성하고 해당 디렉토리 아래에 account.js 및 todo.js라는 두 개의 파일을 작성하십시오.
해당 디렉토리 아래에 util이라는 디렉토리와 auth.js라는 파일을 만듭니다. auth.js 아래에 다음 코드를 복사하여 붙여 넣습니다.
export const authMiddleWare = (history) => {
    const authToken = localStorage.getItem('AuthToken');
    if(authToken === null){
        history.push('/login')
    }
}
todo.js 파일에 들어가기 위해 Hello to todo라는 텍스트를 렌더링 하는 클래스를 작성합니다. 다음 섹션에서 해야 할 일을 다룰 것입니다.
import React, { Component } from 'react'

import withStyles from '@material-ui/core/styles/withStyles';
import Typography from '@material-ui/core/Typography';

const styles = ((theme) => ({
    content: {
        flexGrow: 1,
        padding: theme.spacing(3),
    },
    toolbar: theme.mixins.toolbar,
    })
);

class todo extends Component {
    render() {
        const { classes } = this.props;
        return (
            <main className={classes.content}>
            <div className={classes.toolbar} />
            <Typography paragraph>
                Hello I am todo
            </Typography>
            </main>
        )
    }
}

export default (withStyles(styles)(todo));
이제 계정 섹션의 시간입니다. account.js에서 Material UI, clsx, axios 및 authmiddleWare 유틸리티를 가져옵니다.
// account.js

import React, { Component } from 'react';

import withStyles from '@material-ui/core/styles/withStyles';
import Typography from '@material-ui/core/Typography';
import CircularProgress from '@material-ui/core/CircularProgress';
import CloudUploadIcon from '@material-ui/icons/CloudUpload';
import { Card, CardActions, CardContent, Divider, Button, Grid, TextField } from '@material-ui/core';

import clsx from 'clsx';

import axios from 'axios';
import { authMiddleWare } from '../util/auth';
계정 페이지에 다음 스타일을 추가합니다.
// account.js

const styles = (theme) => ({
	content: {
		flexGrow: 1,
		padding: theme.spacing(3)
	},
	toolbar: theme.mixins.toolbar,
	root: {},
	details: {
		display: 'flex'
	},
	avatar: {
		height: 110,
		width: 100,
		flexShrink: 0,
		flexGrow: 0
	},
	locationText: {
		paddingLeft: '15px'
	},
	buttonProperty: {
		position: 'absolute',
		top: '50%'
	},
	uiProgess: {
		position: 'fixed',
		zIndex: '1000',
		height: '31px',
		width: '31px',
		left: '50%',
		top: '35%'
	},
	progess: {
		position: 'absolute'
	},
	uploadButton: {
		marginLeft: '8px',
		margin: theme.spacing(1)
	},
	customError: {
		color: 'red',
		fontSize: '0.8rem',
		marginTop: 10
	},
	submitButton: {
		marginTop: '10px'
	}
});
account라는 클래스 구성 요소를 만듭니다. 당분간 다음 코드를 복사하여 붙여 넣습니다.
// account.js

class account extends Component {
	constructor(props) {
		super(props);

		this.state = {
			firstName: '',
			lastName: '',
			email: '',
			phoneNumber: '',
			username: '',
			country: '',
			profilePicture: '',
			uiLoading: true,
			buttonLoading: false,
			imageError: ''
		};
	}

	componentWillMount = () => {
		authMiddleWare(this.props.history);
		const authToken = localStorage.getItem('AuthToken');
		axios.defaults.headers.common = { Authorization: `${authToken}` };
		axios
			.get('/user')
			.then((response) => {
				console.log(response.data);
				this.setState({
					firstName: response.data.userCredentials.firstName,
					lastName: response.data.userCredentials.lastName,
					email: response.data.userCredentials.email,
					phoneNumber: response.data.userCredentials.phoneNumber,
					country: response.data.userCredentials.country,
					username: response.data.userCredentials.username,
					uiLoading: false
				});
			})
			.catch((error) => {
				if (error.response.status === 403) {
					this.props.history.push('/login');
				}
				console.log(error);
				this.setState({ errorMsg: 'Error in retrieving the data' });
			});
	};

	handleChange = (event) => {
		this.setState({
			[event.target.name]: event.target.value
		});
	};

	handleImageChange = (event) => {
		this.setState({
			image: event.target.files[0]
		});
	};

	profilePictureHandler = (event) => {
		event.preventDefault();
		this.setState({
			uiLoading: true
		});
		authMiddleWare(this.props.history);
		const authToken = localStorage.getItem('AuthToken');
		let form_data = new FormData();
		form_data.append('image', this.state.image);
		form_data.append('content', this.state.content);
		axios.defaults.headers.common = { Authorization: `${authToken}` };
		axios
			.post('/user/image', form_data, {
				headers: {
					'content-type': 'multipart/form-data'
				}
			})
			.then(() => {
				window.location.reload();
			})
			.catch((error) => {
				if (error.response.status === 403) {
					this.props.history.push('/login');
				}
				console.log(error);
				this.setState({
					uiLoading: false,
					imageError: 'Error in posting the data'
				});
			});
	};

	updateFormValues = (event) => {
		event.preventDefault();
		this.setState({ buttonLoading: true });
		authMiddleWare(this.props.history);
		const authToken = localStorage.getItem('AuthToken');
		axios.defaults.headers.common = { Authorization: `${authToken}` };
		const formRequest = {
			firstName: this.state.firstName,
			lastName: this.state.lastName,
			country: this.state.country
		};
		axios
			.post('/user', formRequest)
			.then(() => {
				this.setState({ buttonLoading: false });
			})
			.catch((error) => {
				if (error.response.status === 403) {
					this.props.history.push('/login');
				}
				console.log(error);
				this.setState({
					buttonLoading: false
				});
			});
	};

	render() {
		const { classes, ...rest } = this.props;
		if (this.state.uiLoading === true) {
			return (
				<main className={classes.content}>
					<div className={classes.toolbar} />
					{this.state.uiLoading && <CircularProgress size={150} className={classes.uiProgess} />}
				</main>
			);
		} else {
			return (
				<main className={classes.content}>
					<div className={classes.toolbar} />
					<Card {...rest} className={clsx(classes.root, classes)}>
						<CardContent>
							<div className={classes.details}>
								<div>
									<Typography className={classes.locationText} gutterBottom variant="h4">
										{this.state.firstName} {this.state.lastName}
									</Typography>
									<Button
										variant="outlined"
										color="primary"
										type="submit"
										size="small"
										startIcon={<CloudUploadIcon />}
										className={classes.uploadButton}
										onClick={this.profilePictureHandler}
									>
										Upload Photo
									</Button>
									<input type="file" onChange={this.handleImageChange} />

									{this.state.imageError ? (
										<div className={classes.customError}>
											{' '}
											Wrong Image Format || Supported Format are PNG and JPG
										</div>
									) : (
										false
									)}
								</div>
							</div>
							<div className={classes.progress} />
						</CardContent>
						<Divider />
					</Card>

					<br />
					<Card {...rest} className={clsx(classes.root, classes)}>
						<form autoComplete="off" noValidate>
							<Divider />
							<CardContent>
								<Grid container spacing={3}>
									<Grid item md={6} xs={12}>
										<TextField
											fullWidth
											label="First name"
											margin="dense"
											name="firstName"
											variant="outlined"
											value={this.state.firstName}
											onChange={this.handleChange}
										/>
									</Grid>
									<Grid item md={6} xs={12}>
										<TextField
											fullWidth
											label="Last name"
											margin="dense"
											name="lastName"
											variant="outlined"
											value={this.state.lastName}
											onChange={this.handleChange}
										/>
									</Grid>
									<Grid item md={6} xs={12}>
										<TextField
											fullWidth
											label="Email"
											margin="dense"
											name="email"
											variant="outlined"
											disabled={true}
											value={this.state.email}
											onChange={this.handleChange}
										/>
									</Grid>
									<Grid item md={6} xs={12}>
										<TextField
											fullWidth
											label="Phone Number"
											margin="dense"
											name="phone"
											type="number"
											variant="outlined"
											disabled={true}
											value={this.state.phoneNumber}
											onChange={this.handleChange}
										/>
									</Grid>
									<Grid item md={6} xs={12}>
										<TextField
											fullWidth
											label="User Name"
											margin="dense"
											name="userHandle"
											disabled={true}
											variant="outlined"
											value={this.state.username}
											onChange={this.handleChange}
										/>
									</Grid>
									<Grid item md={6} xs={12}>
										<TextField
											fullWidth
											label="Country"
											margin="dense"
											name="country"
											variant="outlined"
											value={this.state.country}
											onChange={this.handleChange}
										/>
									</Grid>
								</Grid>
							</CardContent>
							<Divider />
							<CardActions />
						</form>
					</Card>
					<Button
						color="primary"
						variant="contained"
						type="submit"
						className={classes.submitButton}
						onClick={this.updateFormValues}
						disabled={
							this.state.buttonLoading ||
							!this.state.firstName ||
							!this.state.lastName ||
							!this.state.country
						}
					>
						Save details
						{this.state.buttonLoading && <CircularProgress size={30} className={classes.progess} />}
					</Button>
				</main>
			);
		}
	}
}
이 파일의 끝에 다음 내보내기를 추가하십시오.
export default withStyles(styles)(account);account.js에는 많은 구성 요소가 사용됩니다. 먼저 응용 프로그램이 어떻게 보이는지 봅시다. 그런 다음 사용되는 모든 구성 요소와 사용 이유를 설명하겠습니다.
브라우저로 이동하면 토큰이 만료되면 login 페이지로 리디렉션됩니다. 세부 사항을 추가하고 다시 로그인하십시오. 완료하면 계정 탭으로 이동하여 다음 UI를 찾으십시오.

계정 섹션
계정 섹션에는 3 개의 처리기가 있습니다.
이 3 개의 처리기 외에 스타일이 있는 양식 페이지입니다. 뷰 폴더 내부의 디렉토리 구조는 다음과 같습니다.
+-- public
+-- src
|   +-- components
|   +-- +-- todo.js
|   +-- +-- account.js
|   +-- pages
|   +-- +-- home.js
|   +-- +-- login.js
|   +-- +-- signup.js
|   +-- util
|   +-- +-- auth.js
|   +-- README.md
|   +-- package-lock.json
|   +-- package.json
|   +-- .gitignore
이것으로 계정 대시 보드를 완성했습니다. 이제 커피를 마시고 휴식을 취하고 다음 섹션에서 우리는 Todo Dashboard를 만들 것입니다.
섹션 4 : 할일 대시 보드
이 섹션에서는 Todos 대시 보드의 다음 기능에 대한 UI를 개발할 것입니다.
이 섹션에서 구현 된 Todo 대시 보드 코드는 이 커밋에서 찾을 수 있습니다.
components 디렉토리 아래의 todos.js로 이동하십시오. 기존 가져 오기에 다음 가져 오기를 추가하십시오.
import Button from '@material-ui/core/Button';
import Dialog from '@material-ui/core/Dialog';
import AddCircleIcon from '@material-ui/icons/AddCircle';
import AppBar from '@material-ui/core/AppBar';
import Toolbar from '@material-ui/core/Toolbar';
import IconButton from '@material-ui/core/IconButton';
import CloseIcon from '@material-ui/icons/Close';
import Slide from '@material-ui/core/Slide';
import TextField from '@material-ui/core/TextField';
import Grid from '@material-ui/core/Grid';
import Card from '@material-ui/core/Card';
import CardActions from '@material-ui/core/CardActions';
import CircularProgress from '@material-ui/core/CircularProgress';
import CardContent from '@material-ui/core/CardContent';
import MuiDialogTitle from '@material-ui/core/DialogTitle';
import MuiDialogContent from '@material-ui/core/DialogContent';

import axios from 'axios';
import dayjs from 'dayjs';
import relativeTime from 'dayjs/plugin/relativeTime';
import { authMiddleWare } from '../util/auth';
또한 기존 스타일 구성 요소에 다음 CSS 요소를 추가해야 합니다.
const styles = (theme) => ({
	.., // Existing CSS elements
	title: {
		marginLeft: theme.spacing(2),
		flex: 1
	},
	submitButton: {
		display: 'block',
		color: 'white',
		textAlign: 'center',
		position: 'absolute',
		top: 14,
		right: 10
	},
	floatingButton: {
		position: 'fixed',
		bottom: 0,
		right: 0
	},
	form: {
		width: '98%',
		marginLeft: 13,
		marginTop: theme.spacing(3)
	},
	toolbar: theme.mixins.toolbar,
	root: {
		minWidth: 470
	},
	bullet: {
		display: 'inline-block',
		margin: '0 2px',
		transform: 'scale(0.8)'
	},
	pos: {
		marginBottom: 12
	},
	uiProgess: {
		position: 'fixed',
		zIndex: '1000',
		height: '31px',
		width: '31px',
		left: '50%',
		top: '35%'
	},
	dialogeStyle: {
		maxWidth: '50%'
	},
	viewRoot: {
		margin: 0,
		padding: theme.spacing(2)
	},
	closeButton: {
		position: 'absolute',
		right: theme.spacing(1),
		top: theme.spacing(1),
		color: theme.palette.grey[500]
	}
});
팝업 대화 상자에 대한 전환을 추가합니다 :
const Transition = React.forwardRef(function Transition(props, ref) {
	return <Slide direction="up" ref={ref} {...props} />;
});
기존 작업 관리 클래스를 제거하고 다음 클래스를 복사하여 붙여 넣기 하십시오.
class todo extends Component {
	constructor(props) {
		super(props);

		this.state = {
			todos: '',
			title: '',
			body: '',
			todoId: '',
			errors: [],
			open: false,
			uiLoading: true,
			buttonType: '',
			viewOpen: false
		};

		this.deleteTodoHandler = this.deleteTodoHandler.bind(this);
		this.handleEditClickOpen = this.handleEditClickOpen.bind(this);
		this.handleViewOpen = this.handleViewOpen.bind(this);
	}

	handleChange = (event) => {
		this.setState({
			[event.target.name]: event.target.value
		});
	};

	componentWillMount = () => {
		authMiddleWare(this.props.history);
		const authToken = localStorage.getItem('AuthToken');
		axios.defaults.headers.common = { Authorization: `${authToken}` };
		axios
			.get('/todos')
			.then((response) => {
				this.setState({
					todos: response.data,
					uiLoading: false
				});
			})
			.catch((err) => {
				console.log(err);
			});
	};

	deleteTodoHandler(data) {
		authMiddleWare(this.props.history);
		const authToken = localStorage.getItem('AuthToken');
		axios.defaults.headers.common = { Authorization: `${authToken}` };
		let todoId = data.todo.todoId;
		axios
			.delete(`todo/${todoId}`)
			.then(() => {
				window.location.reload();
			})
			.catch((err) => {
				console.log(err);
			});
	}

	handleEditClickOpen(data) {
		this.setState({
			title: data.todo.title,
			body: data.todo.body,
			todoId: data.todo.todoId,
			buttonType: 'Edit',
			open: true
		});
	}

	handleViewOpen(data) {
		this.setState({
			title: data.todo.title,
			body: data.todo.body,
			viewOpen: true
		});
	}

	render() {
		const DialogTitle = withStyles(styles)((props) => {
			const { children, classes, onClose, ...other } = props;
			return (
				<MuiDialogTitle disableTypography className={classes.root} {...other}>
					<Typography variant="h6">{children}</Typography>
					{onClose ? (
						<IconButton aria-label="close" className={classes.closeButton} onClick={onClose}>
							<CloseIcon />
						</IconButton>
					) : null}
				</MuiDialogTitle>
			);
		});

		const DialogContent = withStyles((theme) => ({
			viewRoot: {
				padding: theme.spacing(2)
			}
		}))(MuiDialogContent);

		dayjs.extend(relativeTime);
		const { classes } = this.props;
		const { open, errors, viewOpen } = this.state;

		const handleClickOpen = () => {
			this.setState({
				todoId: '',
				title: '',
				body: '',
				buttonType: '',
				open: true
			});
		};

		const handleSubmit = (event) => {
			authMiddleWare(this.props.history);
			event.preventDefault();
			const userTodo = {
				title: this.state.title,
				body: this.state.body
			};
			let options = {};
			if (this.state.buttonType === 'Edit') {
				options = {
					url: `/todo/${this.state.todoId}`,
					method: 'put',
					data: userTodo
				};
			} else {
				options = {
					url: '/todo',
					method: 'post',
					data: userTodo
				};
			}
			const authToken = localStorage.getItem('AuthToken');
			axios.defaults.headers.common = { Authorization: `${authToken}` };
			axios(options)
				.then(() => {
					this.setState({ open: false });
					window.location.reload();
				})
				.catch((error) => {
					this.setState({ open: true, errors: error.response.data });
					console.log(error);
				});
		};

		const handleViewClose = () => {
			this.setState({ viewOpen: false });
		};

		const handleClose = (event) => {
			this.setState({ open: false });
		};

		if (this.state.uiLoading === true) {
			return (
				<main className={classes.content}>
					<div className={classes.toolbar} />
					{this.state.uiLoading && <CircularProgress size={150} className={classes.uiProgess} />}
				</main>
			);
		} else {
			return (
				<main className={classes.content}>
					<div className={classes.toolbar} />

					<IconButton
						className={classes.floatingButton}
						color="primary"
						aria-label="Add Todo"
						onClick={handleClickOpen}
					>
						<AddCircleIcon style={{ fontSize: 60 }} />
					</IconButton>
					<Dialog fullScreen open={open} onClose={handleClose} TransitionComponent={Transition}>
						<AppBar className={classes.appBar}>
							<Toolbar>
								<IconButton edge="start" color="inherit" onClick={handleClose} aria-label="close">
									<CloseIcon />
								</IconButton>
								<Typography variant="h6" className={classes.title}>
									{this.state.buttonType === 'Edit' ? 'Edit Todo' : 'Create a new Todo'}
								</Typography>
								<Button
									autoFocus
									color="inherit"
									onClick={handleSubmit}
									className={classes.submitButton}
								>
									{this.state.buttonType === 'Edit' ? 'Save' : 'Submit'}
								</Button>
							</Toolbar>
						</AppBar>

						<form className={classes.form} noValidate>
							<Grid container spacing={2}>
								<Grid item xs={12}>
									<TextField
										variant="outlined"
										required
										fullWidth
										id="todoTitle"
										label="Todo Title"
										name="title"
										autoComplete="todoTitle"
										helperText={errors.title}
										value={this.state.title}
										error={errors.title ? true : false}
										onChange={this.handleChange}
									/>
								</Grid>
								<Grid item xs={12}>
									<TextField
										variant="outlined"
										required
										fullWidth
										id="todoDetails"
										label="Todo Details"
										name="body"
										autoComplete="todoDetails"
										multiline
										rows={25}
										rowsMax={25}
										helperText={errors.body}
										error={errors.body ? true : false}
										onChange={this.handleChange}
										value={this.state.body}
									/>
								</Grid>
							</Grid>
						</form>
					</Dialog>

					<Grid container spacing={2}>
						{this.state.todos.map((todo) => (
							<Grid item xs={12} sm={6}>
								<Card className={classes.root} variant="outlined">
									<CardContent>
										<Typography variant="h5" component="h2">
											{todo.title}
										</Typography>
										<Typography className={classes.pos} color="textSecondary">
											{dayjs(todo.createdAt).fromNow()}
										</Typography>
										<Typography variant="body2" component="p">
											{`${todo.body.substring(0, 65)}`}
										</Typography>
									</CardContent>
									<CardActions>
										<Button size="small" color="primary" onClick={() => this.handleViewOpen({ todo })}>
											{' '}
											View{' '}
										</Button>
										<Button size="small" color="primary" onClick={() => this.handleEditClickOpen({ todo })}>
											Edit
										</Button>
										<Button size="small" color="primary" onClick={() => this.deleteTodoHandler({ todo })}>
											Delete
										</Button>
									</CardActions>
								</Card>
							</Grid>
						))}
					</Grid>

					<Dialog
						onClose={handleViewClose}
						aria-labelledby="customized-dialog-title"
						open={viewOpen}
						fullWidth
						classes={{ paperFullWidth: classes.dialogeStyle }}
					>
						<DialogTitle id="customized-dialog-title" onClose={handleViewClose}>
							{this.state.title}
						</DialogTitle>
						<DialogContent dividers>
							<TextField
								fullWidth
								id="todoDetails"
								name="body"
								multiline
								readonly
								rows={1}
								rowsMax={25}
								value={this.state.body}
								InputProps={{
									disableUnderline: true
								}}
							/>
						</DialogContent>
					</Dialog>
				</main>
			);
		}
	}
}
이 파일의 끝에 다음 내보내기를 추가하십시오.
export default withStyles(styles)(todo);먼저 UI의 작동 방식을 이해 한 후 코드를 이해합니다. 브라우저로 이동하면 다음 UI가 나타납니다.

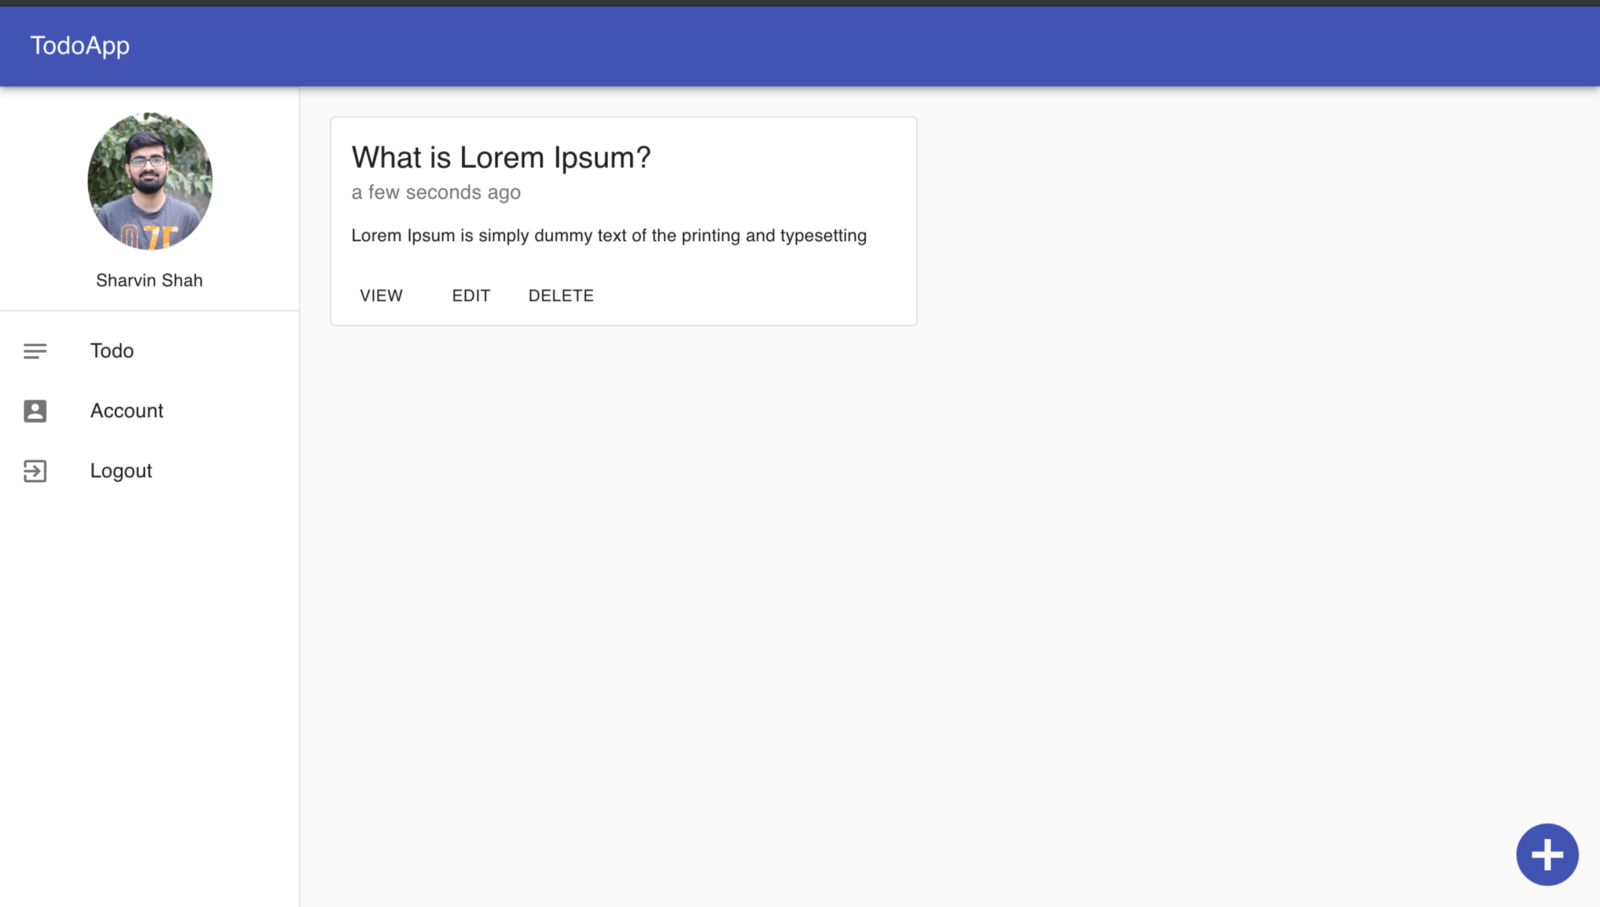
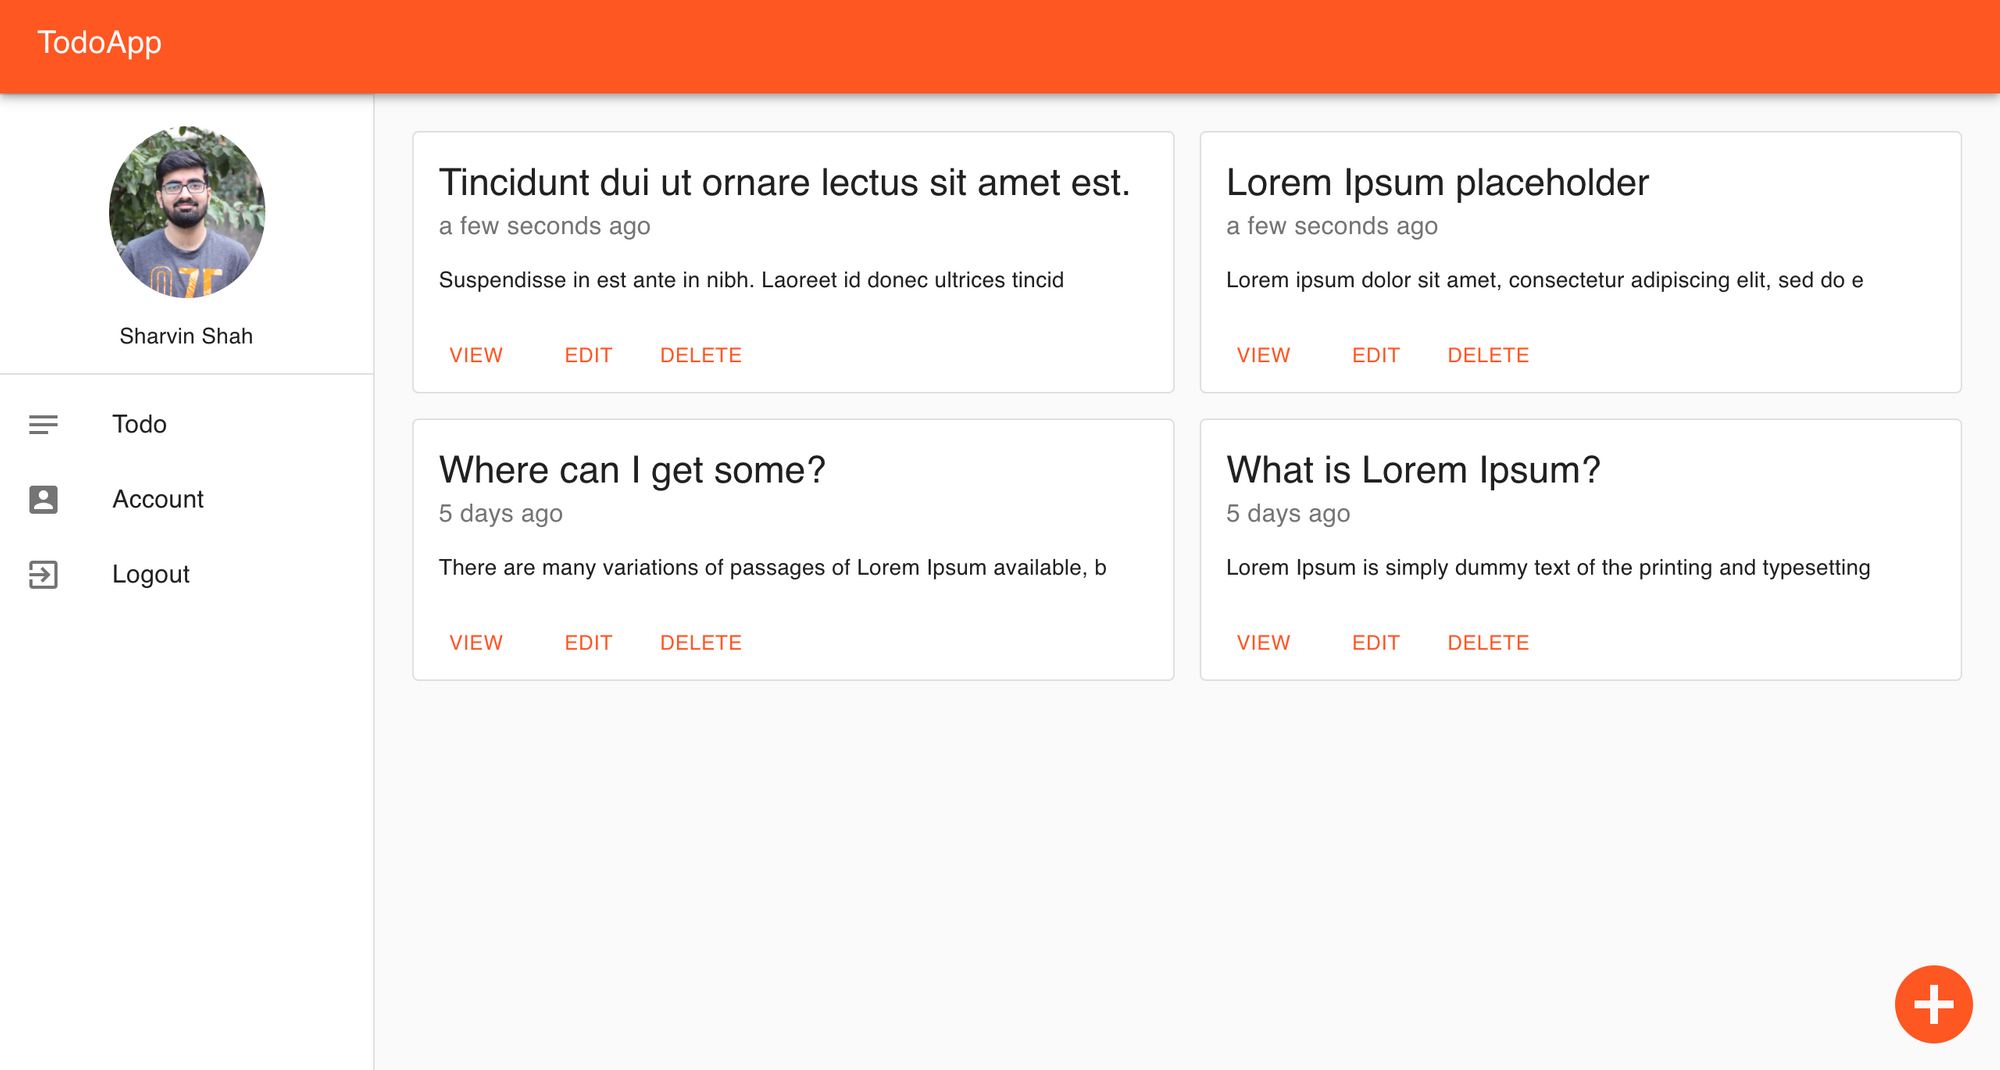
할일 대시 보드
오른쪽 하단에 있는 추가 버튼을 클릭하면 다음 화면이 표시됩니다.
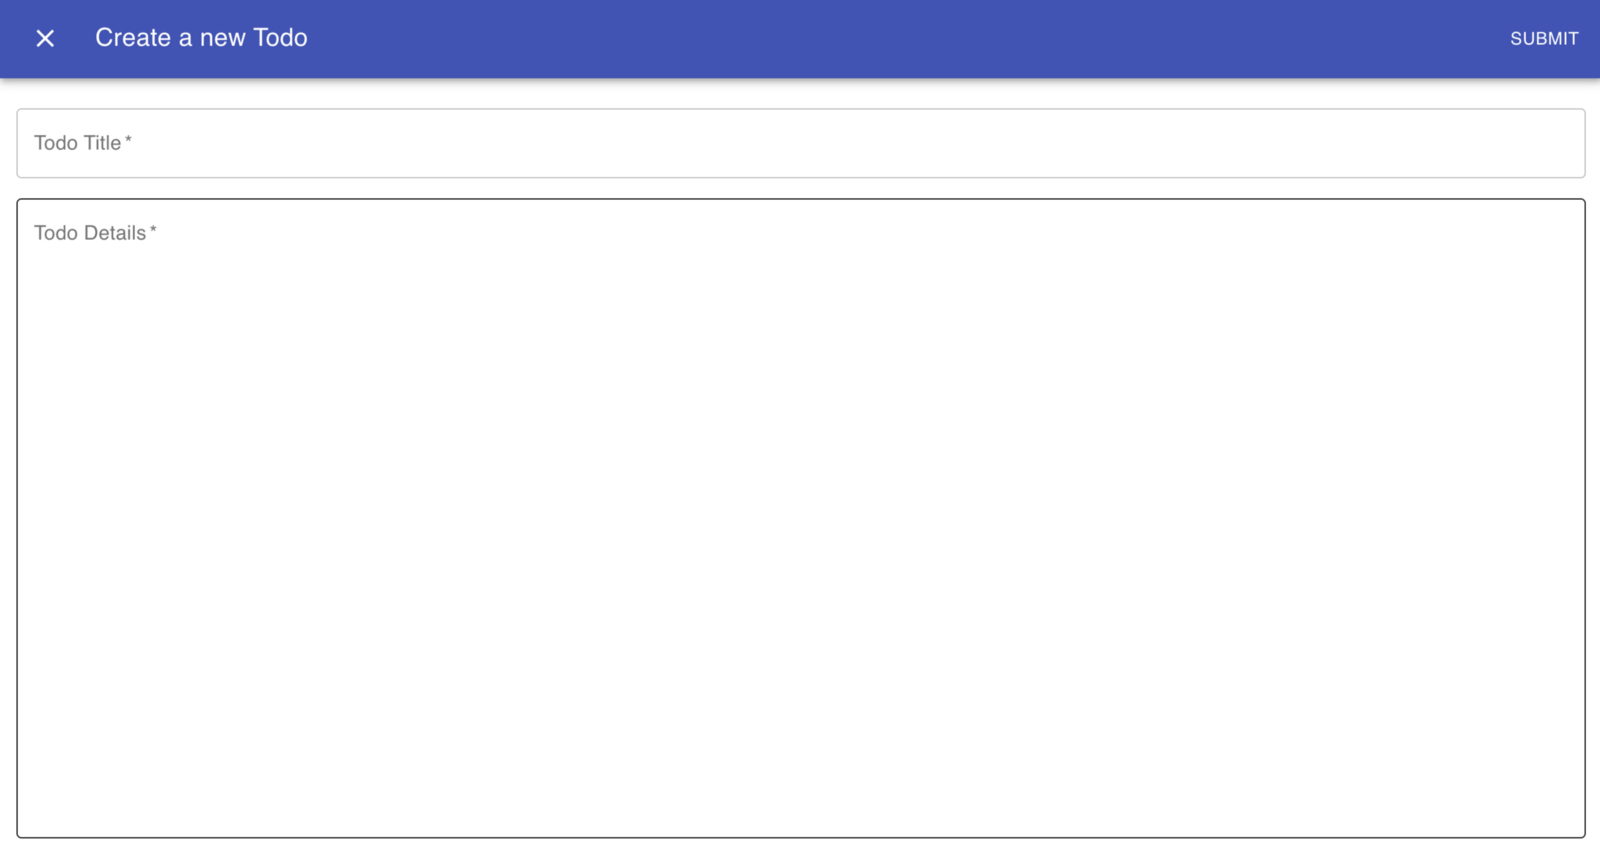
할 일 추가
작업 관리 제목과 세부 사항을 추가하고 제출 단추를 누르십시오. 다음과 같은 화면이 나타납니다.
할일 대시 보드
그런 다음보기 버튼을 클릭하면 Todo의 전체 세부 정보를 볼 수 있습니다.
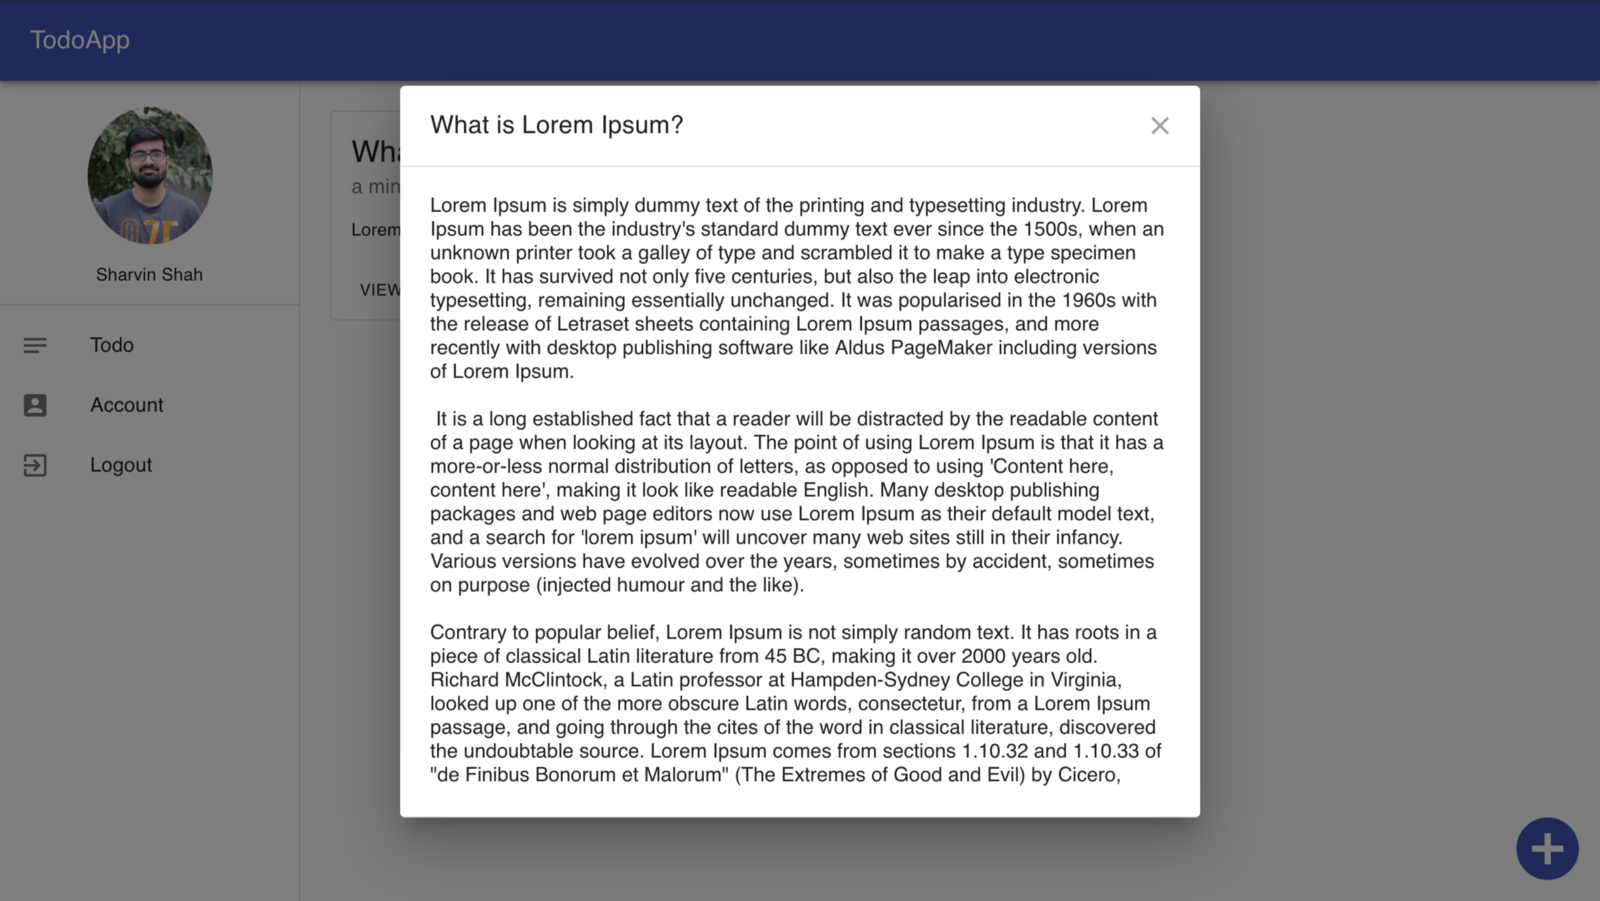
단일 할일보기
수정 버튼을 클릭하면 할 일을 편집 할 수 있습니다.

할일 편집
삭제 버튼을 클릭하면 할 일을 삭제할 수 있습니다. 이제 Dashboard의 작동 방식을 알고 있으므로 사용 된 구성 요소를 이해합니다.
. Add Todo : Add Todo를 구현하기 위해 Material UI의 Dialogue 컴포넌트를 사용합니다. 이 구성 요소는 후크 기능을 구현합니다. 클래스를 사용하고 있으므로 해당 기능을 제거합니다.
// This sets the state to open and buttonType flag to add:
const handleClickOpen = () => {
      this.setState({
           todoId: '',
           title: '',
           body: '',
           buttonType: '',
           open: true
     });
};

// This sets the state to close:
const handleClose = (event) => {
      this.setState({ open: false });
};
이 외에도 Todo 버튼 추가 위치를 변경합니다.
// Position our button
floatingButton: {
    position: 'fixed',
    bottom: 0,
    right: 0
},

<IconButton className={classes.floatingButton} ... >
이제 이 대화 상자에서 목록 태그를 양식으로 바꿉니다. 새로운 할 일을 추가하는 데 도움이 될 것입니다.
// Show Edit or Save depending on buttonType state
{this.state.buttonType === 'Edit' ? 'Save' : 'Submit'}

// Our Form to add a todo
<form className={classes.form} noValidate>
	<Grid container spacing={2}>
		<Grid item xs={12}>
        // TextField here
        </Grid>
        <Grid item xs={12}>
        // TextField here
        </Grid>
    </Grid>
</form>
handleSubmit은 buttonType 상태를 읽는 논리로 구성됩니다. 상태가 빈 문자열 (“”)이면 Add Todo API에 게시됩니다. 상태가 편집인 경우 해당 시나리오에서 편집 작업 관리가 업데이트 됩니다.
2. Get Todos : 할 일을 표시하기 위해 그리드 컨테이너를 사용하고 그 안에 할 그리드 아이템을 배치합니다. 그 안에는 카드 구성 요소를 사용하여 데이터를 표시합니다.
<Grid container spacing={2}>
    {this.state.todos.map((todo) => (
	<Grid item xs={12} sm={6}>
	<Card className={classes.root} variant="outlined">
	    <CardContent>
        // Here will show Todo with view, edit and delete button
        </CardContent>
    </Card>
    </Grid>))}
</Grid>
API가 목록으로 전송할 때 맵을 사용하여 할 일 항목을 표시합니다. componentWillMount 라이프 사이클을 사용하여 렌더가 실행되기 전에 상태를 가져오고 설정합니다. 3 개의 버튼 (view, edit 및 delete)이 있으므로 버튼을 클릭 할 때 작업을 처리하려면 3 개의 핸들러가 필요합니다. 이 버튼들에 대해서는 각각의 하위 섹션에서 배울 것입니다.
3. Edit Todo : 할일 편집을 위해 할 일 추가에 사용되는 대화 팝업 코드를 재사용 합니다. 버튼 클릭을 구별하기 위해 buttonType 상태를 사용하고 있습니다. 추가 작업의 경우 buttonType 상태는 (“”)이고 편집 작업은 편집입니다.
handleEditClickOpen(data) {
	this.setState({
		..,
		buttonType: 'Edit',
		..
	});
}
handleSubmit 메소드에서 buttonType 상태를 읽은 다음 그에 따라 요청을 보냅니다.
4. Delete Todo :이 버튼을 클릭하면 todo 객체를 deleteTodoHandler로 보낸 다음 요청을 백엔드로 더 보냅니다.
<Button size="small" onClick={() => this.deleteTodoHandler({ todo })}>Delete</Button>5. View Todo : 데이터를 표시 할 때 사용자가 할 일에 대한 정보를 볼 수 있도록 데이터를 자릅니다. 그러나 사용자가 그것에 대해 더 알고 싶다면 보기 버튼을 클릭해야 합니다.
이를 위해 맞춤형 대화를 사용합니다. 그 안에 DialogTitle과 DialogContent를 사용합니다. 제목과 내용이 표시됩니다. DialougeContent에서이 양식을 사용하여 사용자가 게시 한 컨텐츠를 표시합니다. (이것은 내가 찾은 솔루션 중 하나이며 다른 방법으로 자유롭게 시도 할 수 있습니다.)
// This is used to remove the underline of the Form
InputProps={{
       disableUnderline: true
}}

// This is used so that user cannot edit the data
readonly
6. Applying Theme : 이것은 응용 프로그램의 마지막 단계입니다. 응용 프로그램에 테마를 적용합니다. 이를 위해 머티리얼 UI에서 createMuiTheme 및 ThemeProvider를 사용하고 있습니다. App.js에 다음 코드를 복사하여 붙여 넣습니다.
import { ThemeProvider as MuiThemeProvider } from '@material-ui/core/styles';
import createMuiTheme from '@material-ui/core/styles/createMuiTheme';

const theme = createMuiTheme({
	palette: {
		primary: {
			light: '#33c9dc',
			main: '#FF5722',
			dark: '#d50000',
			contrastText: '#fff'
		}
	}
});

function App() {
	return (
        <MuiThemeProvider theme={theme}>
        // Router and switch will be here.
        </MuiThemeProvider>
    );
}
CardActions에서 todo.js의 버튼에 테마를 적용하는 것을 놓쳤습니다. 보기, 편집 및 삭제 버튼의 색상 태그를 추가하십시오.
<Button size="small" color="primary" ...>브라우저로 이동하면 앱이 다른 색상이라는 것을 제외하고 모든 것이 동일하다는 것을 알 수 있습니다.
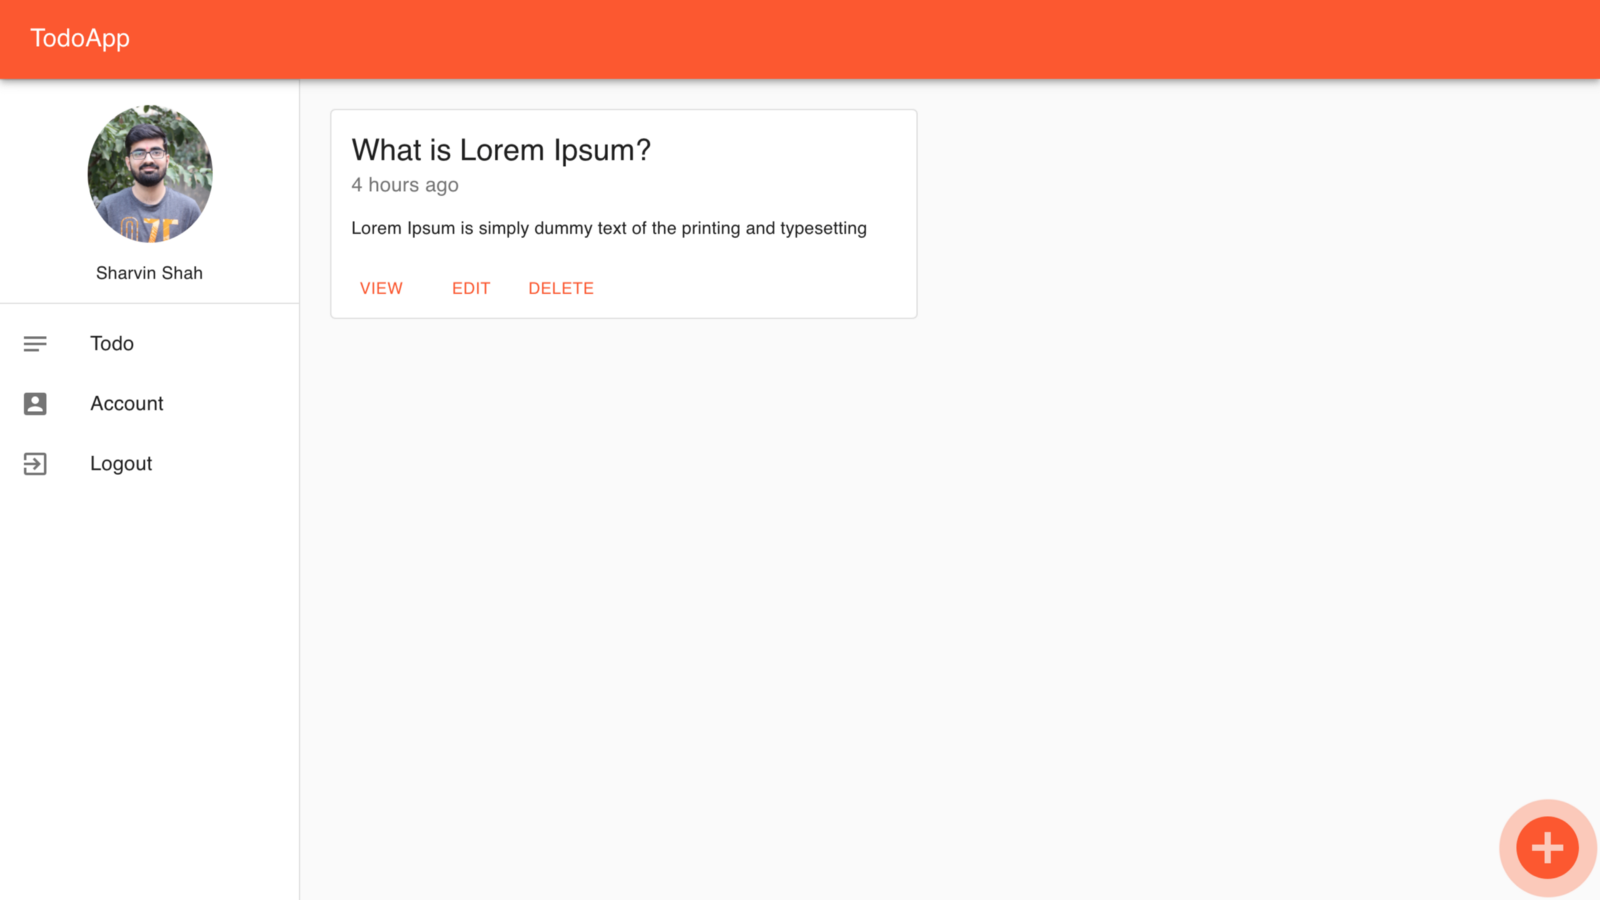
테마를 적용한 후 TodoApp
그리고 우리는 끝났습니다! ReactJS와 Firebase를 사용하여 TodoApp을 구축했습니다. 이 시점까지 모든 것을 구축했다면 이 성과에 대해 매우 큰 축하를 드립니다.
등록된 댓글이 없습니다.