Express, Sequelize & MySQL을 사용하여 Node.js Rest API를 구축하기 시작할 것입니다.
여기서는 MySQL 인스턴스와 상호 작용하기 위해 Sequelize를 사용합니다.
https://christosploutarchou.com/how-to-build-simple-node-js-rest-api/
필요한 응용
- Docker는 OS 레벨 가상화를 사용하여 컨테이너라는 패키지로 소프트웨어를 제공하는 서비스 제품으로서의 플랫폼 세트입니다. 컨테이너는 서로 분리되어 있으며 자체 소프트웨어, 라이브러리 및 구성 파일을 번들로 제공합니다. 그들은 잘 정의 된 채널을 통해 서로 통신 할 수 있습니다.
- Node.js는 빠르고 확장 가능한 네트워크 애플리케이션을 쉽게 구축 할 수 있도록 Chrome의 JavaScript 런타임에 구축 된 플랫폼입니다. Node.js는 서버 측 및 네트워킹 애플리케이션 개발을 위한 오픈 소스, 크로스 플랫폼 런타임 환경입니다.
- ExpressJS는 node.js에서 가장 널리 사용되는 웹 프레임 워크 중 하나입니다. node.js HTTP 모듈 위에 구축되어 라우팅, 미들웨어, 뷰 시스템 등에 대한 지원을 추가합니다. 너무 많은 방법을 시도하는 다른 프레임 워크와 달리 매우 간단하고 최소화되므로 개발자의 유연성이 떨어집니다. 자신의 디자인 선택.
- Sequelize는 Postgres, MySQL, MariaDB, SQLite 및 Microsoft SQL Server를 위한 약속 기반 Node.js ORM입니다. 견고한 트랜잭션 지원, 관계, 열성 및 지연 로딩, 읽기 복제 등이 특징입니다.
- CORS는 다양한 옵션으로 CORS를 활성화하는 데 사용할 수 있는 Connect / Express 미들웨어를 제공하기 위한 anode.js 패키지입니다.
- body-parser 처리기 전에 미들웨어에서 들어오는 요청 본문을 구문 분석합니다 (요구 사항).
- Postman은 API를 빌드, 테스트 및 수정하는 데 도움이 되는 API (application programming interface) 개발 도구이며 다양한 유형의 HTTP 요청 (GET, POST, PUT, PATCH 등)을 수행 할 수 있습니다.
Node.js Rest CRUD API 개요
제목별로 게시물을 작성, 검색, 업데이트, 삭제 및 찾을 수 있는 Rest Apis를 빌드합니다.
먼저, Express 웹 서버부터 시작하십시오. 다음으로 MySQL 데이터베이스에 대한 구성을 추가하고 Sequelize를 사용하여 모델을 게시하고 컨트롤러를 작성합니다. 그런 다음 모든 CRUD 작업 (사용자 지정 파인더 포함)을 처리하기 위한 경로를 정의합니다.
다음 표는 내보낼 Rest API의 개요를 보여줍니다.
| Methods | Urls | Actions |
|---|
| GET | api/posts/all | Get all Posts |
| GET | api/posts/:id | Get post by id |
| POST | api/posts/create | Create a new post |
| PUT | api/posts/update/:id | Update post by id |
| DELETE | api/posts/delete/:id | Delete post by id |
| DELETE | api/posts/deletealls | Delete all posts |
| GET | api/posts/published | Get all published posts |
| GET | api/posts?title=’test’ | Get all posts which title contains 'test' |
| GET | api/posts/publisher?name=christos | Get All posts where publisher name is 'christos' |
This is our project structure:
Now let’s start Creating Node.js
App
먼저 폴더를 만듭니다.
- $ mkdir node_rest_api_with_mysql
- $ cd node_rest_api_with_mysql
다음으로 a.package.json 파일을 사용하여 Node.js 앱을 초기화합니다.
- npm init
- name: (nodejs-express-sequelize-mysql)
- version: (1.0.0)
- description: Node.js Rest Apis with Express, Sequelize & MySQL.
- entry point: (index.js) server.js
- test command:
- git repository:
- keywords: nodejs, express, sequelize, mysql, rest, api, docker
- author: Christos Ploutarchou
- license: (ISC)
- Is this ok? (yes) yes
이미 PC에 MySQL이 설치되어 있다면 다음 단계를 무시할 수 있습니다
다음으로 mysql 및 phpMyAdmin에 도커를 설치해야 합니다.
- Docker 설치 (여기에서 docker 설치에 대해 자세히 알아보기)
- 프로젝트 루트 디렉토리에 입력
- compose 쓰기
docker-compose up -d
- your_ip:8183
- Server: mysql
- Username: root/root
- Password: root/pass
docker exec -it mysql_container_name mysql -u root -p
도커 phpmyadmin ENV
| PMA_ARBITRARY | when set to 1 connection to the arbitrary server will be allowed |
| PPMA_HOST | define address/host name of the MySQL server |
| PMA_PORT | define port of the MySQL server |
- phpmyadmin 이미지에 대한 자세한 정보가 필요한 경우 여기를 읽으십시오
- mysql 이미지에 대한 자세한 정보가 필요한 경우 여기를 읽으십시오
우리는 또한 프로젝트에 필요한 모듈, 즉 표현, 순서, mysql2 및 body 파서를 설치해야 합니다.
다음 명령을 실행하십시오 :
npm install express body-parser cors sequelize mysql2 --save
설치가 끝나면 package.json 파일은 다음과 같아야 합니다.
- {
- "name": "node_rest_api_with_mysql",
- "version": "1.0.0",
- "description": "Node.js Rest Api with Express, Sequelize, MySQL & phpMyAdmin .",
- "main": "server.js",
- "scripts": {
- "start": "nodemon server.js"
- },
- "repository": {
- "type": "git",
- "url": "git+https://github.com/cploutarchou/node_rest_api_with_mysql.git"
- },
- "keywords": [
- "node",
- "rest-api",
- "tutorial",
- "mysql",
- "phpMyAdmin",
- "docker",
- "node.js",
- "sequilize"
- ],
- "author": "Christos Ploutarchou",
- "license": "ISC",
- "bugs": {
- "url": "https://github.com/cploutarchou/node_rest_api_with_mysql/issues"
- },
- "homepage": "https://github.com/cploutarchou/node_rest_api_with_mysql#readme",
- "dependencies": {
- "body-parser": "^1.19.0",
- "cors": "^2.8.5",
- "express": "^4.17.1",
- "mysql2": "^2.1.0",
- "sequelize": "^5.21.5"
- },
- "devDependencies": {
- "nodemon": "^2.0.2"
- }
- }
Setup Express 웹 서버
루트 디렉토리에 새로운 Inserver.js 파일을 생성해야 합니다 :
- const express = require("express");
- const bodyParser = require("body-parser");
- const cors = require("cors");
- const server = express();
- const db = require("./models");
- const corsSettings = {
- originL: "http://localhost:8081"
- };
- const api = require("./routes/index");
- server.use(cors(corsSettings));
- // Parse request of content-type - application/json
- server.use(bodyParser.json());
- // parse requests of content-type -application/x-www-form-urlencoded
- server.use(bodyParser.urlencoded({ extended: true }));
- create a simple route
- server.get("/", (_req, res) => {
- res.json({ message: "Welcome to node.js rest api application. Created for learning purposes by Christos Ploutarchou" });
- });
- // set listening ports for request
- const port = process.env.PORT || 8080;
- server.listen(port, () => {
- console.log("Server running on port : " + port );
- });
우리가 여기서 하는 일 :
– import express, body-parser cors modules :
- Express는 나머지 API를 빌드하기 위한 것입니다.
- body-parser는 요청을 파싱하고 req.body 객체를 생성하도록 도와줍니다.
- cors는 Express 미들웨어를 제공하여 다양한 옵션으로 CORS를 활성화합니다.
– Express 앱을 만든 다음 app.use() 메소드를 사용하여 body-parser 및 cors 미들웨어를 추가하십시오. origin:http://localhost:8081을 설정합니다.
– 시험하기 쉬운 GET 경로를 정의하십시오.
– 들어오는 요청에 대해 포트 8080에서 청취하십시오.
이제 다음 명령을 실행하여 앱을 실행 해 봅시다 : node server.js.
URL http://localhost:8080/으로 브라우저를 열면 다음이 표시됩니다.
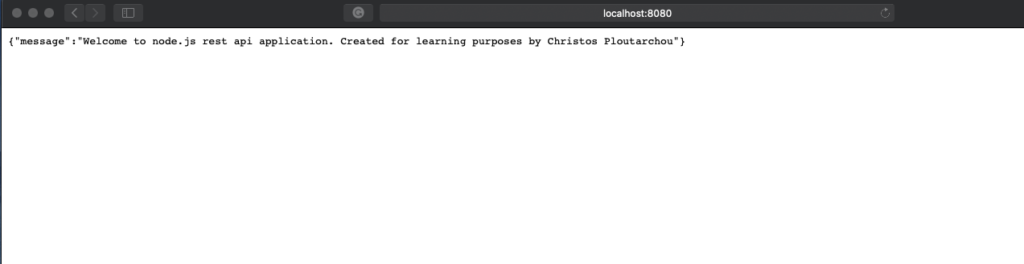
예, 첫 번째 단계가 완료되었습니다. 다음 섹션에서 Sequelize와 함께 작업하겠습니다.
MySQL 데이터베이스 구성 및 Sequelize
루트 폴더에서 다음과 같이 db.config.js 파일을 사용하여 구성을 위한 별도의 구성 폴더를 만듭니다.
참고 : 사용자 프로젝트 도커 작성을 사용하지 않는 경우 로컬 환경 신임 정보 및 정보로 데이터베이스 정보를 업데이트 해야 합니다.
- module.exports = {
- HOST: "localhost",
- USER: "root",
- PASSWORD: "pass",
- DB: "restapi",
- dialect: "mysql",
- pool: {
- max: 10,
- min: 0,
- acquire: 30000,
- idle: 50000
- }
- };
처음 5 개의 매개 변수는 MySQL 연결을 위한 것입니다.
pool은 선택 사항이며 Sequelize 연결 풀 구성에 사용됩니다.
- max : 풀의 최대 연결 수
- min : 풀의 최소 연결 수
- idle: 연결이 해제되기 전에 유휴 상태가 될 수 있는 최대 시간 (밀리 초)
- acquire: 해당 풀이 오류를 발생 시키기 전에 연결을 시도하는 최대 시간 (밀리 초)
자세한 내용은 Sequelize 생성자를 위한 API 참조를 방문하십시오.
Initialize Sequelize
다음 단계에서 모델을 포함 할 '앱 / 모델'폴더에서 Sequelize를 초기화합니다.
이제 다음 코드를 사용하여 app / models / index.js를 만듭니다.
- const dbConfig = require("../config/db.config");
- const Sequelize = require("sequelize");
- const database = new Sequelize(dbConfig.DB, dbConfig.USER, dbConfig.PASSWORD, {
- host: dbConfig.HOST,
- dialect: dbConfig.dialect,
- operatorsAliases: false,
- pool: {
- max: dbConfig.pool.max,
- min: dbConfig.pool.min,
- acquire: dbConfig.pool.acquire,
- idle: dbConfig.pool.idle
- }
- });
- const db = {};
- db.Sequelize = Sequelize;
- db.databaseConf = database;
- db.posts = require("./Sequelize.model")(database, Sequelize);
- module.exports = db;
server.js에서 sync() 메소드를 호출하는 것을 잊지 마십시오 :
- const db = require("./models");
- db.databaseConf.sync();
그 후 server.js 파일은 다음과 같아야 합니다.
- const express = require("express");
- const bodyParser = require("body-parser");
- const cors = require("cors");
- const server = express();
- const db = require("./models");
- const corsSettings = {
- originL: "http://localhost:8081"
- };
- const api = require("./routes/index");
- server.use(cors(corsSettings));
- // Parse request of content-type - application/json
- server.use(bodyParser.json());
- // parse requests of content-type -application/x-www-form-urlencoded
- server.use(bodyParser.urlencoded({ extended: true }));
- create a simple route
- server.get("/", (_req, res) => {
- res.json({ message: "Welcome to node.js rest api application. Created for learning purposes by Christos Ploutarchou" });
- });
- // set listening ports for request
- const port = process.env.PORT || 8080;
- server.listen(port, () => {
- console.log("Server running on port : " + port );
- });
- db.databaseConf.sync();
Sequelize Model 정의
모델 폴더에서 다음과 같은 파일을 작성하십시오.
- module.exports = (database, Sequelize) => {
- return database.define("restTutorial", {
- title: {
- type: Sequelize.STRING
- },
- description: {
- type: Sequelize.TEXT
- },
- published: {
- type: Sequelize.BOOLEAN
- },
- publisher: {
- type: Sequelize.STRING
- }
- });
- };
이 Sequelize Model은 MySQL 데이터베이스의 restTutorials 테이블을 나타냅니다. 이 열은 자동으로 생성됩니다 : id, title, description, published, createdAt, updatedAt.
Sequelize를 초기화 한 후 CRUD 함수를 작성할 필요가 없으며 Sequelize는 다음과 같은 기능을 모두 지원합니다.
- 새 글 작성 : create(object)
- 모든 게시물 가져 오기 : findAll()
- ID로 게시물을 업데이트 : update(data, where: { id: id })
- 게시물 삭제 : destroy(where: { id: id })
- 모든 게시물 삭제 : destroy(where: {})
- 제목으로 모든 게시물 가져 오기 : findAll({ where: { title: ... } })
- 게시자 이름으로 모든 게시물 가져 오기 : findAll({ where: { publisher: ... } })
이러한 기능은 컨트롤러에서 사용됩니다.
컨트롤러 생성
앱 / 컨트롤러 폴더 안에 다음 CRUD 함수를 사용하여 Post.js를 만들어 보겠습니다.
- create
- findAll
- findOne
- update
- delete
- deleteAll
- findAllPublished
- findByPublisherName
- const db = require('../models')
- const postObj = db.posts
- const Op = db.Sequelize.Op
- // Create and save new Post
- exports.create = (request, result) => {
- }
- // Save Post object to db
- postObj.create(post).then(data => {
- }
- // Retrieve all Post (Receive data with condition).
- exports.getAllPosts = (request, result) => {
- }
- // Get Post object by ID
- exports.getPostByID = (request, result) => {
- }
- // Update a Post object by the id
- exports.updatePostByID = (request, result) => {
- }
- // Delete Post object by ID
- exports.deletePostByID = (request, result) => {
- }
- // Delete All Posts objects from database
- exports.deleteAllPosts = (request, result) => {
- }
- // Get all published Post
- exports.getAllPublishedPosts = (request, result) => {
- }
- // Get all published Post by Publisher Name
- exports.getAllPostsByPublisherName = (request, result) => {
- }
- // Get all published post by Title
- exports.getPostByTitle = (request, result) => {
- }
이제 이러한 기능을 구현하겠습니다.
새 게시물 개체 만들기
- // Create and save new Post
- exports.create = (request, result) => {
- if (!request.body.title) {
- result.status(400).send({
- message: "Content cannot be empty"
- });
- }
- // Create a Post object
- const post = {
- title: request.body.title,
- description: request.body.description,
- published: request.body.published ? request.body.published : false,
- publisher: request.body.publisher ? request.body.publisher : false
- };
- // Save Post object to db
- postObj.create(post).then(data => {
- result.send(data);
- }).catch(err => {
- result.status(500).send({
- message: err.message || "Some error occurred while saving."
- });
- });
- };
모든 개체 가져 오기 (게시물 제목 별)
- // Get all published post by Title
- exports.getPostByTitle = (request, result) => {
- const title = request.query.title;
- postObj.findAll({
- where: {
- publisher: { [Op.like]: <code data-enlighter-language="generic" class="EnlighterJSRAW">%${title}%</code> },
- published: true
- }
- }).then(data => {
- result.send(data);
- }).catch(err => {
- result.status(500).send({
- message: err.message || "Something going wrong. Unable to retrieve data!"
- });
- });
- };
이 함수에서 request.query.title.을 사용하여 요청에서 쿼리 문자열을 가져 와서 findAll() 메서드의 조건으로 간주합니다.
단일 게시물 개체 가져 오기 (게시 ID 별)
- // Get Post object by ID
- exports.getPostByID = (request, result) => {
- const paramID = request.params.id;
- console.log(paramID);
- console.log(paramID);
- postObj.findAll({
- where: { id: paramID }
- }).then(data => {
- result.send(data);
- }).catch(err => {
- result.status(500).send({
- message: err.message || <code data-enlighter-language="generic" class="EnlighterJSRAW">Some error occurred while retrieving data with id : ${paramID}</code>
- });
- });
- };
ID로 Post 객체 업데이트
- // Update a Post object by the id
- exports.updatePostByID = (request, result) => {
- const id = request.params.id;
- postObj.update(request.body, {
- where: { id: id }
- }).then(num => {
- if (num === 1) {
- result.send({
- message: "Post object successfully updated."
- });
- } else {
- result.send({
- message: <code data-enlighter-language="generic" class="EnlighterJSRAW">Cannot update Post object with id=${id}!</code>
- });
- }
- }).catch(err => {
- result.status(500).send({
- message: err.message || <code data-enlighter-language="generic" class="EnlighterJSRAW">Error while updating Post object with id=${id}!</code>
- });
- });
- };
ID로 게시물 개체 삭제
- // Delete Post object by ID
- exports.deletePostByID = (request, result) => {
- const id = request.params.id;
- postObj.destroy({
- where: { id: id }
- }).then(num => {
- if (num === 1) {
- result.send({
- message: "Post object successfully deleted."
- });
- } else {
- result.send({
- message: <code data-enlighter-language="generic" class="EnlighterJSRAW">Cannot delete Post object with id=${id}!</code>
- });
- }
- }).catch(err => {
- result.status(500).send({
- message: err.message || <code data-enlighter-language="generic" class="EnlighterJSRAW">Cannot delete Post object with id=${id}!</code>
- });
- });
- };
데이터베이스에서 모든 게시물 개체 삭제
- // Delete All Posts objects from database
- exports.deleteAllPosts = (request, result) => {
- postObj.destroy({
- where: {},
- truncate: false
- }).then(nums => {
- result.send({
- message: <code data-enlighter-language="generic" class="EnlighterJSRAW">${nums} Post objects was deleted successfully!</code>
- });
- }).catch(err => {
- result.status(500).send({
- message: err.message || "Cannot delete Post objects. Something going wrong}!"
- });
- });
- };
데이터베이스에서 게시 된 모든 게시물 개체 가져 오기
- // Get all published Post
- exports.getAllPublishedPosts = (request, result) => {
- postObj.findAll({
- where: { published: true }
- }).then(data => {
- result.send(data);
- }).catch(err => {
- result.status(500).send({
- message: err.message || "Something going wrong. Unable to retrieve data!"
- });
- });
- };
데이터베이스에서 게시 된 모든 게시물 개체 가져 오기
- exports.getAllPosts = (request, result) => {
- postObj.findAll()
- .then(data => {
- result.send(data);
- }).catch(err => {
- result.status(500).send({
- message: err.message || "Some error occurred while retrieving data."
- });
- });
- };
게시자 이름으로 모든 게시물 가져 오기
- // Get all published Post by Publisher Name
- exports.getAllPostsByPublisherName = (request, result) => {
- const name = request.params.name;
- const condition = name ? { publisher: { [Op.like]: <code data-enlighter-language="generic" class="EnlighterJSRAW">%${name}%</code> } } : null;
- postObj.findAll({ where: condition }).then(data => {
- result.send(data);
- }).catch(err => {
- result.status(500).send({
- message: err.message || "Something going wrong. Unable to retrieve data!"
- });
- });
- };
경로 정의
클라이언트가 HTTP 요청 (GET, POST, PUT, DELETE)을 사용하여 엔드 포인트에 대한 요청을 보낼 때 경로를 설정하여 서버의 응답 방법을 결정해야 합니다.
이제 다음과 같은 내용을 가진 route / folder 내에 a index.js content 파일을 만들어 봅시다 :
- const post = require("../controllers/Post");
- const express = require("express");
- const router = express.Router();
- // Create New Post
- router.post("/api/posts/create", post.create);
- // // Retrieve all posts
- router.get("/api/posts/all", post.getAllPosts);
- // Retrieve all Published posts
- router.get("/api/posts/published", post.getAllPublishedPosts);
- // Retrieve all Published posts by Publisher Name
- router.get("/api/posts/publisher", post.getAllPostsByPublisherName);
- // Retrieve all posts by title
- router.get("/api/posts", post.getPostByTitle);
- // Retrieve post by ID
- router.get("/api/posts/:id", post.getPostByID);
- // // Update post by ID
- router.put("/api/post/update/:id", post.updatePostByID);
- // // Delete post by ID
- router.delete("/api/post/delete/:id", post.deletePostByID);
- // Delete all posts
- router.delete("/api/posts/deleteAll", post.deleteAllPosts);
- module.exports = router;
..controllers / Post에서 컨트롤러를 사용하고 있음을 알 수 있습니다.
또한 server.js (app.listen() 직전에)에 경로를 포함해야 합니다.
- const api = require("./routes/index");
- server.use("/", api);
업데이트 후 server.js 파일은 다음과 같아야 합니다.
- const express = require("express");
- const bodyParser = require("body-parser");
- const cors = require("cors");
- const server = express();
- const db = require("./models");
- const corsSettings = {
- originL: "http://localhost:8081"
- };
- const api = require("./routes/index");
- server.use(cors(corsSettings));
- // Parse request of content-type - application/json
- server.use(bodyParser.json());
- // parse requests of content-type -application/x-www-form-urlencoded
- server.use(bodyParser.urlencoded({ extended: true }));
- server.use("/", api);
- // set listening ports for request
- const port = process.env.PORT || 80;
- server.listen(port, () => {
- console.log(<code data-enlighter-language="generic" class="EnlighterJSRAW">Server running on port : ${port}</code>);
- });
- // Run following function if you want drop existing tables and re-sync database
- // db.dropRestApiTable();
- db.databaseConf.sync();
참고 : 개발시 기존 테이블을 삭제하고 데이터베이스를 다시 동기화 해야 할 수 있습니다. 모델 /index.js에 새로운 기능을 만들어 적용 해 봅시다.
index.js에 다음 함수 추가
- db.dropRestApiTable = () => {
- db.databaseConf.sync({ force: true }).then(() => {
- console.log("restTutorial table just dropped and db re-synced.");
- });
- };
기존 테이블을 삭제하려는 경우 server.js 파일에서 해당 함수를 호출 할 수 있습니다.
db.dropRestApiTable();
API 테스트
node server.js 명령으로 Node.js 애플리케이션을 실행하십시오.
- Server running on port : 80
- Executing (default): CREATE TABLE IF NOT EXISTS restTutorials (id INTEGER NOT NULL auto_increment , title VARCHAR(255), description TEXT, published TINYINT(1), publisher VARCHAR(255), createdAt DATETIME NOT NULL, updatedAt DATETIME NOT NULL, PRIMARY KEY (id)) ENGINE=InnoDB;
- Executing (default): SHOW INDEX FROM restTutorials
Postman을 사용하여 위의 모든 Apis를 테스트합니다.
1. /api/posts/create Fire를 사용하여 새 게시물을 만듭니다.
아래에서 우리의 게시물 요청 샘플을 볼 수 있습니다.
- {
- "title": "JS Tutorials : Part 1",
- "description": "Node.js Rest APIs with Express, Sequelize & MySQL Part 1",
- "published": true,
- "publisher": "Christos Ploutarchou"
- }
데이터가 db에 저장된 경우 게시 요청을 보내면 상태가 200이어야 합니다.
참고 : docker-compose를 사용하여 MySQL을 실행하면 다음 자격 증명을 사용하여 localhost : 8183에서 phpMyAdmin에 액세스 할 수 있습니다. username : root | 비밀번호 : pass
새로운 게시물을 생성 한 후 phpMyAdmin에서 다음 쿼리를 실행하여 MySQL 테이블을 확인할 수 있습니다
select * from posts;
출력은 아래 이미지와 유사해야 합니다.

2. GET /api/posts/all Api를 사용하여 모든 게시물 검색
아래 이미지와 같은 것을 얻을 수 있습니다 :

모든 게시물 가져 오기
3. GET /api/posts/:id Api를 사용하여 모든 게시물 검색

ID로 게시물 받기
4. PUT /api/post/update/를 사용하여 게시물 업데이트 : id Api

ID로 게시물 업데이트
5. GET /api/posts? title = tutorial Api를 사용하여 단어 'tutorials'가 포함 된 모든 게시물 찾기

제목으로 게시물 받기
6. GET /api/posts/publisher/?name = Christos Api를 사용하여 발행인 이름으로 모든 게시물 찾기

게시자 이름으로 모든 게시물 가져 오기
7. GET /api/posts/ 게시 된 API를 사용하여 게시 된 모든 게시물 찾기

게시 된 모든 게시물 가져 오기
8. DELETE /api/posts/delete/:id Api를 사용하여 게시물 삭제

게시물 ID로 게시물 삭제
9. DELETE /api/posts/deleteAll Api를 사용하여 모든 게시물 삭제

모든 게시물 삭제
GitHub 리포지토리를 통해 프로젝트의 전체 사본을 다운로드 할 수 있습니다. 여기를 클릭하십시오. (내 프로젝트가 마음에 들면 별을 남겨주세요)
