Months ago, when I heard that the legendary JS1k game jam would not be continuing, I talked it over with some other devs and decided to help fill the void we would host a 2k game jam on itch called 2kPlus Jam. The primary goal of this comp was to create a game that fits entirely in a 2 kilobyte zip file. That is incredibly small, for point of reference a 3.5 floppy disk could hold over 700 of these games.
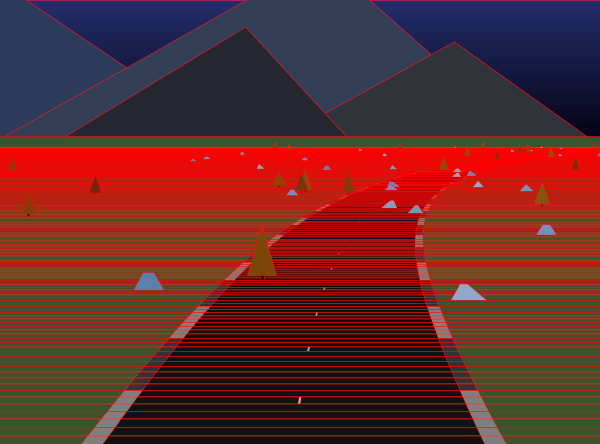
My entry, Hue Jumper, is an homage to 80’s racing game rendering technology. The 3D graphics and physics engine was implemented from scratch in pure JavaScript. I also spent ungodly hours tweaking the gameplay and visuals.
The theme for the game jam was “Shift” which I incorporated by shifting the hue for the world’s color when the player crosses a checkpoint. I imagined that crossing a checkpoint was fictionally like shifting or jumping into a new dimension with a different hue, which is how I came up with the name “Hue Jumper”.
This post is going to be a bit long because it contains the JavaScript code for my game in it’s entirety. The code is already well commented so I’m not going to explain every line of it nor are you expected to read through all the code now. Instead my goal is to explain how it works, why I made it this way, and walk you through the overall structure. This same code is on CodePen for you to play around with live. So please continue reading, buckle up, and hold onto your butts!

Inspiration
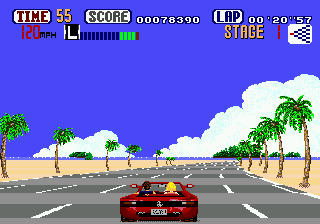
Out Run by Sega
My primary inspiration comes from nostalgia of classic 80’s style racing games like Out Run. Using a similar technique, they were able to push real time 3D graphics on very early hardware. Also I have recently been playing some modern racing games like Distance and Lonely Mountains: Downhill which helped inform the visual design and feel.
Jake Gordon’s project to create a pseudo 3D racer in JavaScript was a big help. He wrote a fantastic multi post blog series that explains how it works. Though I started from scratch, seeing his code helped me work through some of the math and other problems I encountered.
I also looked at a JS1k game called Moto1kross by Chris Glover. This small one kilobyte racing game helped give me a point of reference for what was possible, and with an extra kilobyte of space available I knew I had to far surpass it.
High Level Strategy
Because of the strict size limitation, I needed to be very careful about how my program is structured. My general strategy was to keep everything as simple as possible in serving the ultimate goal of making a game that looks and feels solid.
To help compress the code, I ran it through Google Closure Compiler which removes all white space, renames variables to 1 letter characters, and performs some light optimization. You can use this site to run your code through Closure Compiler Service online. Unfortunately Closure does some other stuff that doesn’t help, like replacing template strings, default parameters and other ES6 features that help save space. So I needed to manually undo some of that and perform a few more ‘risky’ minification techniques to squeeze out every last byte. It’s not a huge win though, the bulk of the savings comes from the structure of the code itself.
The code needs to be zipped to fit into a 2 kilobytes. If that was not an option there is a similar yet less powerful tool called RegPack which can make self uncompromising JavaScript. Either way the strategy is the same, to repeat code wherever possible and let the compressor deflate it. For example there are certain strings which appear often so their compression ratio is large. Some of the best examples are c.width, c.height, and Math, but there are many other smaller ones that add up. So, when reading through this code, keep in mind that you will often see things purposefully repeated to take advantage of the compression.
CodePen
Here’s the game running live on CodePen. You can actually play it in the iframe, but for best results I recommend opening it in a new tab, where you can edit or fork the code.
HTML
There is very little html used by my game, as it is mostly JavaScript. This is the smallest way to create a full screen canvas, combined with code that later sets the canvas size to the window inner size. I’m not sure why on CodePen it was necessary to add overflow:hidden to the body, but this should work fine when opened directly.
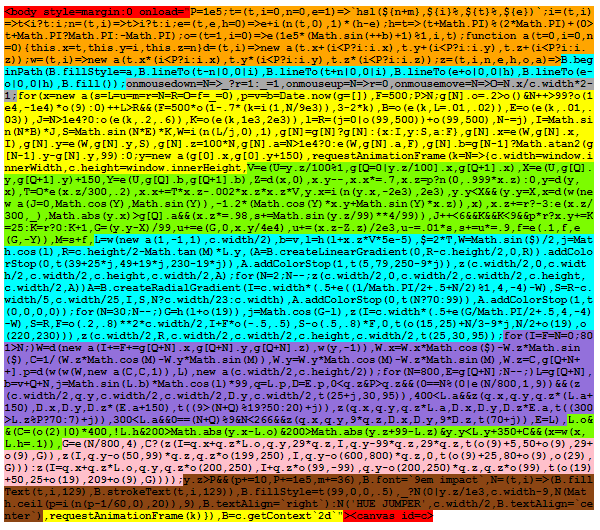
The final minified version uses an even smaller setup by wrapping the JavaScript in an onload call… <body style=margin:0 onload=”code_goes_here”><canvas id=c> However, during development I prefer not to use that condensed setup because the code is stored in a string so editors can’t properly highlight the syntax.
<body style=margin:0>
<canvas id=c>
<script>
Constants
There are many constants that control different aspects of the game. When the code is minified with a tool like Google Closure, these constants will all be replaced much like a #define in C++. Putting them first makes it faster to tweak gameplay.
// draw settings
const context = c.getContext`2d`; // canvas context
const drawDistance = 800;         // how far ahead to draw
const cameraDepth = 1;            // FOV of camera
const segmentLength = 100;        // length of each road segment
const roadWidth = 500;            // how wide is road
const curbWidth = 150;            // with of warning track
const dashLineWidth = 9;          // width of the dashed line
const maxPlayerX = 2e3;           // limit player offset
const mountainCount = 30;         // how many mountains are there
const timeDelta = 1/60;           // inverse frame rate
const PI = Math.PI;               // shorthand for Math.PI

// player settings
const height = 150;               // high of player above ground
const maxSpeed = 300;             // limit max player speed
const playerAccel = 1;            // player forward acceleration
const playerBrake = -3;           // player breaking acceleration
const turnControl = .2;           // player turning rate
const jumpAccel = 25;             // z speed added for jump
const springConstant = .01;       // spring players pitch
const collisionSlow = .1;         // slow down from collisions
const pitchLerp = .1;             // rate camera pitch changes
const pitchSpringDamp = .9;       // dampen the pitch spring
const elasticity = 1.2;           // bounce elasticity
const centrifugal = .002;         // how much turns pull player
const forwardDamp = .999;         // dampen player z speed
const lateralDamp = .7;           // dampen player x speed
const offRoadDamp = .98;          // more damping when off road
const gravity = -1;               // gravity to apply in y axis
const cameraTurnScale = 2;        // how much to rotate camera
const worldRotateScale = .00005;  // how much to rotate world

// level settings
const maxTime = 20;               // time to start
const checkPointTime = 10;        // add time at checkpoints
const checkPointDistance = 1e5;   // how far between checkpoints
const maxDifficultySegment = 9e3; // how far until max difficulty
const roadEnd = 1e4;              // how far until end of road
Mouse Control
The input system uses only the mouse. With this bit of code we can track mouse clicks and the horizontal cursor position expressed as a value between -1 and 1. Double clicking is implemented via mouseUpFrames. The mousePressed variable is only used once, to start the game when the player clicks for the first time.
mouseDown     =
mousePressed  =
mouseUpFrames =
mouseX        = 0;

onmouseup   =e=> mouseDown = 0;
onmousedown =e=> mousePressed ? mouseDown = 1 : mousePressed = 1;
onmousemove =e=> mouseX = e.x/window.innerWidth*2 - 1;
Math Functions
There are a few functions used by this game to simplify code and reduce repetition. Some standard math functions to Clamp and Lerp values. ClampAngle is useful because it wraps angles between -PI and PI, something many games require.
Random Test Pattern
The R function works almost like magic because it generates seeded random numbers. This is done by taking the sine of the current random seed, multiplying it by a high number, and then looking at the fractional part. There are many ways to do it but this is one of the smallest. I wouldn’t recommend using this for gambling software but it’s random enough for our purposes. We will be using this random generator to create variety procedurally without needing to save any data. For example the variation in mountains, rocks and trees is not stored anywhere in memory. The goal isn’t to reduce memory in this case though, but to eliminate the code that would be needed to store and retrieve that data.
As this is a “True 3D” game it helps greatly to have a 3D vector class which also makes the code smaller. This class contains only the bare essentials necessary for this game, a constructor with add and multiply functions can take either scalar or vector parameter. To determine if a scalar is passed in, we just check if it is less then a large number. A more correct way would be to use isNan or check if it’s type is a Vec3, but that would require more space.
Clamp     =(v, a, b)  => Math.min(Math.max(v, a), b);
ClampAngle=(a)        => (a+PI) % (2*PI) + (a+PI<0? PI : -PI);
Lerp      =(p, a, b)  => a + Clamp(p, 0, 1) * (b-a);
R         =(a=1, b=0) => Lerp((Math.sin(++randSeed)+1)*1e5%1,a,b);

class Vec3 // 3d vector class
{
  constructor(x=0, y=0, z=0) {this.x = x; this.y = y; this.z = z;}

  Add=(v)=>(
    v = v < 1e5 ? new Vec3(v,v,v) : v,
    new Vec3( this.x + v.x, this.y + v.y, this.z + v.z ));

  Multiply=(v)=>(
    v = v < 1e5 ? new Vec3(v,v,v) : v,
    new Vec3( this.x * v.x, this.y * v.y, this.z * v.z ));
}
Render Functions
LSHA generates a standard HSLA (hue, saturation, luminosity, alpha) color using a template string, and has just been reordered so more often used components come first. The global hue shift that occurs at checkpoints is also applied here.
DrawPoly draws a trapezoid shape and is used to render absolutely everything in the scene. The Y component is converted to an integer using |0 to ensure that the road polys are fully connected. Without this, there would be a thin line between road segments. For this same reason this rendering tech can’t handle applying roll to the camera without causing graphical artifacts from diagonal lines.
DrawText just renders outlined text used to display time, distance, and the game’s title.
LSHA=(l,s=0,h=0,a=1)=>`hsl(${h+hueShift},${s}%,${l}%,${a})`;

// draw a trapazoid shaped poly
DrawPoly=(x1, y1, w1, x2, y2, w2, fillStyle)=>
{
    context.beginPath(context.fillStyle = fillStyle);
    context.lineTo(x1-w1, y1|0);
    context.lineTo(x1+w1, y1|0);
    context.lineTo(x2+w2, y2|0);
    context.lineTo(x2-w2, y2|0);
    context.fill();
}

// draw outlined hud text
DrawText=(text, posX)=>
{
    context.font = '9em impact';         // set font size
    context.fillStyle = LSHA(99,0,0,.5); // set font color
    context.fillText(text, posX, 129);   // fill text
    context.lineWidth = 3;               // line width
    context.strokeText(text, posX, 129); // outline text
}
Build Track with Procedural Generation
Before the game starts we must first generate the entire track which is will be different for every play through. To do this we build a list of road segments that store the position and width of the road at each point along the track.
The track generator is pretty basic, it just tapers between sections of varying frequency, amplitude, and width. The distance along the track determines how difficult that section can be.
The road pitch angle is calculated here using the atan2 function to be used for physics and lighting.
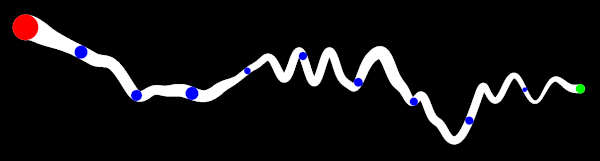
Example result of the procedural track generator.
roadGenLengthMax =                     // end of section
roadGenLength =                        // distance left
roadGenTaper =                         // length of taper
roadGenFreqX =                         // X wave frequency
roadGenFreqY =                         // Y wave frequency
roadGenScaleX =                        // X wave amplitude
roadGenScaleY = 0;                     // Y wave amplitude
roadGenWidth = roadWidth;              // starting road width
startRandSeed = randSeed = Date.now(); // set random seed
road = [];                             // clear road

// generate the road
for( i = 0; i < roadEnd*2; ++i )          // build road past end
{
  if (roadGenLength++ > roadGenLengthMax) // is end of section?
  {
    // calculate difficulty percent
    d = Math.min(1, i/maxDifficultySegment);

    // randomize road settings
    roadGenWidth = roadWidth*R(1-d*.7,3-2*d);        // road width
    roadGenFreqX = R(Lerp(d,.01,.02));               // X curves
    roadGenFreqY = R(Lerp(d,.01,.03));               // Y bumps
    roadGenScaleX = i>roadEnd ? 0 : R(Lerp(d,.2,.6));// X scale
    roadGenScaleY = R(Lerp(d,1e3,2e3));              // Y scale

    // apply taper and move back
    roadGenTaper = R(99, 1e3)|0;                 // random taper
    roadGenLengthMax = roadGenTaper + R(99,1e3); // random length
    roadGenLength = 0;                           // reset length
    i -= roadGenTaper;                           // subtract taper
  }

  // make a wavy road
  x = Math.sin(i*roadGenFreqX) * roadGenScaleX;
  y = Math.sin(i*roadGenFreqY) * roadGenScaleY;
  road[i] = road[i]? road[i] : {x:x, y:y, w:roadGenWidth};

  // apply taper from last section and lerp values
  p = Clamp(roadGenLength / roadGenTaper, 0, 1);
  road[i].x = Lerp(p, road[i].x, x);
  road[i].y = Lerp(p, road[i].y, y);
  road[i].w = i > roadEnd ? 0 : Lerp(p, road[i].w, roadGenWidth);

  // calculate road pitch angle
  road[i].a = road[i-1] ?
    Math.atan2(road[i-1].y-road[i].y, segmentLength) : 0;
}
Startup the Game
Now the the track exists, we need only initialize a few variables to start the game.
// reset everything
velocity = new Vec3
  ( pitchSpring =  pitchSpringSpeed =  pitchRoad = hueShift = 0 );

position = new Vec3(0, height);      // set player start pos
nextCheckPoint = checkPointDistance; // init next checkpoint
time = maxTime;                      // set the start time
heading = randSeed;                  // random world heading
Update Player
This is the main update function that handles updating and rendering everything in the game! Normally it is not good practice to have a giant function in your code and this would be split up into sub functions. So to help explain things, it is broken up into several parts below.
First we need to get some info about the road at the player’s location. To make the physics and rendering feel smooth, the values are interpolated between current and next road segments.
The player’s position and velocity are 3D vectors, and are updated with kinematics to apply gravity, dampening and other factors. If the player is below the road, the position is clamped to the ground plane and velocity is reflected against the normal. Also, while on ground the acceleration is applied and the camera will shake when off road. After play testing I decided to allow the player to still tun while airborne.
Input is handled here to control acceleration, braking, jumping, and turning. Double clicks are detected is via mouseUpFrames. There is also some code to track how many frames the player has been in the air to allow a short grace period when the player can still jump.
The camera’s pitch angle uses a spring system to give a dynamic feel as the player accelerates, brakes, and jumps. Also the camera tilts to match the road angle as the player drives over hills and jumps.
Update=()=>
{

// get player road segment
s = position.z / segmentLength | 0; // current road segment
p = position.z / segmentLength % 1; // percent along segment

// get lerped values between last and current road segment
roadX = Lerp(p, road[s].x, road[s+1].x);
roadY = Lerp(p, road[s].y, road[s+1].y) + height;
roadA = Lerp(p, road[s].a, road[s+1].a);

// update player velocity
lastVelocity = velocity.Add(0);
velocity.y += gravity;
velocity.x *= lateralDamp;
velocity.z = Math.max(0, time?forwardDamp*velocity.z:0);

// add velocity to position
position = position.Add(velocity);

// limit player x position (how far off road)
position.x = Clamp(position.x, -maxPlayerX, maxPlayerX);

// check if on ground
if (position.y < roadY)
{
  position.y = roadY; // match y to ground plane
  airFrame = 0;       // reset air frames

  // get the dot product of the ground normal and the velocity
  dp = Math.cos(roadA)*velocity.y + Math.sin(roadA)*velocity.z;

  // bounce velocity against ground normal
  velocity = new Vec3(0, Math.cos(roadA), Math.sin(roadA))
    .Multiply(-elasticity * dp).Add(velocity);

  // apply player brake and accel
  velocity.z +=
    mouseDown? playerBrake :
    Lerp(velocity.z/maxSpeed, mousePressed*playerAccel, 0);

  // check if off road
  if (Math.abs(position.x) > road[s].w)
  {
    velocity.z *= offRoadDamp;                    // slow down
    pitchSpring += Math.sin(position.z/99)**4/99; // rumble
  }
}

// update player turning and apply centrifugal force
turn = Lerp(velocity.z/maxSpeed, mouseX * turnControl, 0);
velocity.x +=
  velocity.z * turn -
  velocity.z ** 2 * centrifugal * roadX;

// update jump
if (airFrame++<6 && time
  && mouseDown && mouseUpFrames && mouseUpFrames<9)
{
  velocity.y += jumpAccel; // apply jump velocity
  airFrame = 9;            // prevent jumping again
}
mouseUpFrames = mouseDown? 0 : mouseUpFrames+1;

// pitch down with vertical velocity when in air
airPercent = (position.y-roadY) / 99;
pitchSpringSpeed += Lerp(airPercent, 0, velocity.y/4e4);

// update player pitch spring
pitchSpringSpeed += (velocity.z - lastVelocity.z)/2e3;
pitchSpringSpeed -= pitchSpring * springConstant;
pitchSpringSpeed *= pitchSpringDamp;
pitchSpring += pitchSpringSpeed;
pitchRoad = Lerp(pitchLerp, pitchRoad, Lerp(airPercent,-roadA,0));
playerPitch = pitchSpring + pitchRoad;

// update heading
heading = ClampAngle(heading + velocity.z*roadX*worldRotateScale);
cameraHeading = turn * cameraTurnScale;

// was checkpoint crossed?
if (position.z > nextCheckPoint)
{
  time += checkPointTime;               // add more time
  nextCheckPoint += checkPointDistance; // set next checkpoint
  hueShift += 36;                       // shift hue
}
Pre-Render
Before rendering, the canvas is cleared by setting it’s width and height. This also fits the canvas to fill the window.
We also calculate the projection scale used to transform world points to canvas space. The cameraDepth value represents the field of view (FOV) of the camera which is to 90 degrees for this game. The calculation is 1/Math.tan((fovRadians/2), which works out to be exactly 1 for an FOV of 90 degrees. To preserve aspect ratio, the projection is scaled by c.width.
// clear the screen and set size
c.width = window.innerWidth, c.height = window.innerHeight;

// calculate projection scale, flip y
projectScale = (new Vec3(1,-1,1)).Multiply(c.width/2/cameraDepth);
Draw Sky, Sun and Moon
 The background atmosphere is drawn with a full screen linear gradient that changes color based on the sun’s direction.
To conserve space, both the sun and moon are drawn in the same for loop using a full screen radial gradient with transparency.
The linear and radial gradients combine to make a sky box that fully wraps around the scene.
// get horizon, offset, and light amount
horizon = c.height/2 - Math.tan(playerPitch)*projectScale.y;
backgroundOffset = Math.sin(cameraHeading)/2;
light = Math.cos(heading);

// create linear gradient for sky
g = context.createLinearGradient(0,horizon-c.height/2,0,horizon);
g.addColorStop(0,LSHA(39+light*25,49+light*19,230-light*19));
g.addColorStop(1,LSHA(5,79,250-light*9));

// draw sky as full screen poly
DrawPoly(c.width/2,0,c.width/2,c.width/2,c.height,c.width/2,g);

// draw sun and moon (0=sun, 1=moon)
for( i = 2 ; i--; )
{
  // create radial gradient
  g = context.createRadialGradient(
    x = c.width*(.5+Lerp(
      (heading/PI/2+.5+i/2)%1,
      4, -4)-backgroundOffset),
    y = horizon - c.width/5,
    c.width/25,
    x, y, i?c.width/23:c.width);
  g.addColorStop(0, LSHA(i?70:99));
  g.addColorStop(1, LSHA(0,0,0,0));

  // draw full screen poly
  DrawPoly(c.width/2,0,c.width/2,c.width/2,c.height,c.width/2,g);
}
Draw Mountains and Horizon
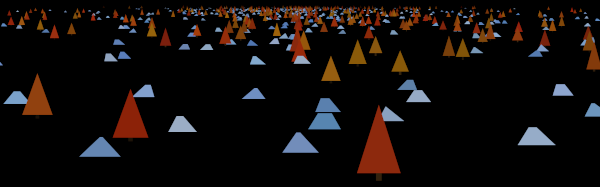
The mountains are procedurally generated, by drawing 50 triangles on the horizon. Lighting is applied so that mountains are darker when facing towards the sun because they are in shadow. Also, closer mountains are darker to simulate fog. The real trick here was tweaking the random values for the size and color to give good results.
The final part of drawing the background is to draw the horizon line and below to fill the bottom of the canvas with solid green.

// set random seed for mountains
randSeed = startRandSeed;

// draw mountains
for( i = mountainCount; i--; )
{
  angle = ClampAngle(heading+R(19));
  light = Math.cos(angle-heading);
  DrawPoly(
    x = c.width*(.5+Lerp(angle/PI/2+.5,4,-4)-backgroundOffset),
    y = horizon,
    w = R(.2,.8)**2*c.width/2,
    x + w*R(-.5,.5),
    y - R(.5,.8)*w, 0,
    LSHA(R(15,25)+i/3-light*9, i/2+R(19), R(220,230)));
}

// draw horizon
DrawPoly(
  c.width/2, horizon, c.width/2, c.width/2, c.height, c.width/2,
  LSHA(25, 30, 95));
Project Road Segments to Canvas Space
Before the road can be rendered, we must first get the projected road points. The first part of this is a bit tricky because our road’s x value needs to be converted to a world space position. To make the roads appear to curve, we will apply the x value as a second order derivative. This is why there is the strange bit of code “x+=w+=”. Because of the way this works, the road segments don’t have persistent world space positions, but instead are recomputed every frame based on the player’s location.
Once we have the world space position, we can subtract the player position from the road position to get the local camera space position. The rest of the code applies a transform by first rotating heading, pitch, then the projection transform to make farther things appear smaller, and finally moving it to canvas space.
for( x = w = i = 0; i < drawDistance+1; )
{
  p = new Vec3(x+=w+=road[s+i].x,     // sum local road offsets
    road[s+i].y, (s+i)*segmentLength) // road y and z pos
      .Add(position.Multiply(-1));    // get local camera space

  // apply camera heading
  p.x = p.x*Math.cos(cameraHeading) - p.z*Math.sin(cameraHeading);

  // tilt camera pitch and invert z
  z = 1/(p.z*Math.cos(playerPitch) - p.y*Math.sin(playerPitch));
  p.y = p.y*Math.cos(playerPitch) - p.z*Math.sin(playerPitch);
  p.z = z;

  // project road segment to canvas space
  road[s+i++].p =                         // projected road point
    p.Multiply(new Vec3(z, z, 1))         // projection
    .Multiply(projectScale)               // scale
    .Add(new Vec3(c.width/2,c.height/2)); // center on canvas
}